

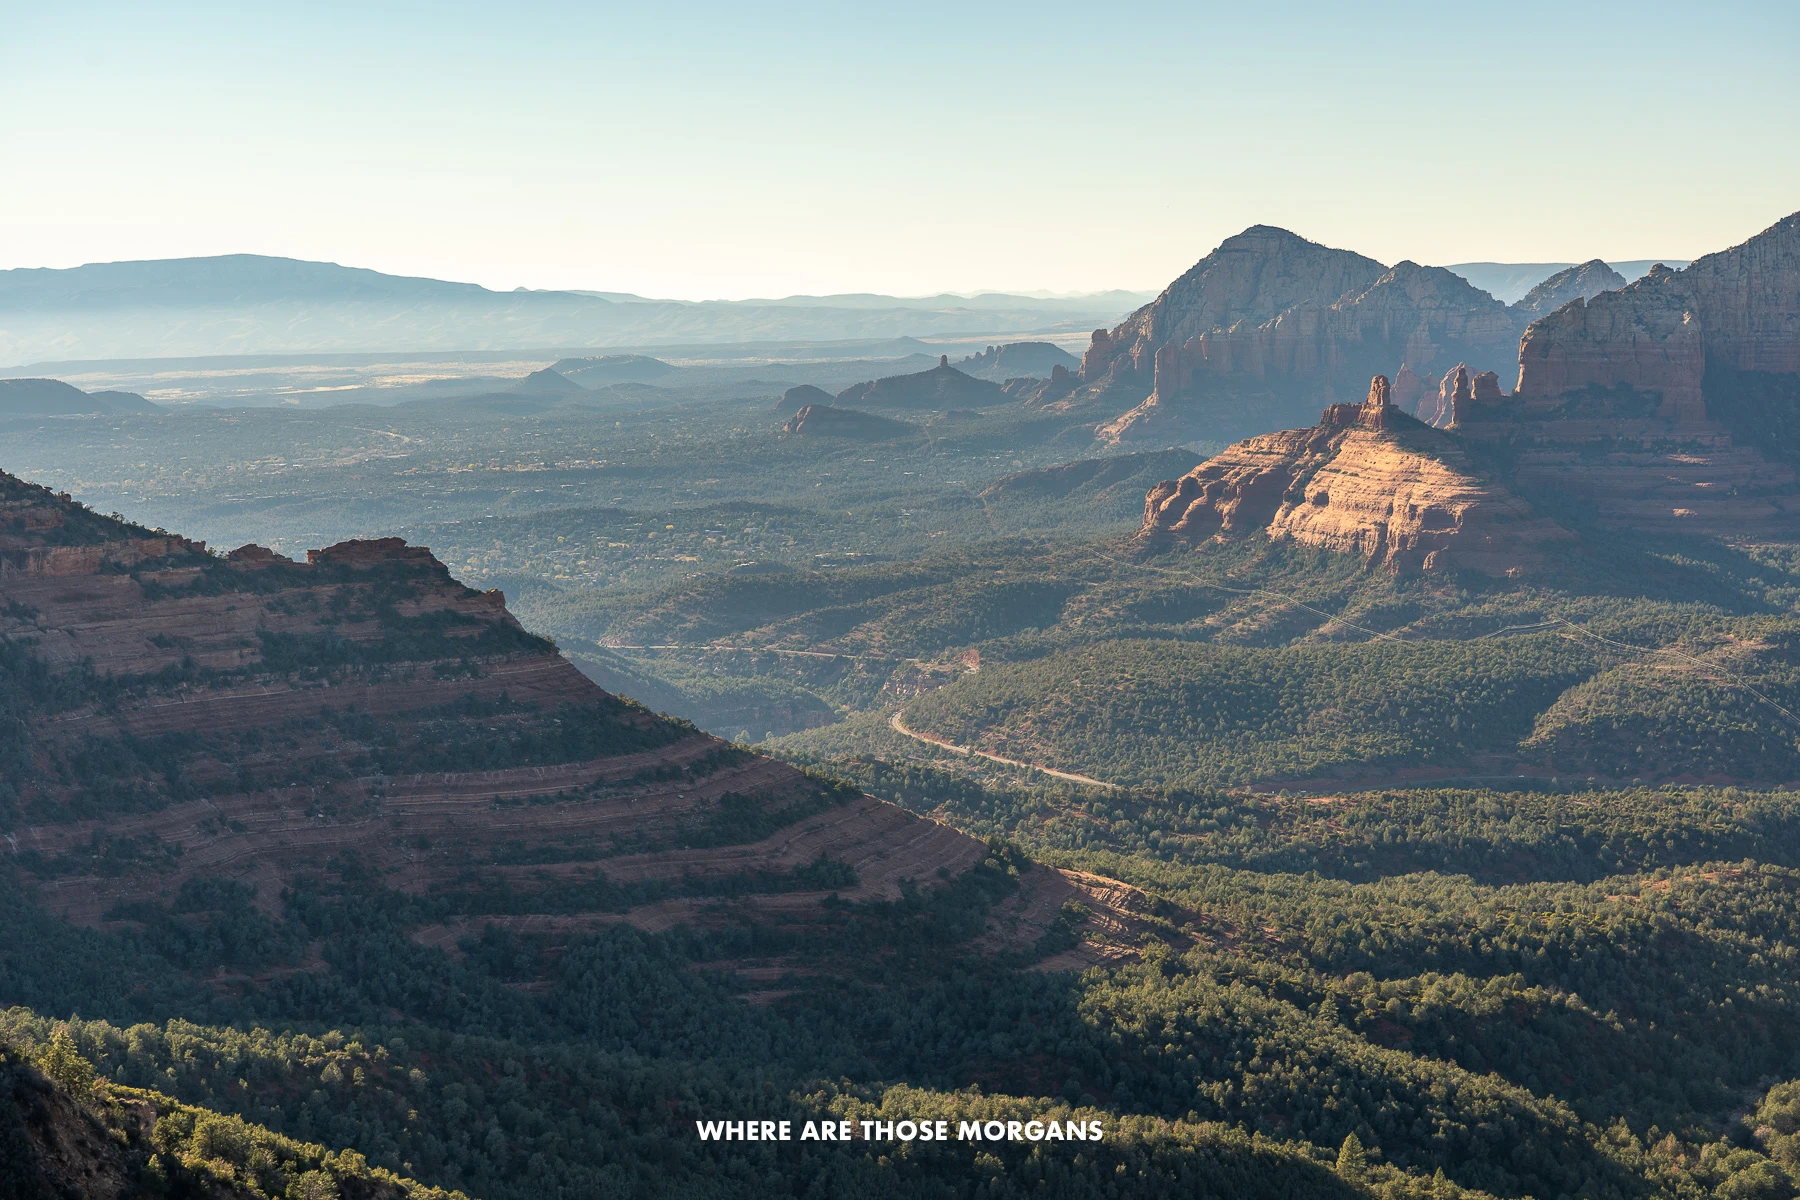
We spent 8 intensive days in Sedona in December 2021, and we didn’t waste a single moment. We hiked every major trail and unearthed hidden gems. We drove every jeep road, climbed into every cave, and chased sunrise and sunset at every iconic viewpoint. We explored ancient ruins, visited all the vortex sites, rode the Verde Canyon Railroad, sampled wineries and experienced Tlaquepaque’s Christmas lights. After the trip, we fully understood exactly how to plan the perfect one week Sedona itinerary.
Our itinerary isn’t theoretical. We’ve tested the timing on every major hike, learned which trails justify the effort and which viewpoints can be skipped. We figured out the optimal routes between attractions and experienced what’s actually possible in different timeframes. We know which sunrise spots require pre-dawn hiking, which parking lots fill up by 8:00 AM, and how to structure days to avoid backtracking across town.
 Mark and Kristen with a jeep rental in Sedona
Hi, we’re Mark and Kristen Morgan. We left our scientific careers in 2018 to become travel writers and photographers, and since then our expert guides have helped millions of travel planners take better trips. Read more about us.
Why trust us with your Sedona itinerary? We did everything there is to do as tourists, made mistakes and found hidden gems. We know the best way to spend 7 days in Sedona. As always, every photo in this guide is ours.
In this guide we walk you step-by-step through our complete 7-day itinerary – exactly how we’d do Sedona in one week if it was our first time again. This efficient and comprehensive plan is based on our 8-day trip but refined to fit into a week, and organized to maximize your time. It’s fast-paced, action-packed and full of adventure. But we know it’s intense, so at the end of each day we explain what we’d cut or condense to slow things down.
Stick around until the end for our map, one-week planning tips, budgeting tips and mistakes to avoid. If 7 days sounds like too much, read our 1-5 days in Sedona itinerary for hikers and non-hikers to see how you can plan a shorter trip. Okay, let’s dive in.
SEDONA Planning
Ultimate Sedona Guidebook: Get our complete 50+ page offline PDF with everything you need for Sedona.
Personalized Sedona Planning Call: Book a 60 minute call with Mark to have your questions answered, optimize your itinerary, avoid tourist traps and get our best insider tips.
Still Planning? Read our essential first-timer’s guide to visiting Sedona to learn about every aspect of visiting.
Note: Our content is reader supported and contains affiliate links. If you make a purchase through one of these links, we may earn a small commission at no extra cost to you and it helps us keep this site running.
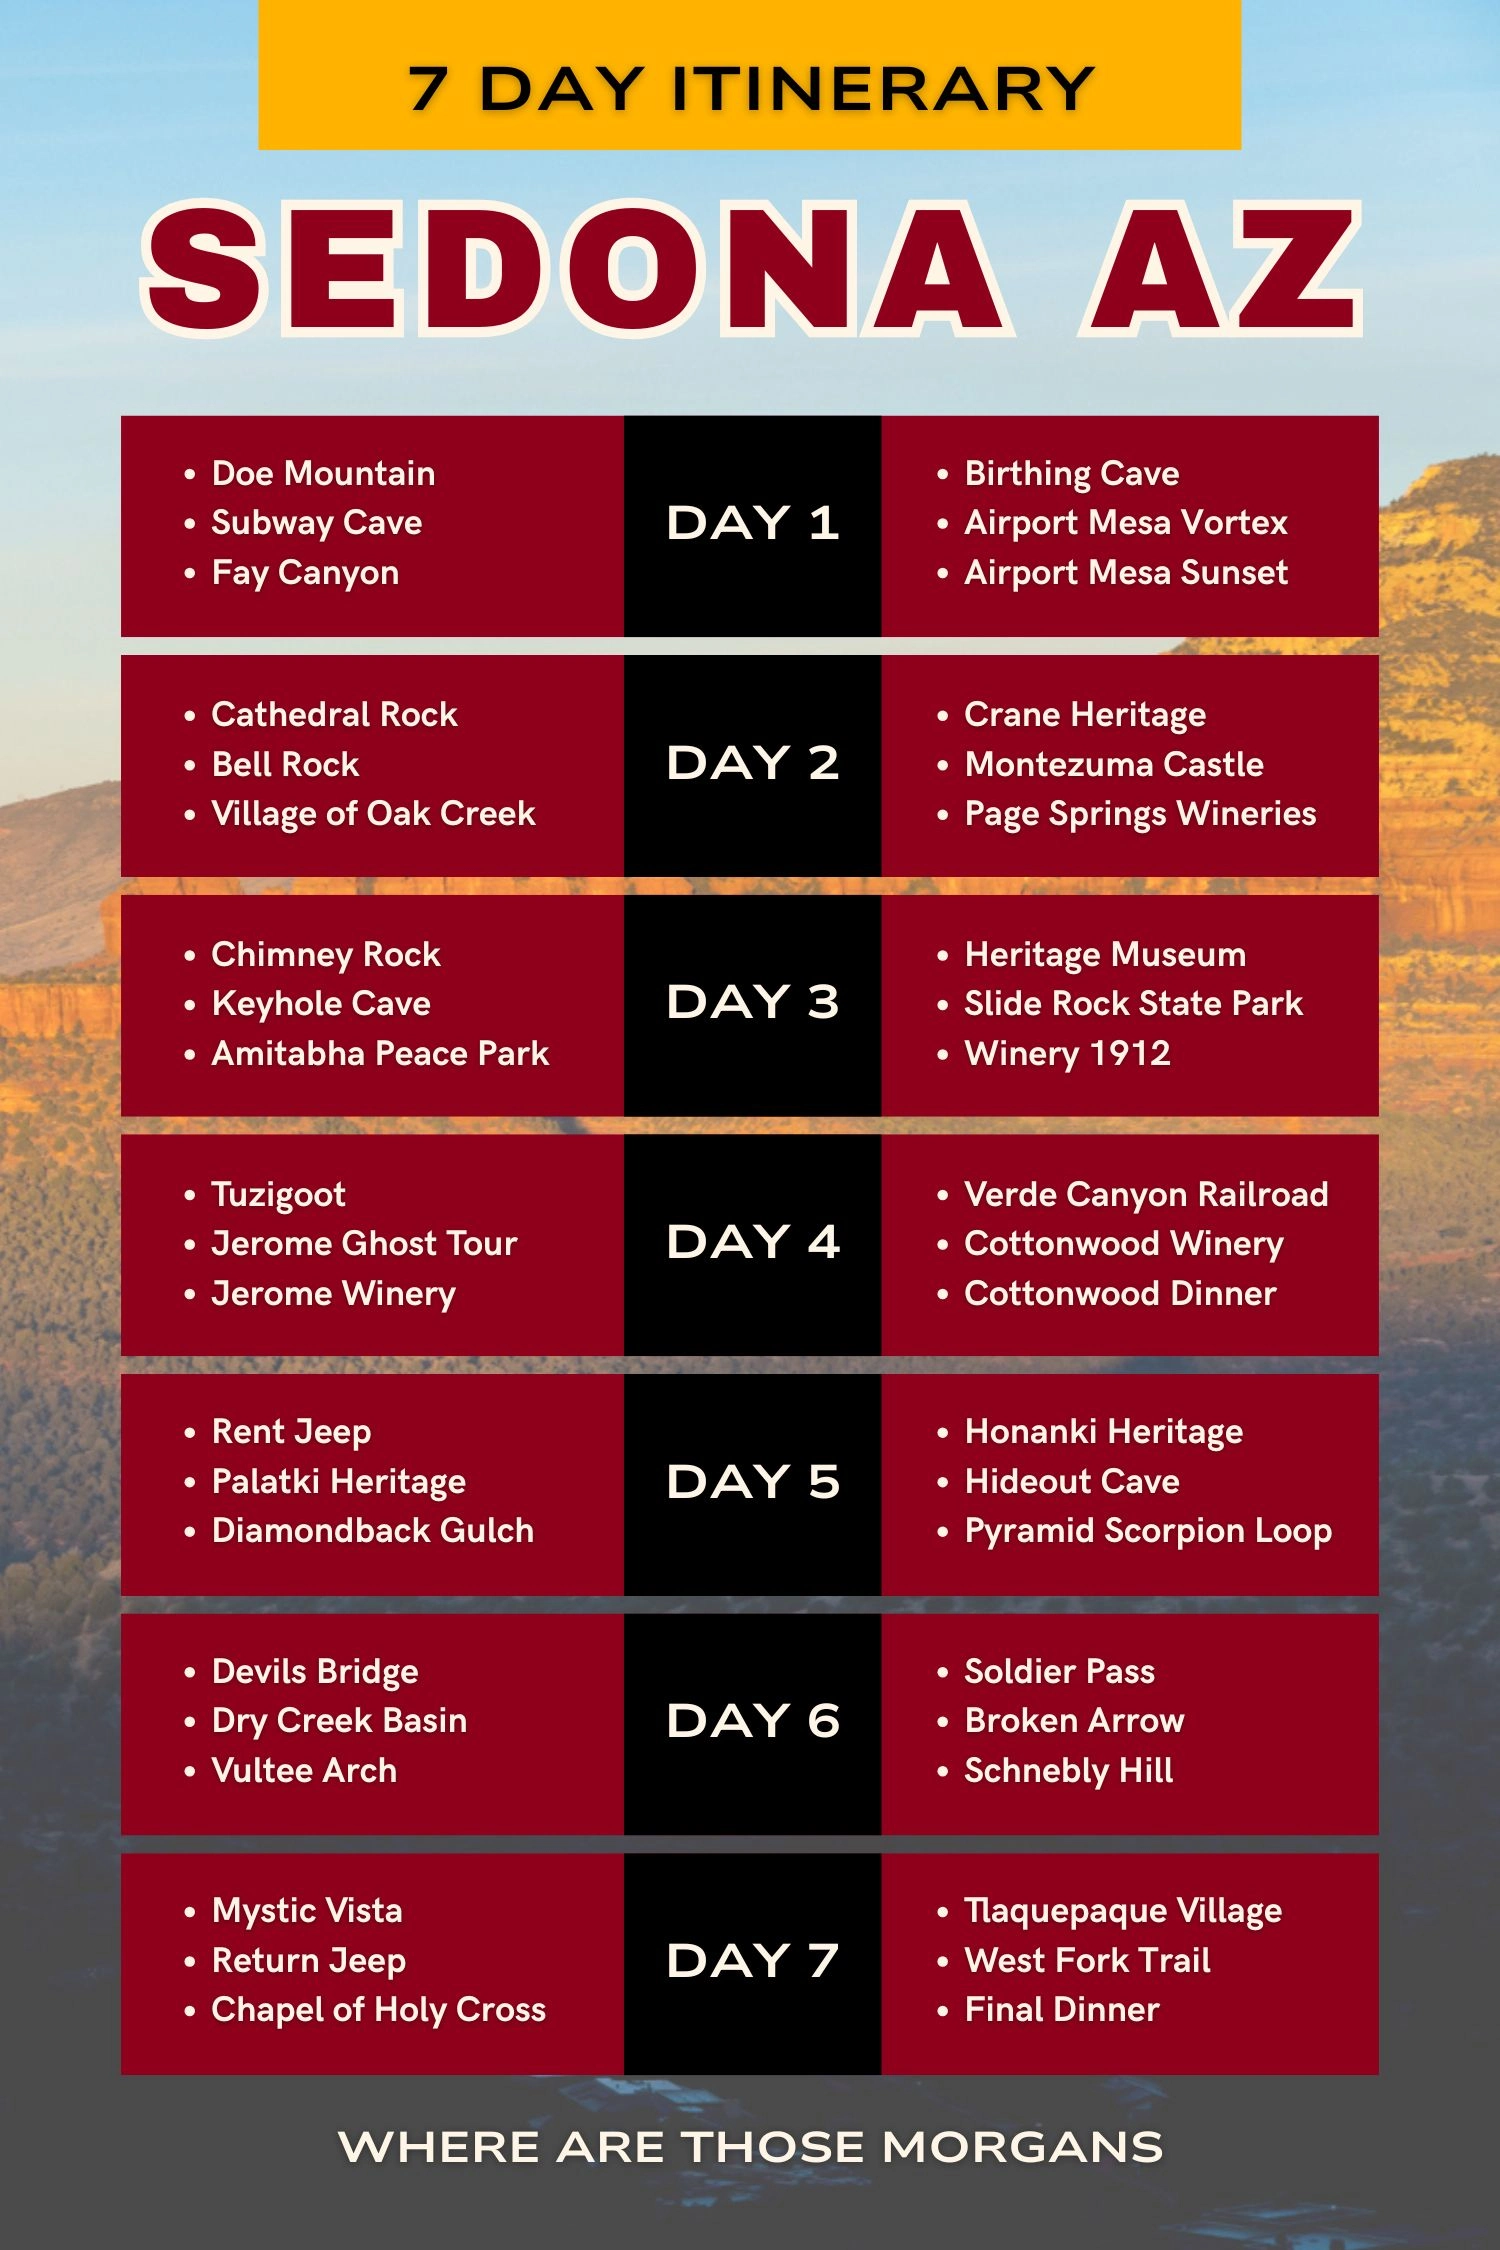 Feel free to save or share our infographic!
Day 1 Morning
Doe Mountain (5:00 AM – 7:00 AM)
Our sunrise hike to Doe Mountain was one of the highlights from our 2021 trip, so we would 100% lock this in for our first morning. It’s a moderately difficult 1.5-mile round trip hike with 400 feet elevation gain, and it was worth every step for those sublime sunrise views.
 Kristen watching the sunrise from Doe Mountain summit
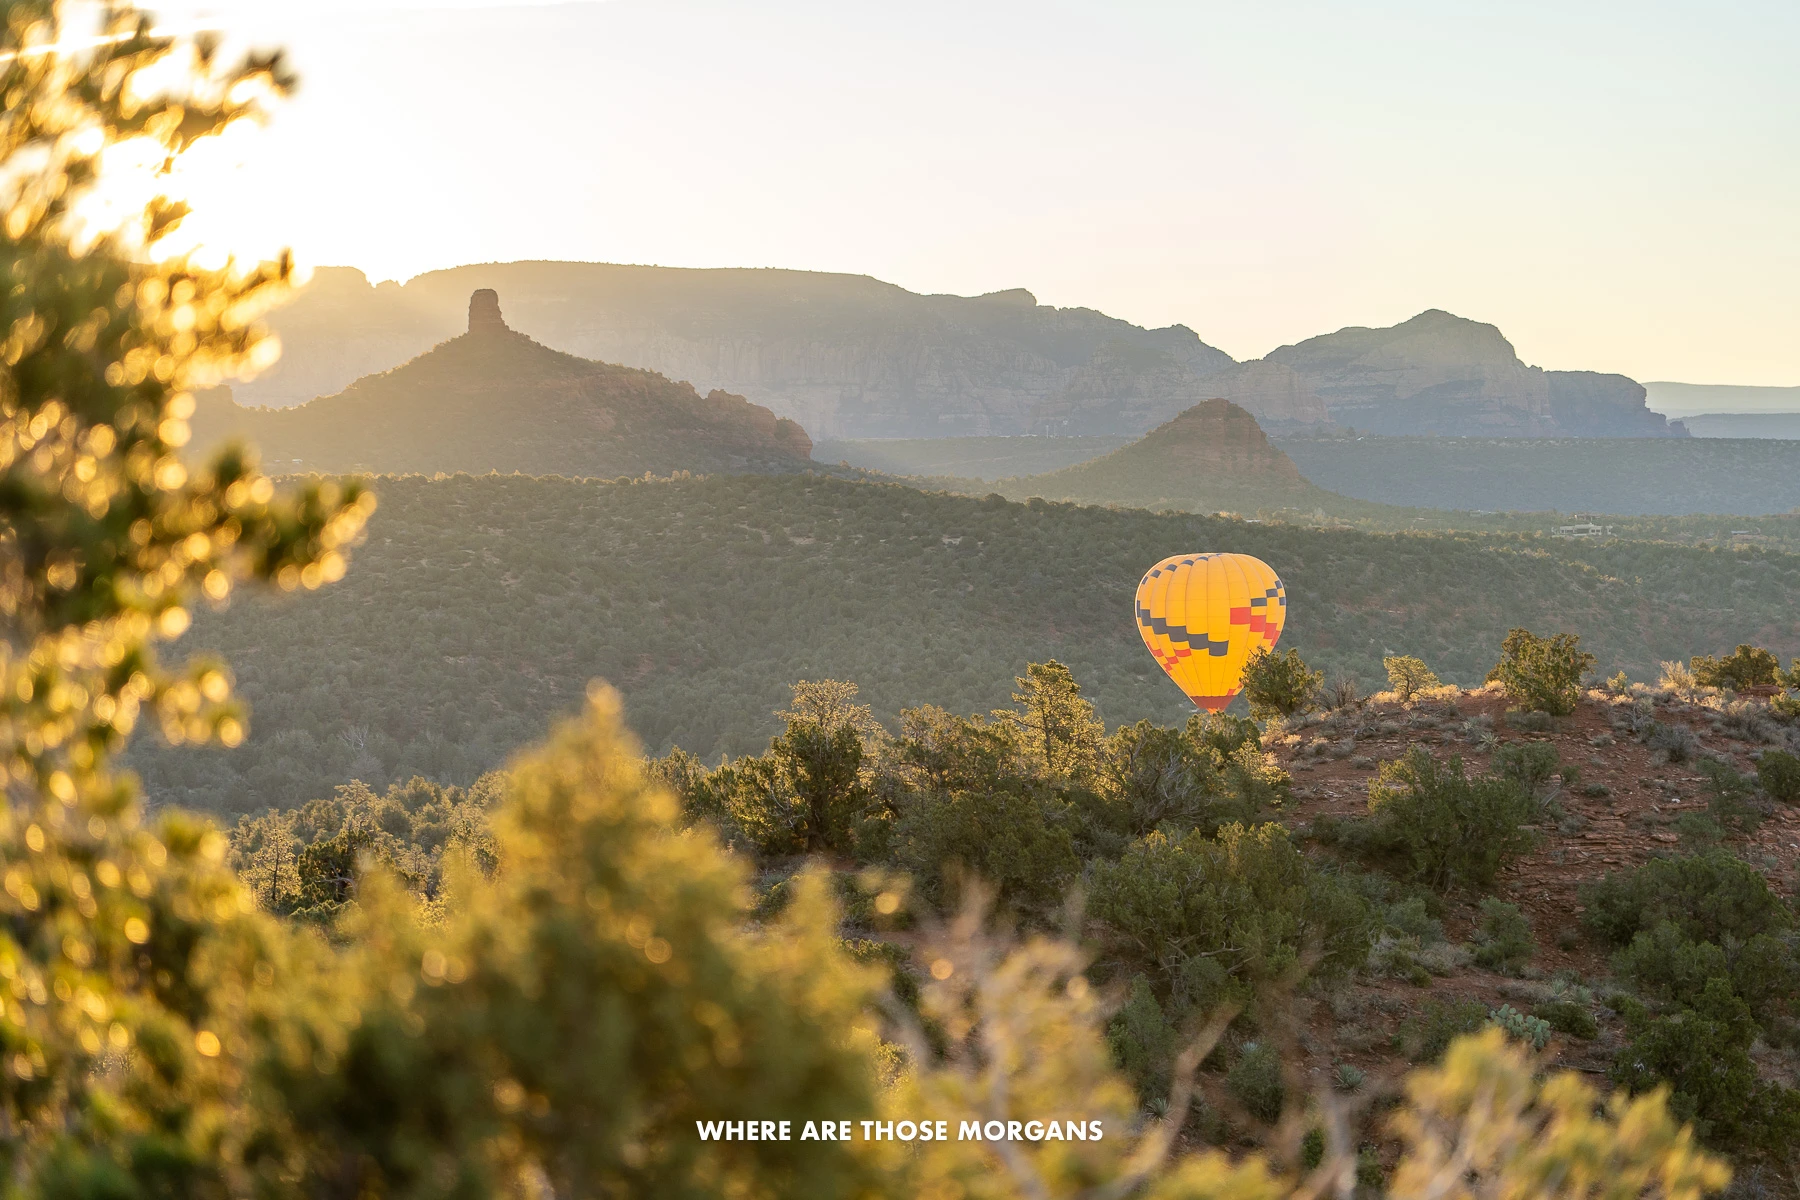
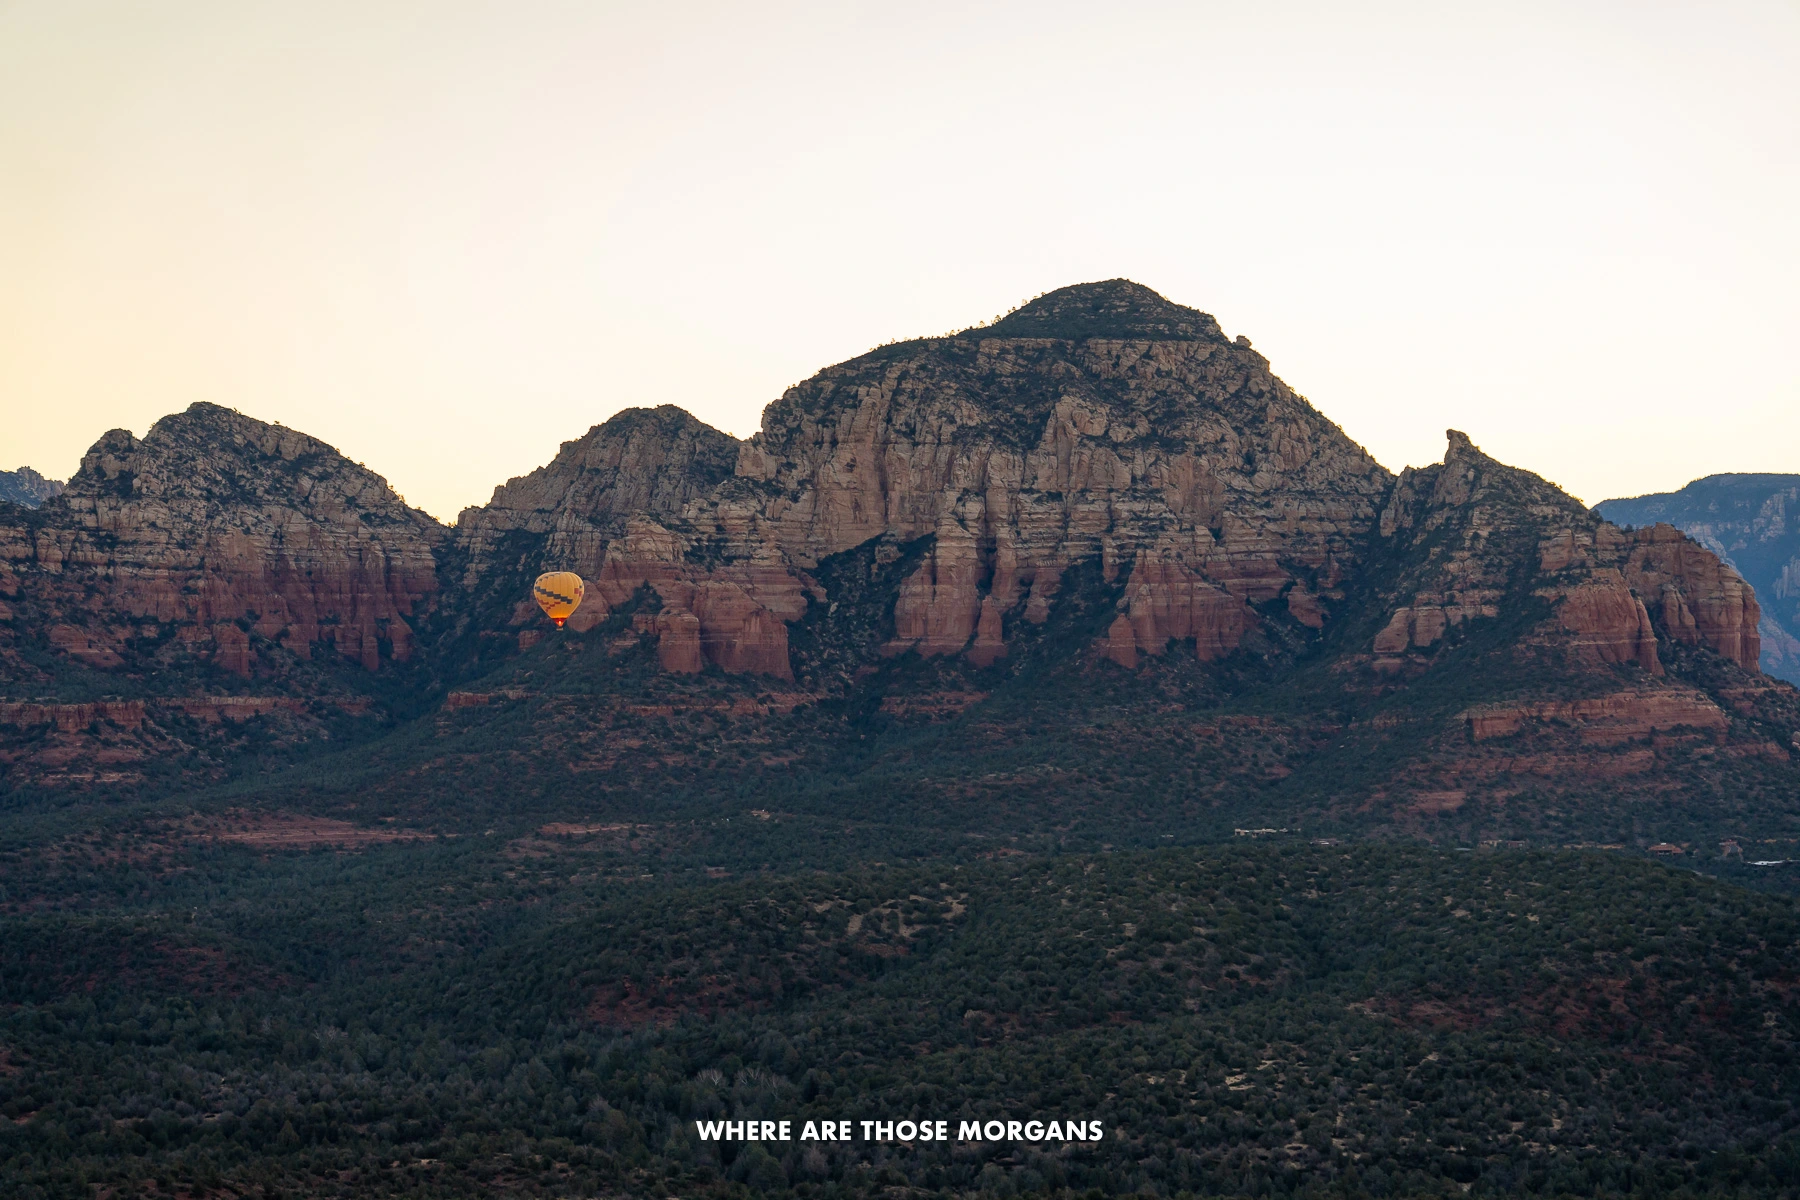
We quickly hiked up with headlamps, had the entire summit mesa to ourselves, drank hot coffees and ate breakfast snacks, wrapped up in our winter coats, and watched a genuinely remarkable sunrise explode from behind a deep valley and tall red rock cliffs. Hot air balloons were taking flight right ahead of us in the valley and our view was totally unobstructed. What a way to start the trip!
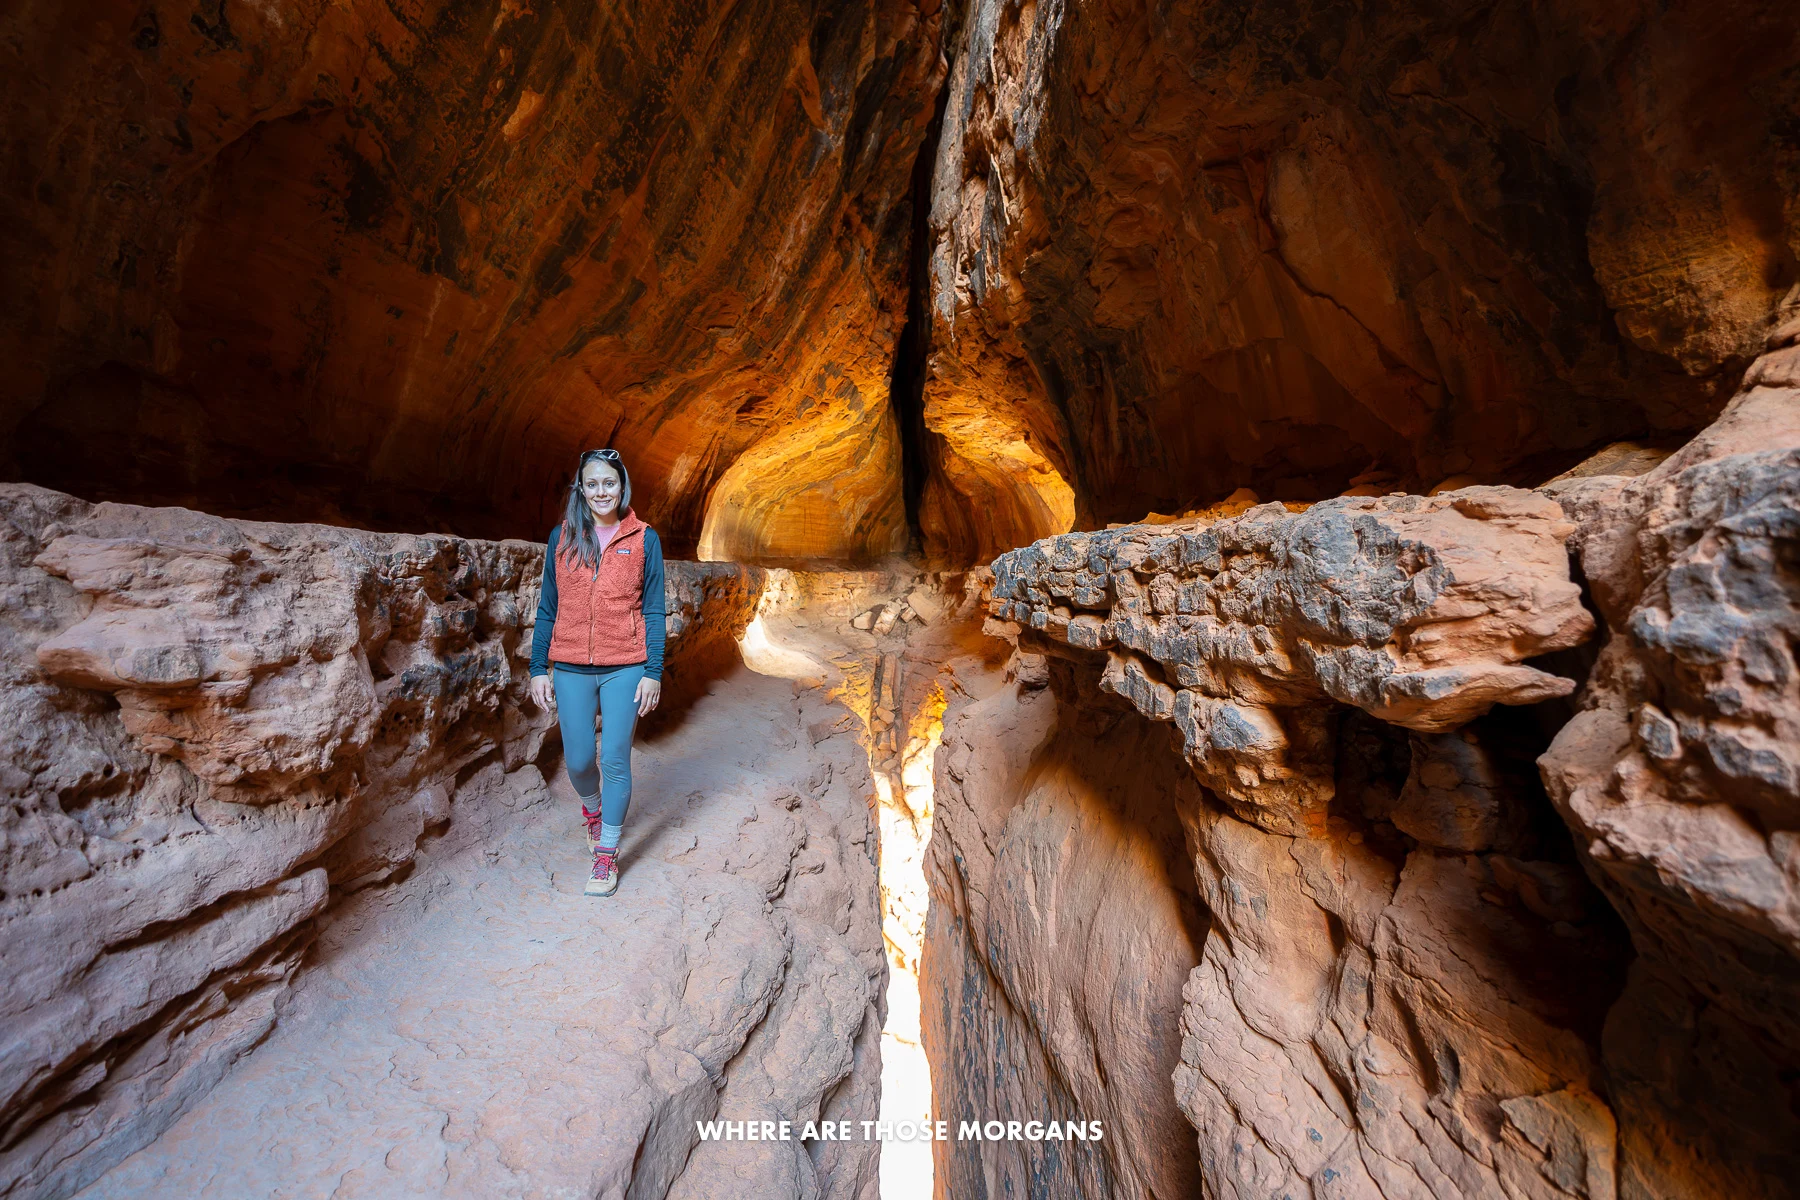
Subway Cave (7:30 AM – 10:00 AM)
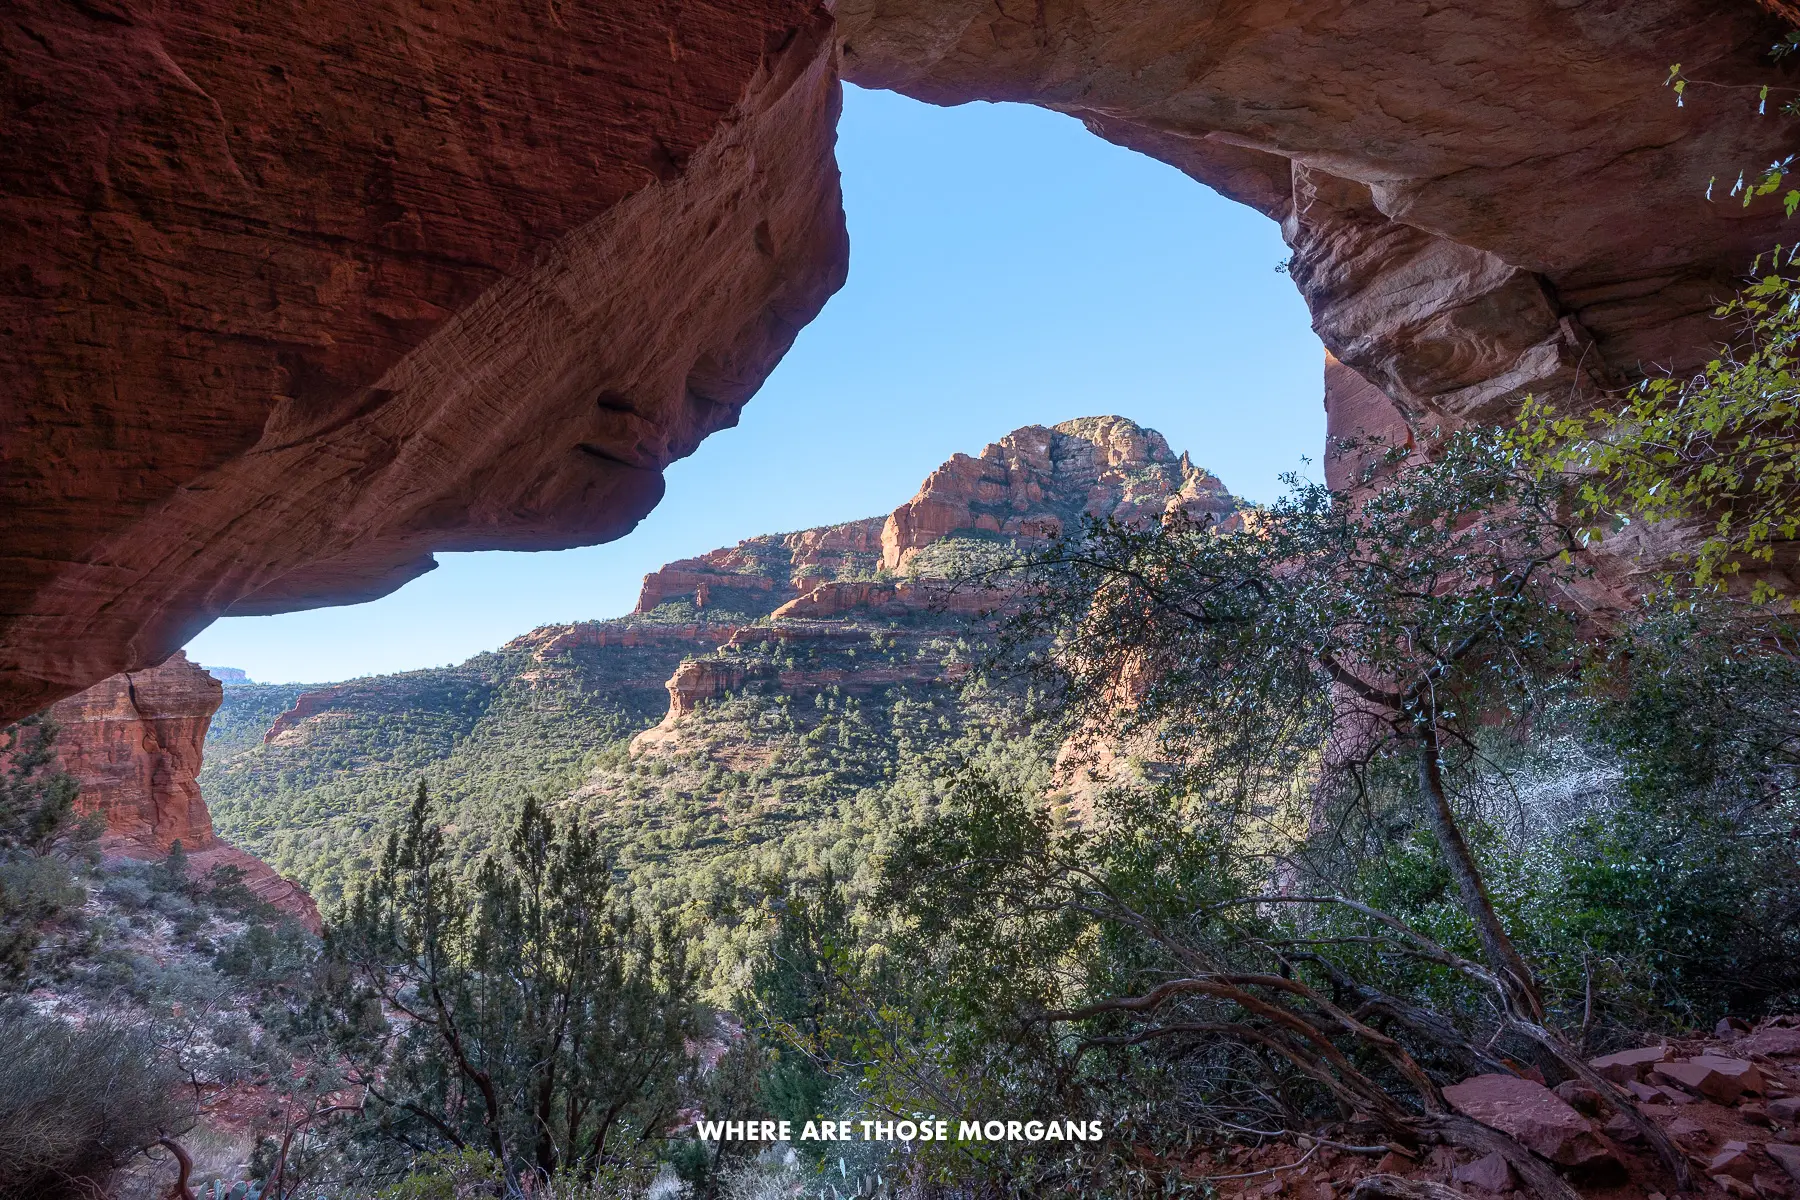
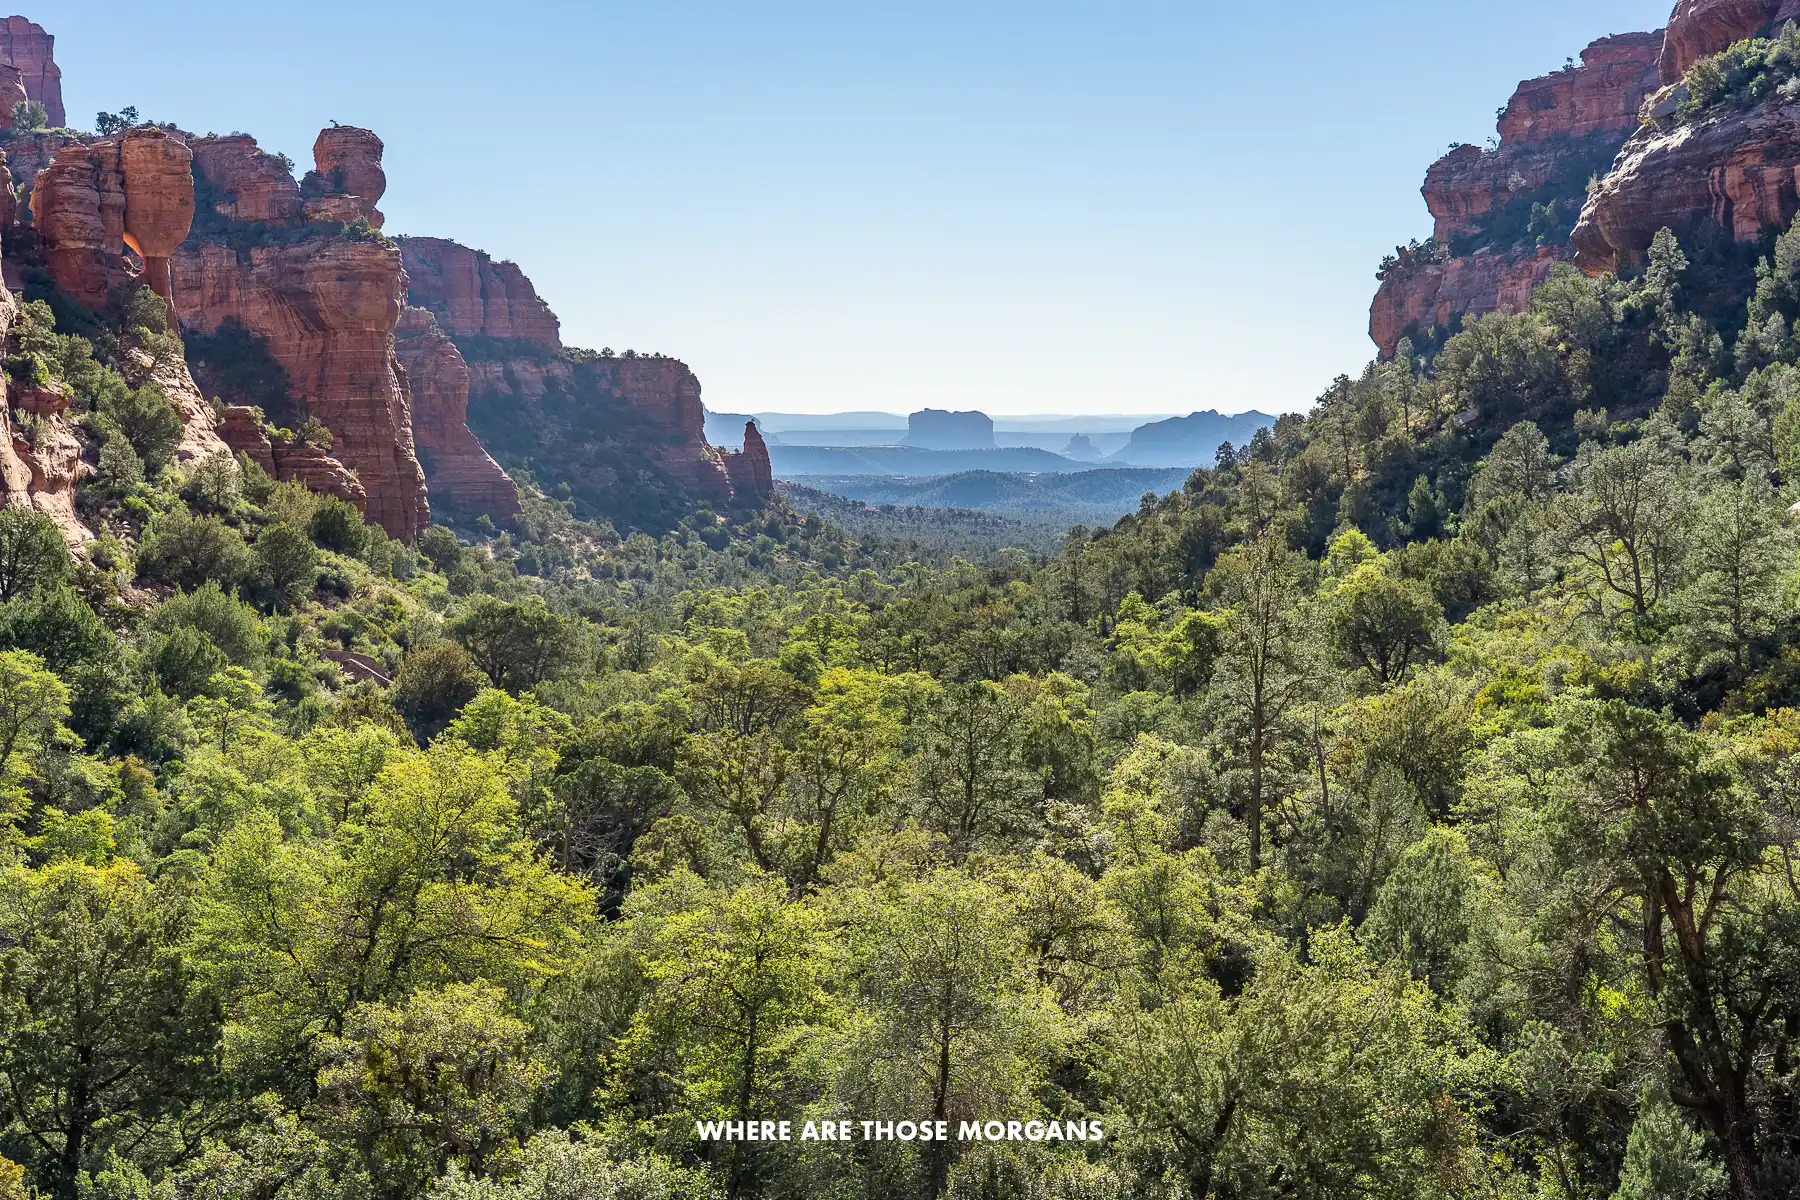
We’d bypass Fay Canyon for now and drive straight to Boynton Canyon Trailhead instead because it has fewer spaces and gets busier with people hiking to Sedona Subway Cave. This early, we’d be among the first people hiking Boynton Canyon Trail which would give us a good chance of being alone inside the cave (we had it entirely to ourselves for 30 minutes in December). To the Subway Cave only, we thought this 5-mile round trip hike with 600 feet elevation gain was moderately difficult, but the cave climb was challenging.
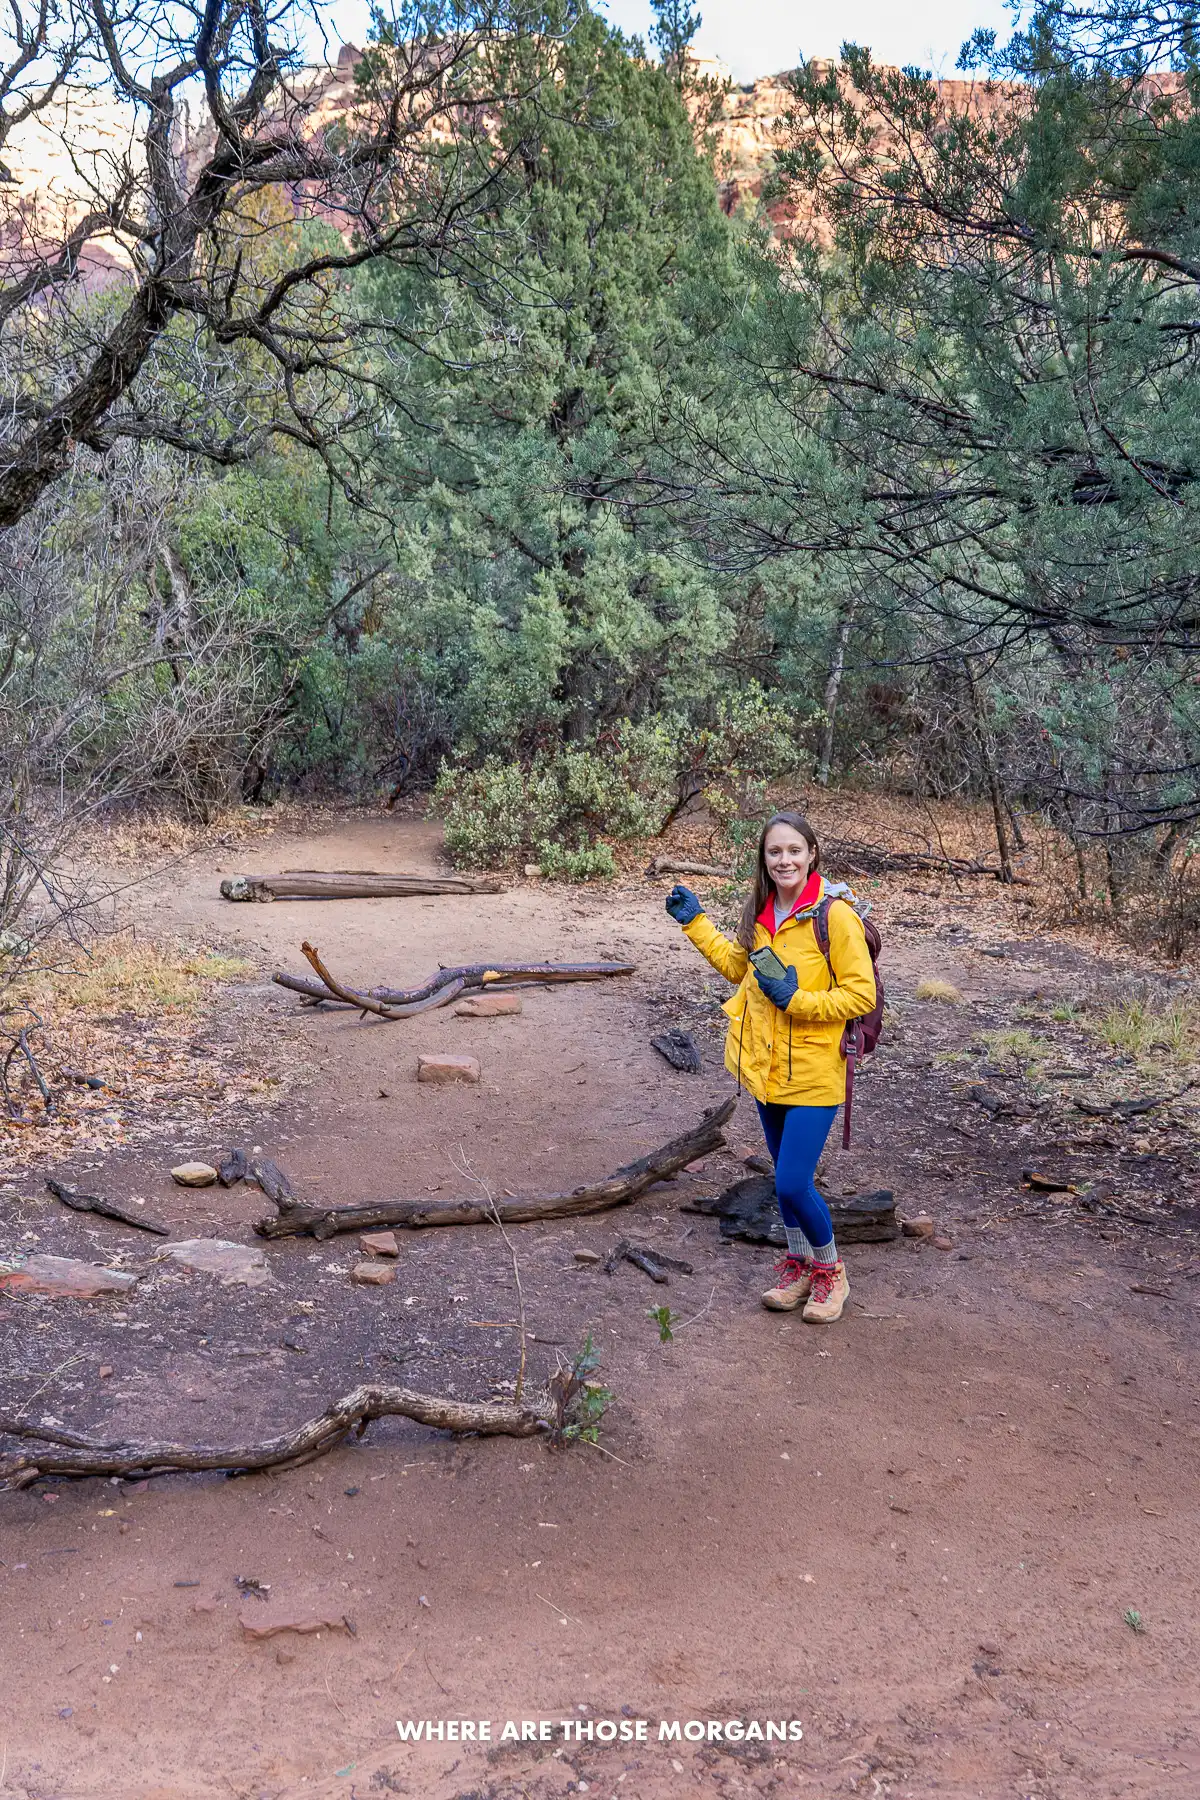 Kristen using the Gaia GPS offline map on her phone to find this turn off Boynton Canyon for the Subway Cave
We’d fork right off Boynton Canyon around 2 miles in (at the massive dead tree), carefully climb into the cave and snap some seriously cool photos of the natural tunnel-shaped red rock formation. We actually hiked the full trail to the end of Boynton Canyon, and it was good but nothing special for Sedona’s high standards, so next time we’d just go to the cave and back.
 Kristen walking through the Subway Cave
There’s also another cave on Boynton Canyon that we missed called Kachina Tree Cave. It’s near the residential area but it’s not clear where to pick up the trail. We probably would try to find it next time because we visited all the other secret Sedona caves and only missed this one, but we wouldn’t say Kachina Cave will make-or-break your trip. Back near the parking lot we’d make a quick stop at Boynton Canyon vortex site to soak up the views and energy.
Fay Canyon (10:30 AM – 12:00 PM)
Next we’d head back to Fay Canyon Trailhead and hope there was a parking space free in the mid-morning. If you’re short on time or don’t want to climb any steep banks, the basic version of Fay Canyon Trail is a flat and quick 2-mile round trip trail with just 150 feet elevation gain. It’s one of the most popular easy hikes in Sedona.
 This was our view looking back through Fay Canyon Arch
But we were chasing a challenge during our trip and we would again next time, so we’d hike straight up a sheer bank on the right side to reach Fay Canyon Arch, and we’d also climb one of the two steep ascents beyond the “end of trail” sign. Last time we did West Ascent so next time we’d do East Ascent.
 This was our hazy and blown out south facing view over Fay Canyon from the West Ascent
Standing inside Fay Canyon Arch was like being in one of Sedona’s caves, and the ascent at the end gave us sensational views looking back up Fay Canyon filled with green vegetation and trees. But adding the arch along with the ascent made our hike closer to 2.4 miles with 600 feet elevation gain, and it significantly increased the difficulty level.
Day 1 Afternoon
Lunch In West Sedona (12:30 PM – 1:30 PM)
Right at the bottom of Dry Creek Road we’d reach Highway 89A which runs through town. But instead of heading into town for lunch, we’d stick close to Dry Creek Road because we’re heading straight back to the Birthing Cave afterwards.
We didn’t visit during our trip, but Layla’s Bakery Cafe would be the perfect place to stop for a quick brunch and coffee. It has excellent ratings and the food looks great.
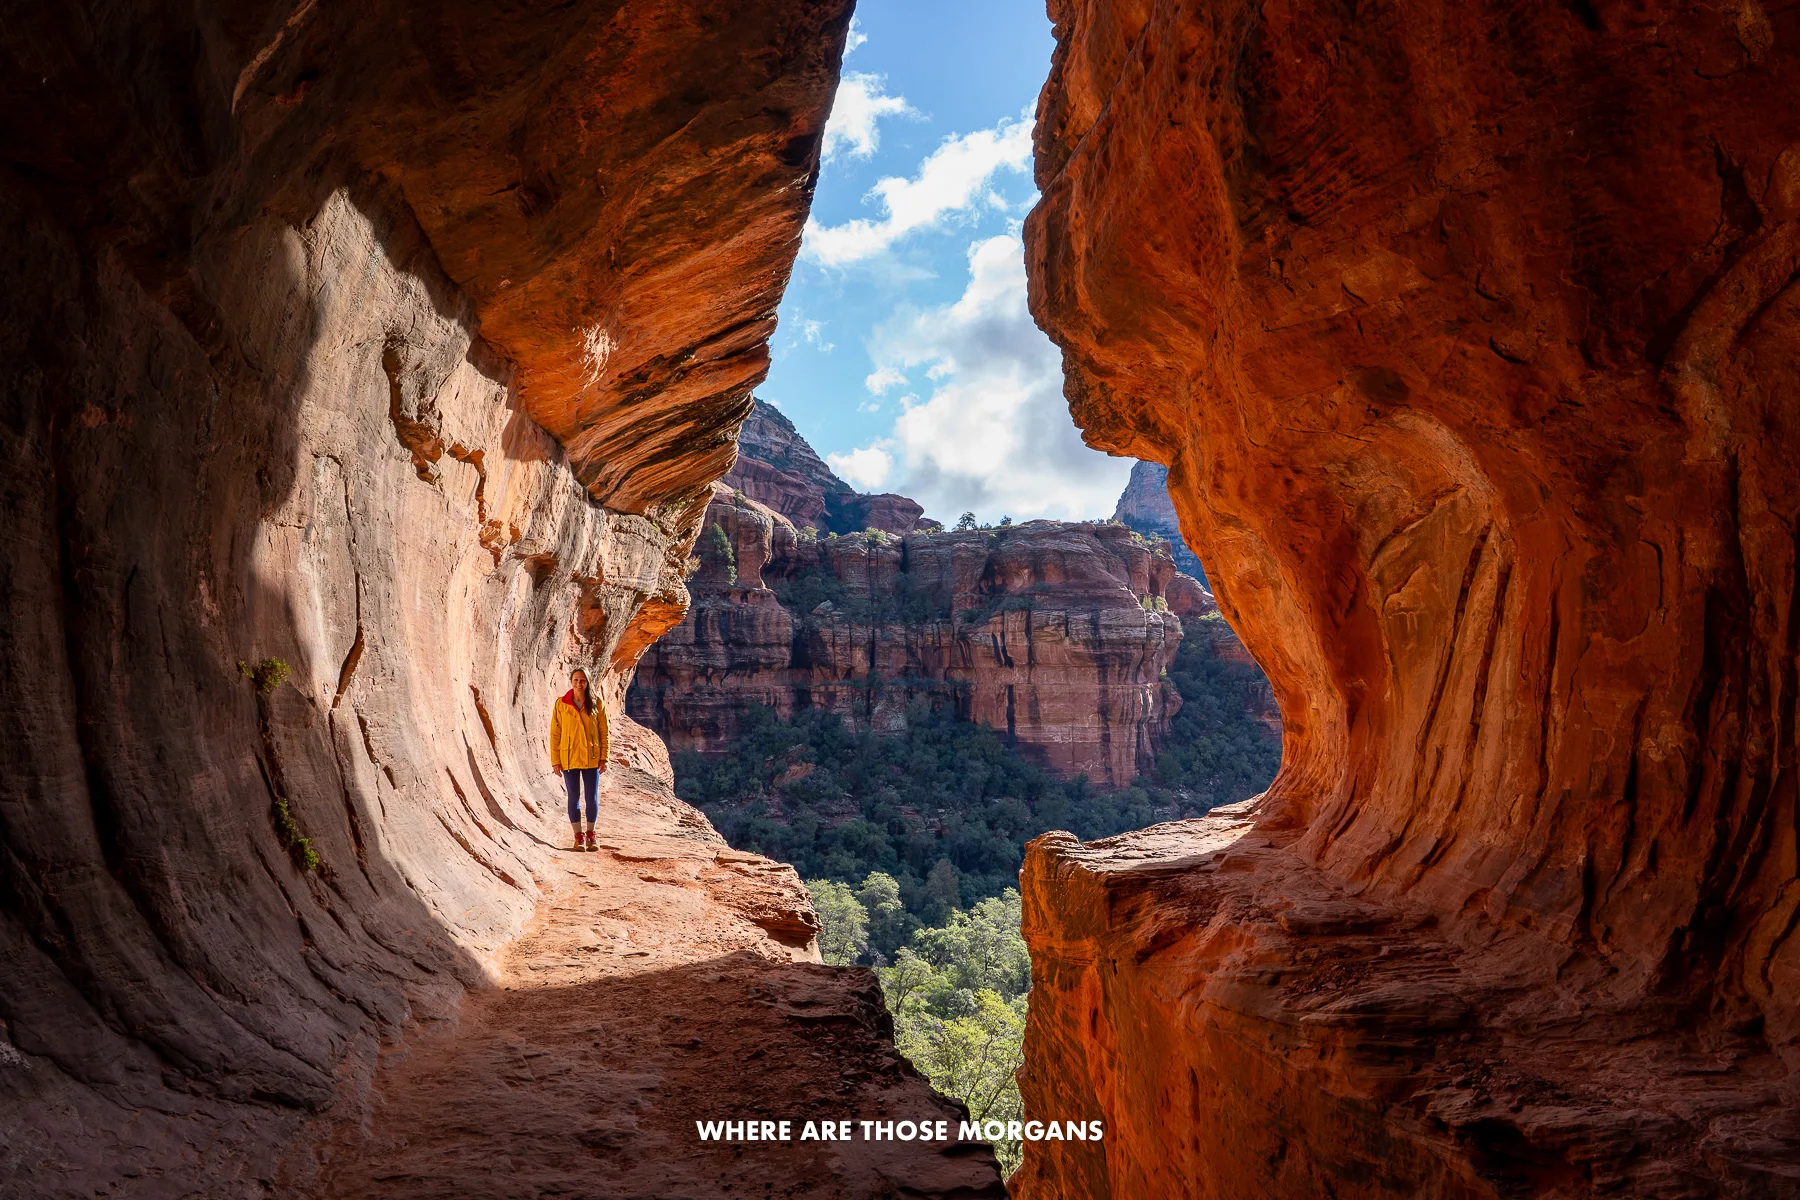
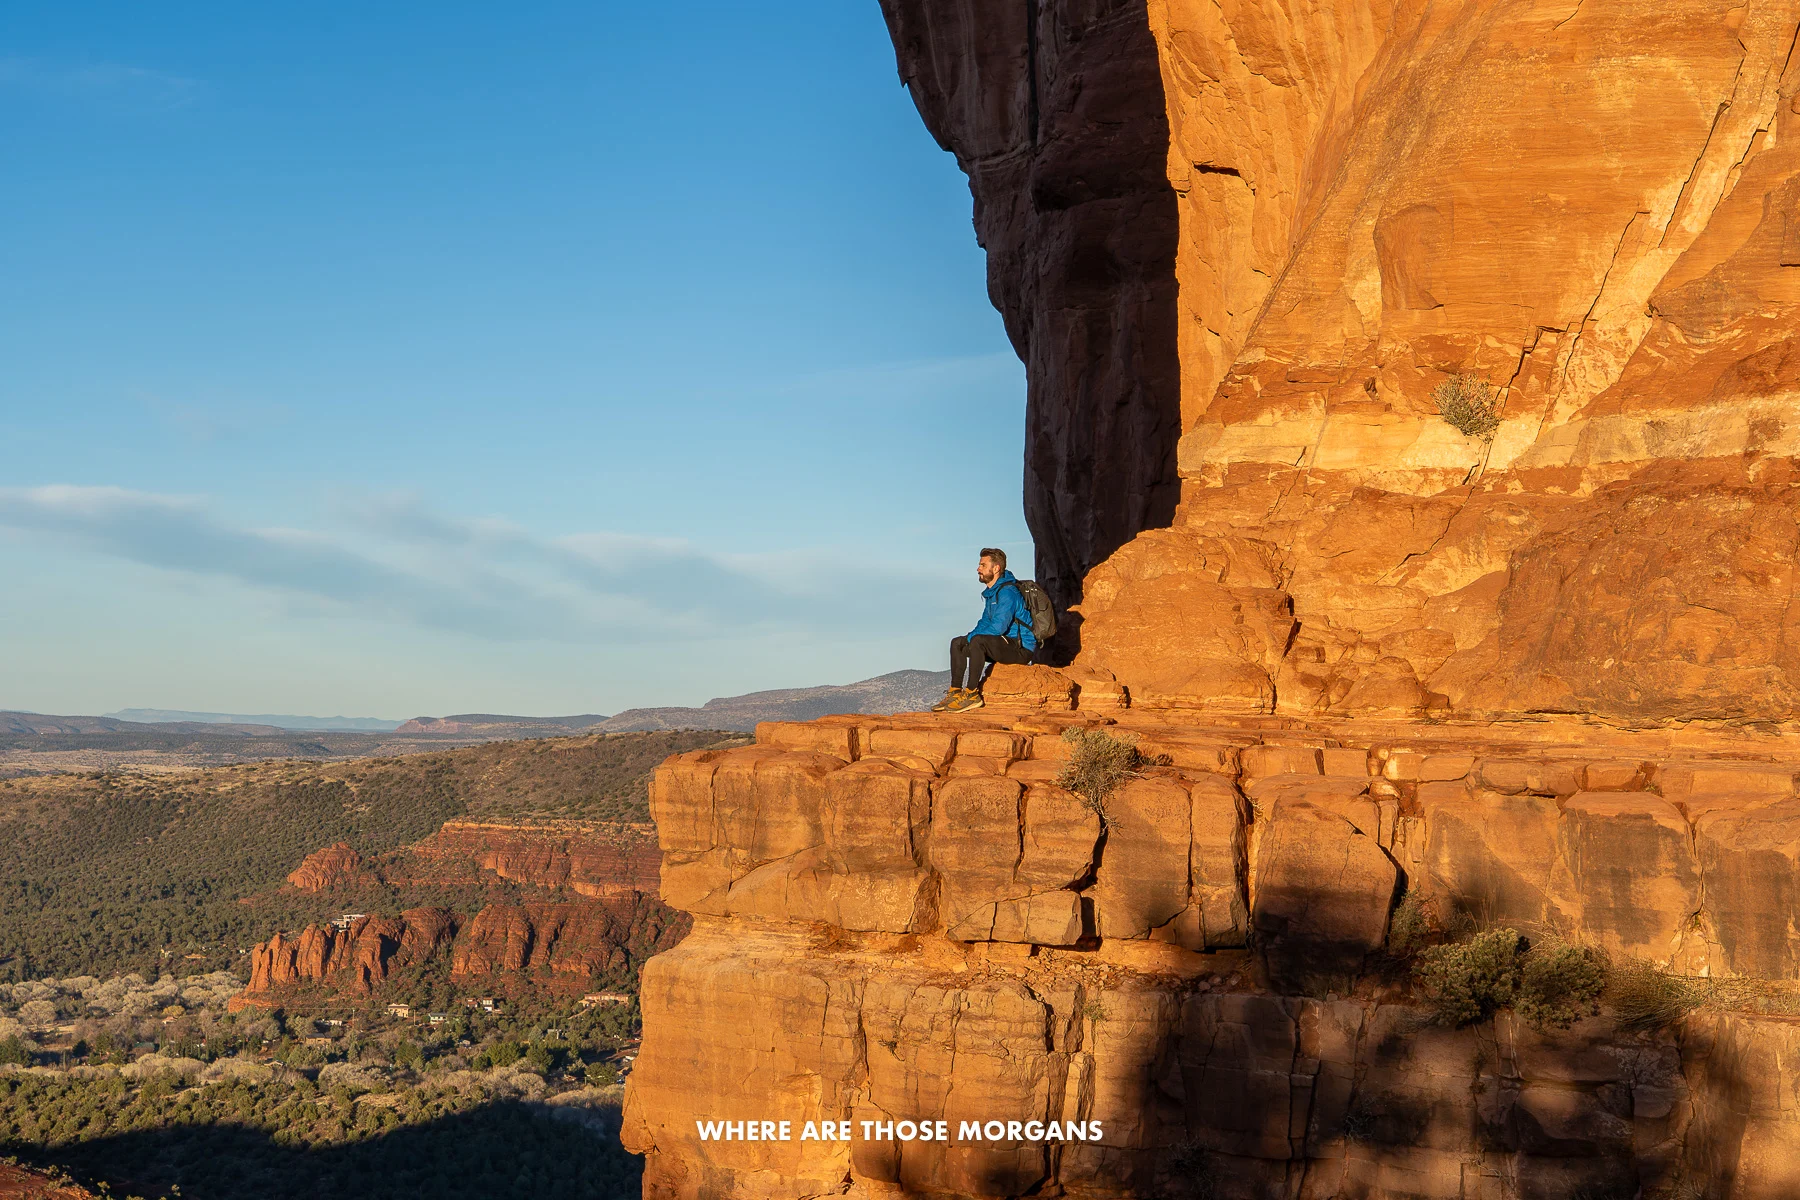
Birthing Cave (2:00 PM – 4:00 PM)
After refueling, we’d drive back up to Long Canyon Trailhead and park anywhere we could squeeze in along the roadside or in the trees. Then we’d set off walking the flat and easy trail until forking left at a broken wooden fence, which would lead us to a short but steep climb and eventually into Sedona’s Birthing Cave.
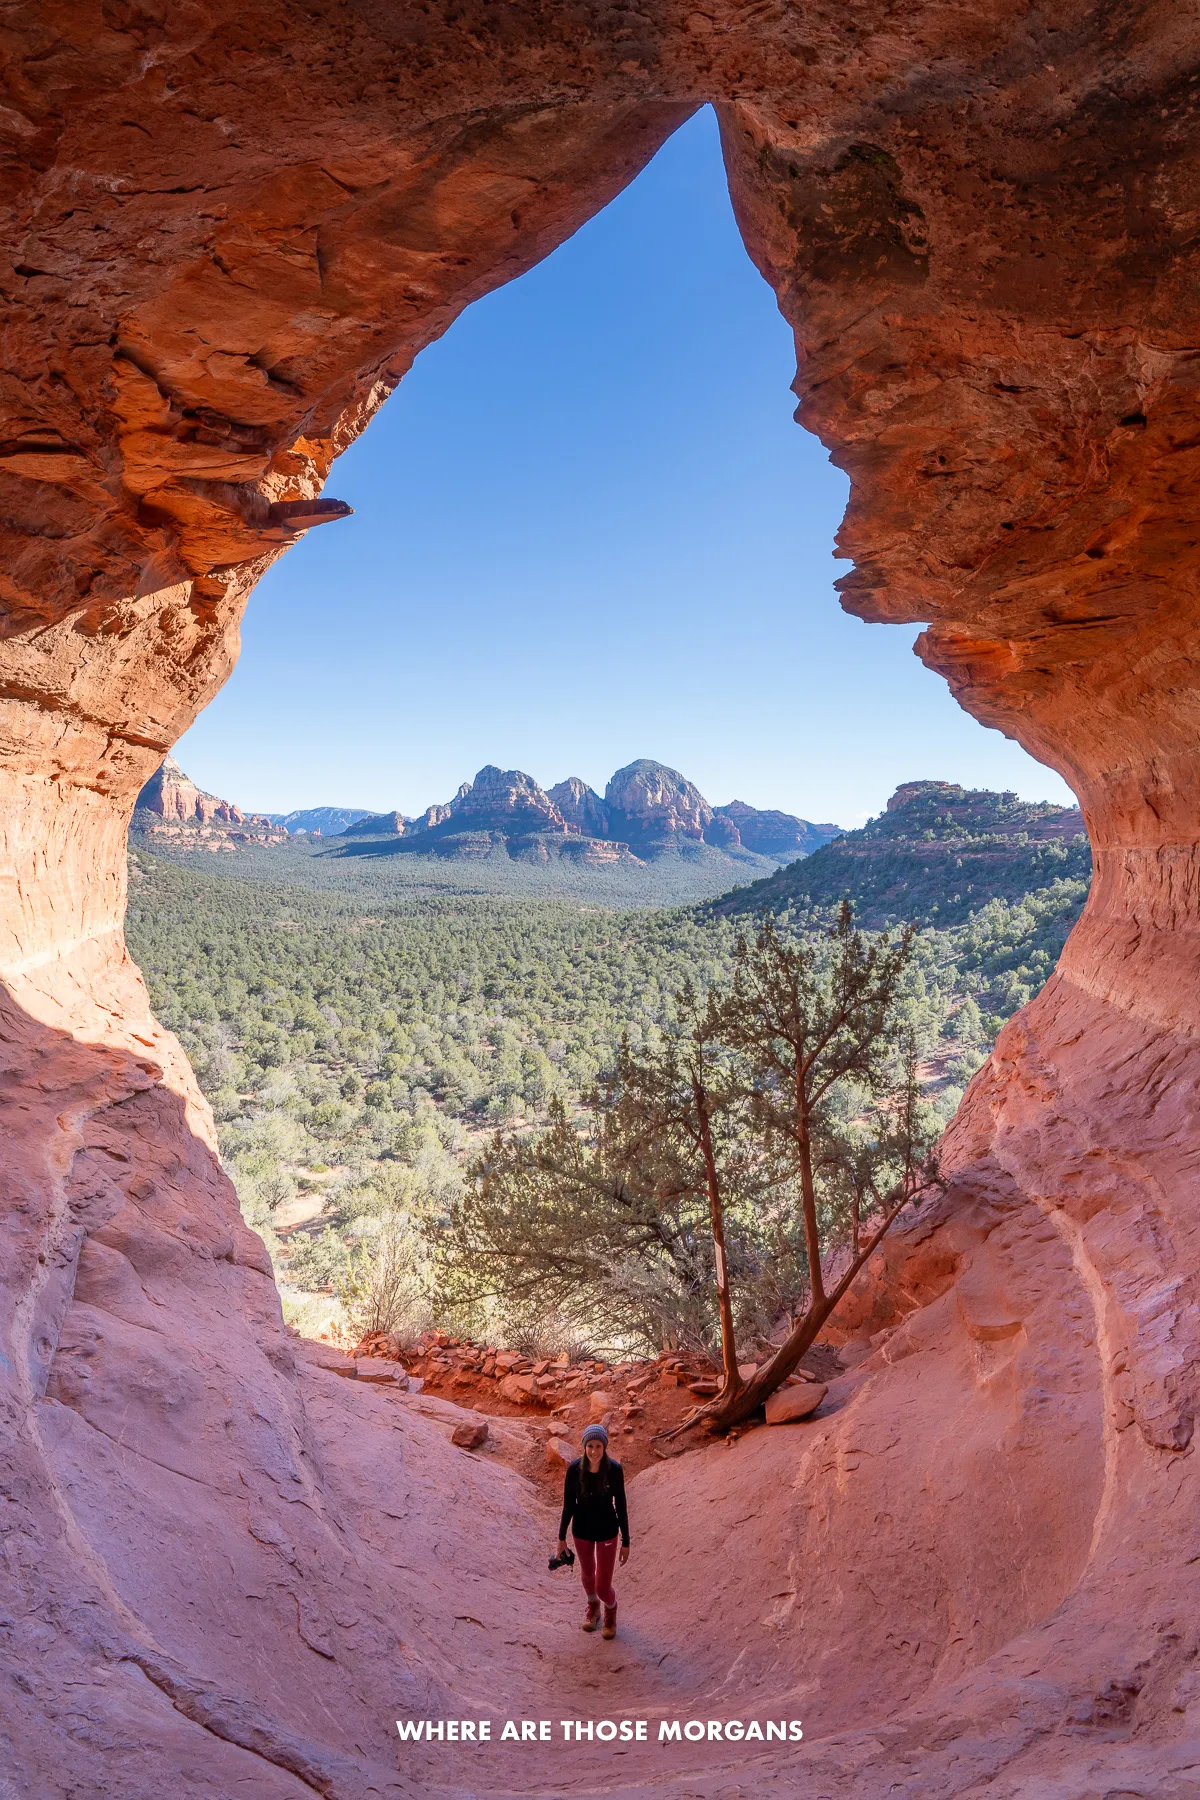 Kristen enjoying the flame-shaped Birthing Cave entrance
From the outside, we couldn’t see how this formation could be classed as a cave. But then we climbed inside and scrambled up to a small hole in the back, looked out at the view and saw the photogenic flame-shaped cave entrance. Wow! The hike is just 1.8 miles round trip with 270 feet elevation gain, and it’s one of the quieter caves so don’t miss it.
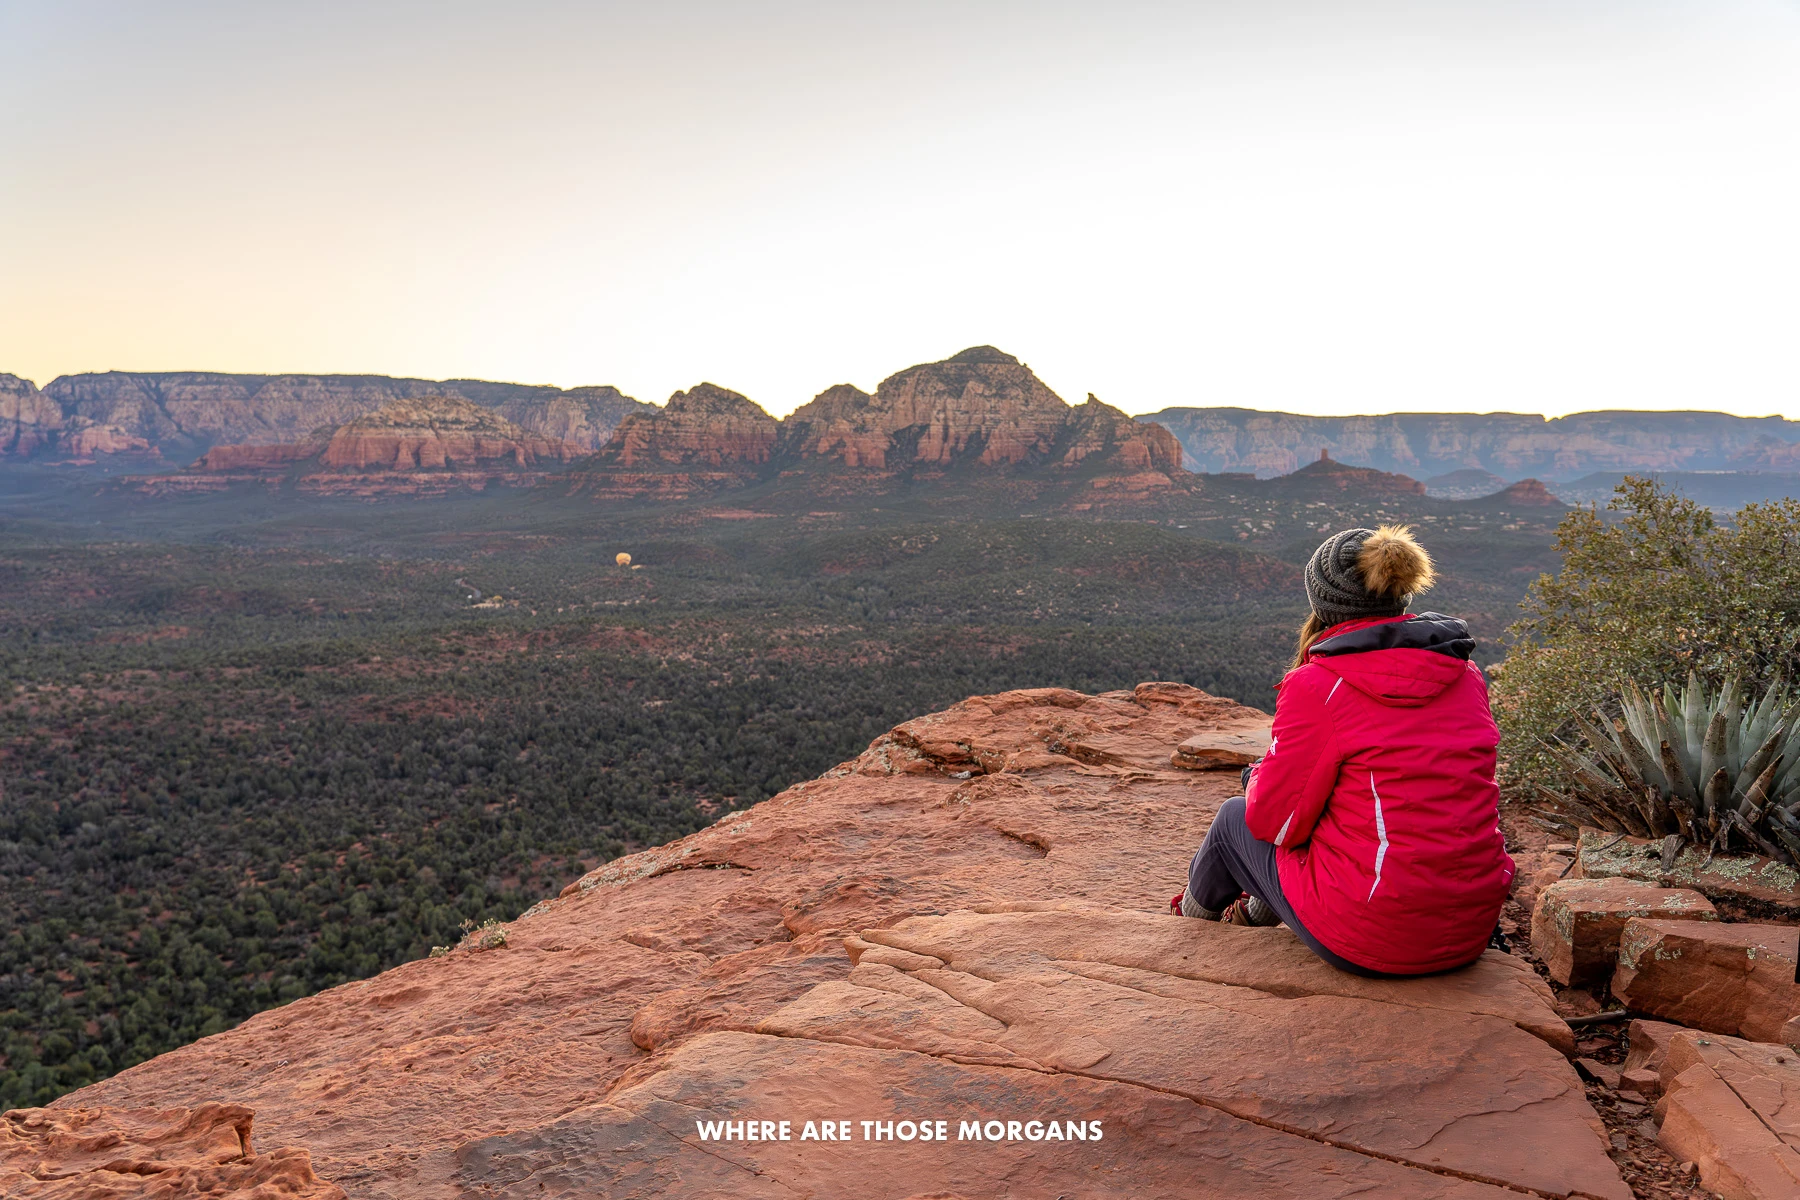
Airport Mesa (4:30 PM – 6:30 PM)
After the cave, we’d drive to the upper parking area at Sedona’s Airport Mesa (large paid parking lot – $3/vehicle) and grab our cameras, before heading straight over to a large fence with a small sign marking the top of Sedona View Trail.
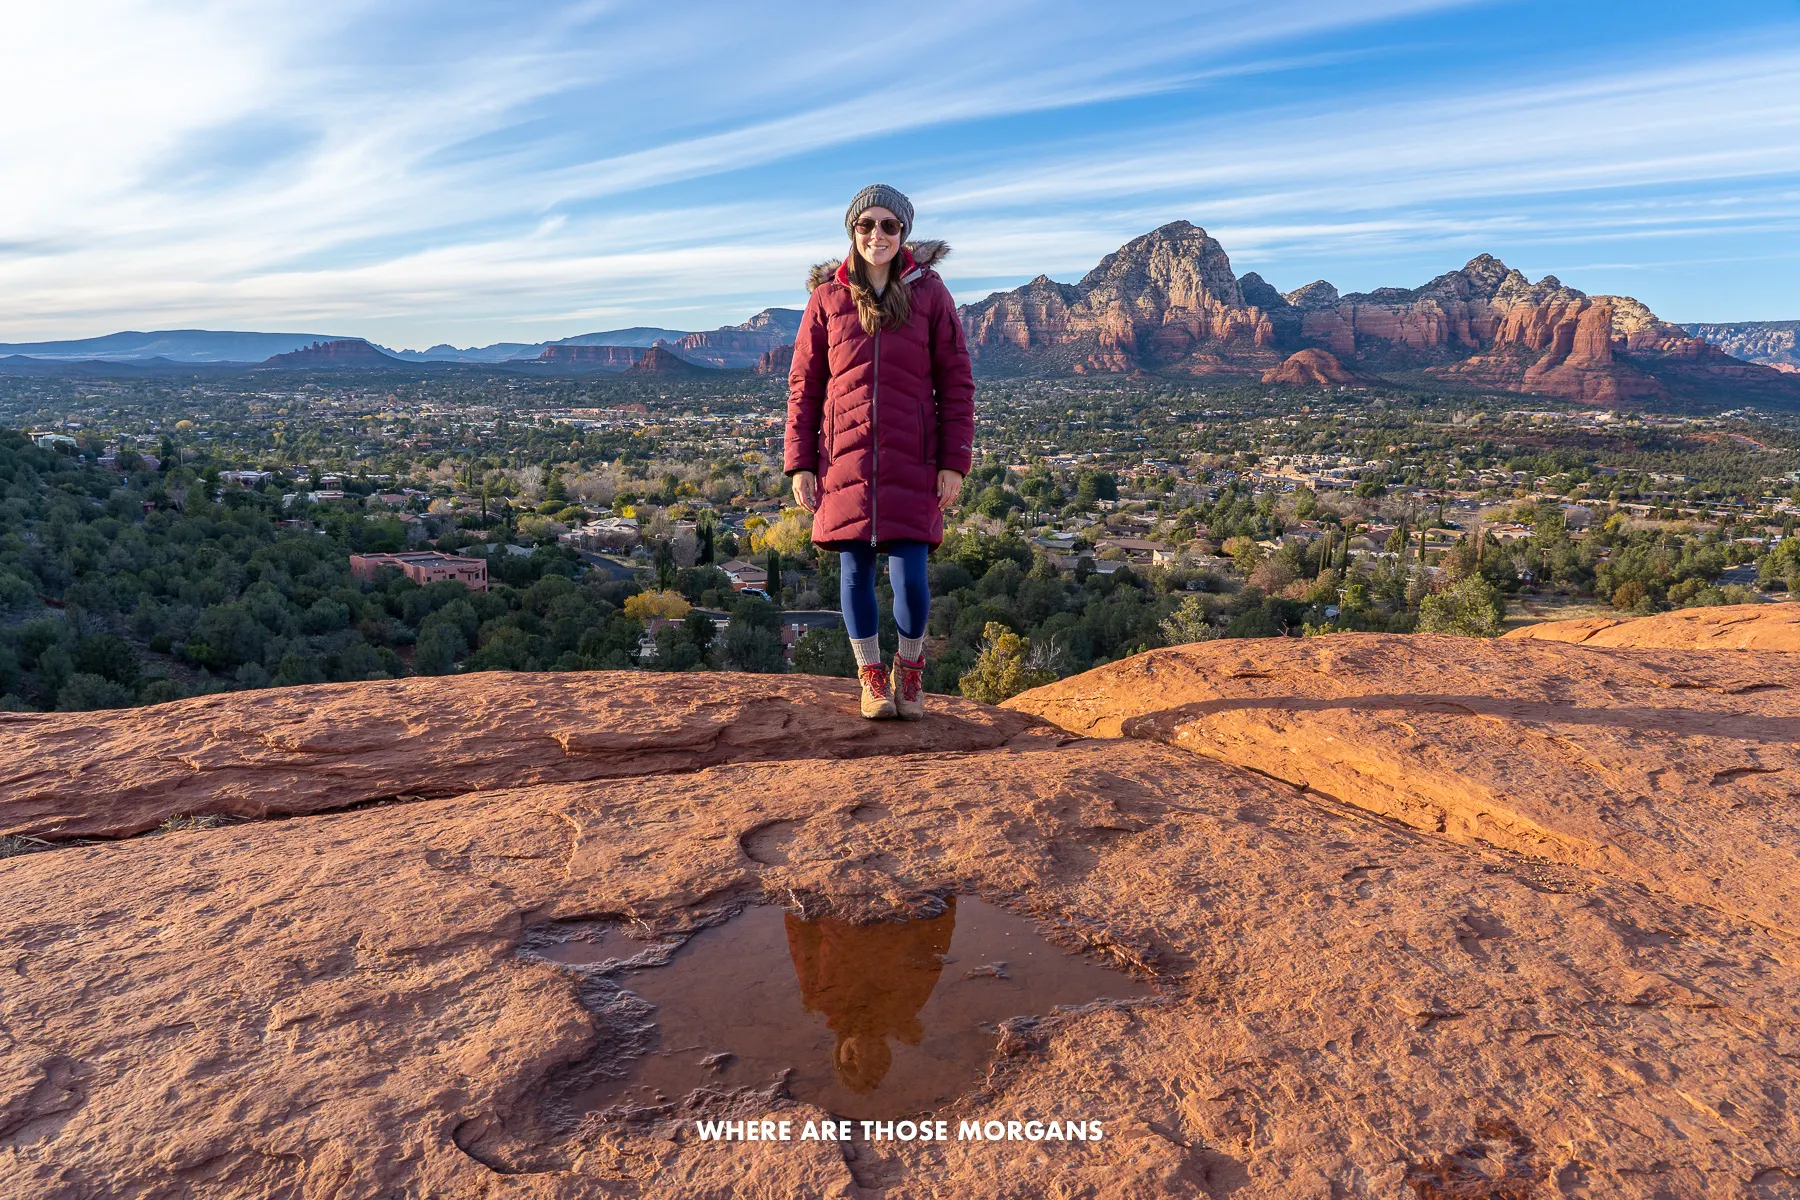 Kristen at Airport Mesa vortex site near dusk
We’d hike the narrow, gradually descending 1.4-mile round trip path down 250 feet to Airport Mesa vortex site and soak up the wide-open views over Bell Rock and south Sedona.
 Mark took this sunset photo overlooking Sedona from Airport Mesa
Well before the actual sunset time, we’d hike back up the trail to the parking lot, walk across the road and set up our tripod on a gravel area with views overlooking town, ready to enjoy the sunset spectacle. We got lucky with bright colors glowing in the clouds, and we hope you do too!
Dinner In West Sedona (7:00 PM)
After all the hiking and calorie burning we’d happily treat ourselves to a big old Neapolitan pizza and a few beers. We ate at Pisa Lisa during our trip and it was great, but Gerardo’s Pizzeria also looks fantastic and it has better reviews so we’d try that next time.
How to slow it down: If the pre-sunrise start doesn’t sound like fun or you just don’t want to take on four hikes in a day, skip Fay Canyon. It’s a fun hike, but the other three are better. Alternatively, if you’re not a strong hiker, skip Boynton Canyon and the Subway Cave but keep the other three because they’re easier.
Day 2 Morning
Cathedral Rock (5:00 AM – 7:00 AM)
We tried to hike Cathedral Rock Trail for sunset but the line of cars waiting for parking was at least 10 deep and it was 1-in-1-out, so we gave up and went back the following morning to hike it for sunrise. And that turned out to be one of the best mistakes we made on the trip because the hike was incredible at dawn.
We weren’t the only people going up, but we were two of just five people so we almost had it to ourselves. The short but steep climb was actually more difficult than we expected because a lot of the lower section was on slick rock and one or two small parts even required use of our hands to climb, but it didn’t take long for us to summit and we beat the sunrise.
 Mark enjoying sunrise views from Cathedral Rock summit
At the top we skirted along the back side and found a second hidden summit that was a bit of a sketchy climb but led to superb views overlooking the sun bursting out from behind Courthouse Butte. And we were alone at this hidden area, which was so cool. It’s 1.2 miles round trip with 700 feet elevation gain – which means it’s steep. Our top tip is to wear robust shoes with good traction for this one.
Bell Rock & Courthouse Butte (7:30 AM – 10:00 AM)
After Cathedral Rock, we’d move straight onto the other skyline dominating red rock formations on the south side of Sedona – Bell Rock and Courthouse Butte Trail. Avoiding the temptation to just run directly up the face of Bell Rock, we’d start by walking the flat and relaxing 4.5-mile loop trail with a very gradual 400 feet elevation change around both formations.
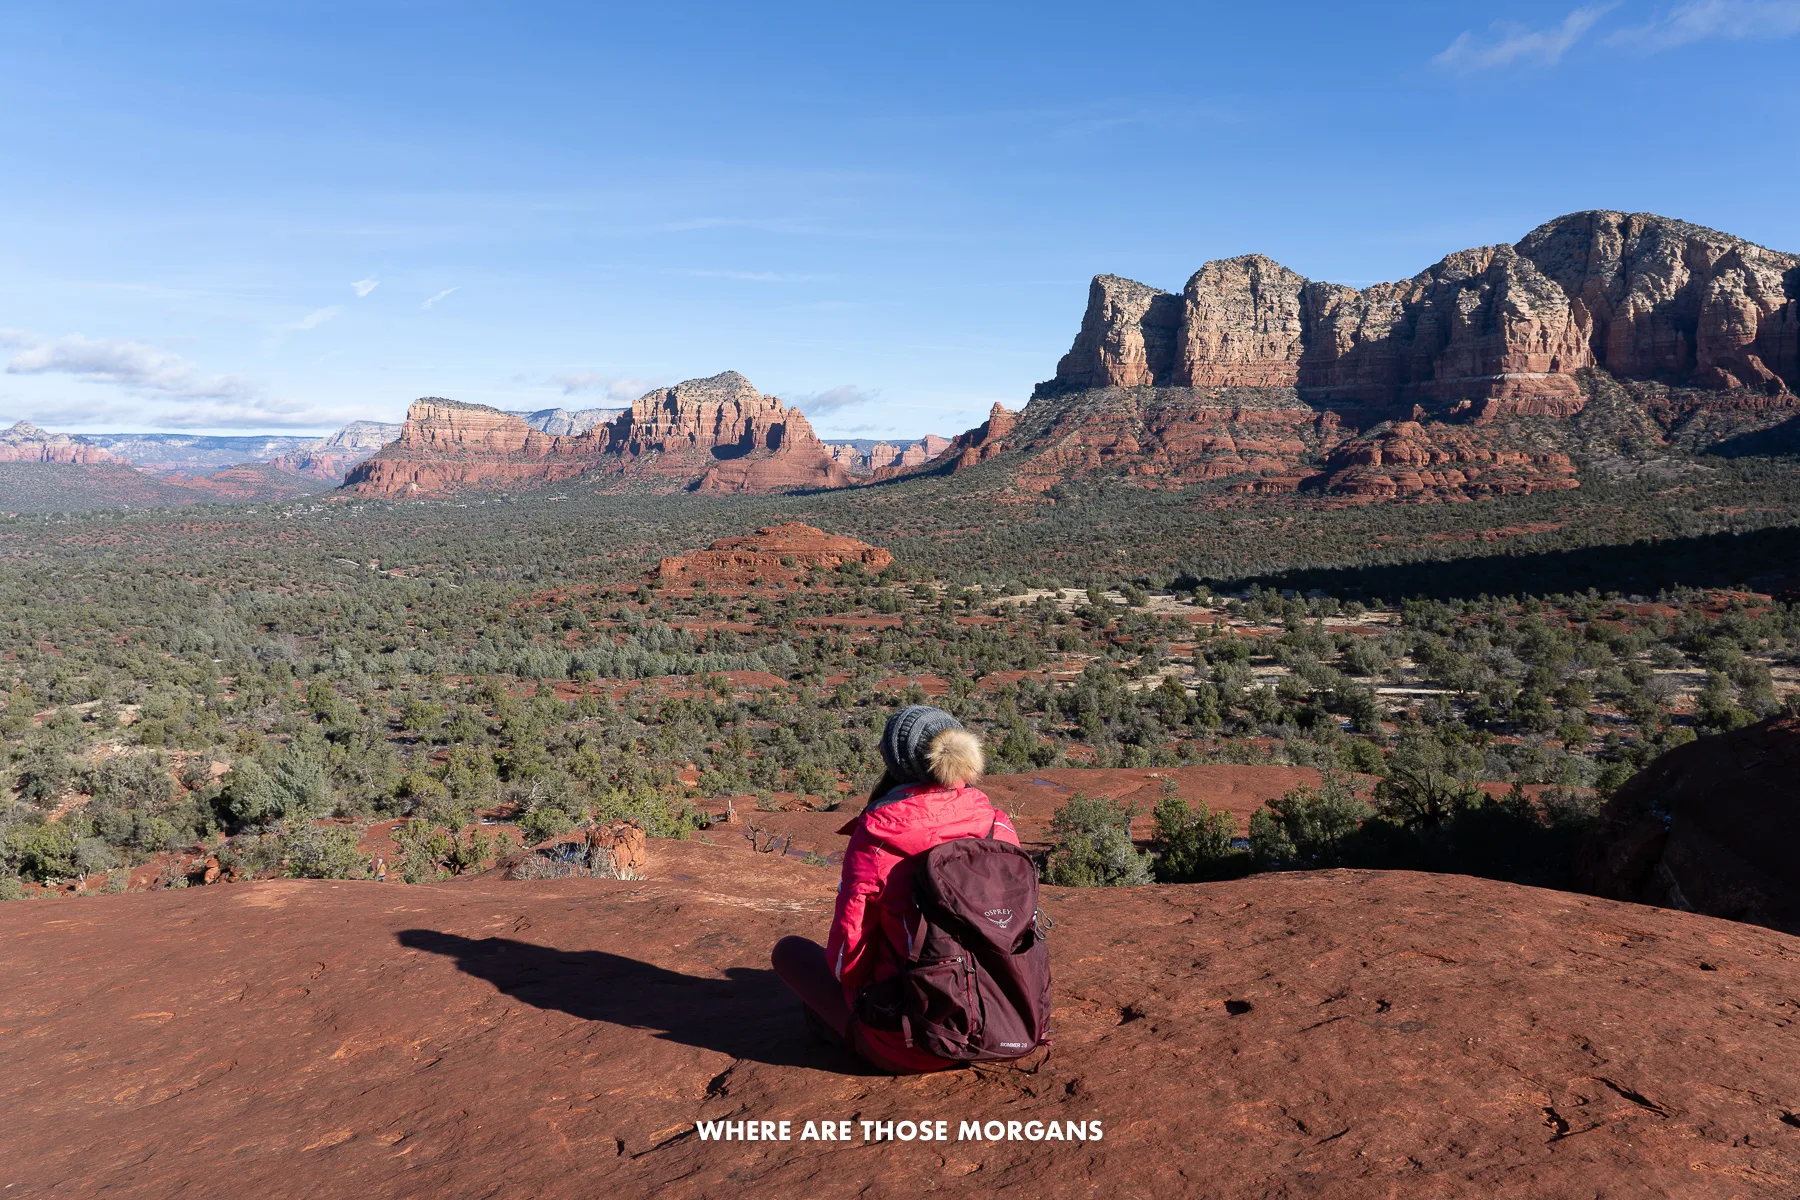 Kristen soaking up the views from half way up Bell Rock
Once the loop was complete, we’d start climbing up Bell Rock. During our visit in December, the north face of Bell Rock was icy and slippery in the morning, so we couldn’t make it far up. But we did find a hidden loop trail around half way up that circled around Bell Rock – it was unmaintained and there were long drops on certain sections, so we wouldn’t do it with younger kids.
Brunch In Village Of Oak Creek (10:30 AM – 12:00 PM)
We actually never made it down to the Village of Oak Creek during our trip because of the way we planned things, but next time we’d definitely follow this more efficient itinerary so we could stop in for brunch or an early lunch.
We’d be more than happy to eat at Flew the Coop for chicken, Miley’s Cafe for brunch, Tortas de Fuego for Mexican, Dellepiane for Argentinian burgers and empanadas, or Red Rock Cafe for another highly rated brunch option.
Day 2 Afternoon
Crane Petroglyph Heritage Site (12:30 PM – 1:30 PM)
Formerly known as V Bar V, the Crane Petroglyph Heritage Site is home to one of the best preserved and largest petroglyph sites in the Verde Valley. It has over 1,000 carvings dating back to the Sinagua people who lived between 600 and 1450 AD.
We planned to visit V Bar V on a Tuesday during our trip in 2021, but made the mistake of not checking opening hours. It’s only open Friday – Monday from 9:30 AM – 3:00 PM, and between June – September it’s only open 8:00 AM – 12:00 PM.
Montezuma Castle National Monument & Well (1:45 PM – 4:00 PM)
Next, we’d head 6 miles southwest to visit Montezuma Well. This is the smaller of the two sites belonging to Montezuma Castle National Monument, but you can begin here without having to pay any entry fees. During our visit we thought we had to buy the entrance pass at the main monument before heading to the Well, but we could have gone to the Well first and saved time.
At Montezuma Well we saw a huge limestone sinkhole with ancient cliff dwellings built into the rim and lower slopes, which was surprisingly interesting. Then we drove to the main Castle to see an impressive five-story cliff dwelling built into a tall limestone cliff, which was even more interesting.
 This was the ancient ruin built into a cliff at Montezuma Castle
It costs $10/adult to enter Montezuma Castle (free for under 16’s), but make sure to keep your tickets because they’re also good for Tuzigoot National Monument on day 4 of this itinerary. You can also use your Interagency Pass (America the Beautiful Pass) for entry.
Wineries & Dinner In Page Springs (4:30 PM)
On the way back to Sedona we’d stop in Page Springs to sample a winery and eat dinner. You can try Page Springs Cellars, Oak Creek Vineyards, Javelina Leap Vineyard, or the winery we tried called DA Ranch. We loved the wine tasting and the warm relaxing vibe (it was winter so we stayed indoors with the friendly golden retriever).
 Kristen at our table in Up the Creek Bistro in Page Springs
After draining a few white and red samplers, we grabbed dinner at the excellent Up the Creek Bistro with lovely views through big glass windows over the creek below.
How to slow it down: The easiest way to slow this day down is to skip the longer hike around Courthouse Butte – just do the short hikes up Cathedral Rock and Bell Rock to save at least one hour.
Day 3 Morning
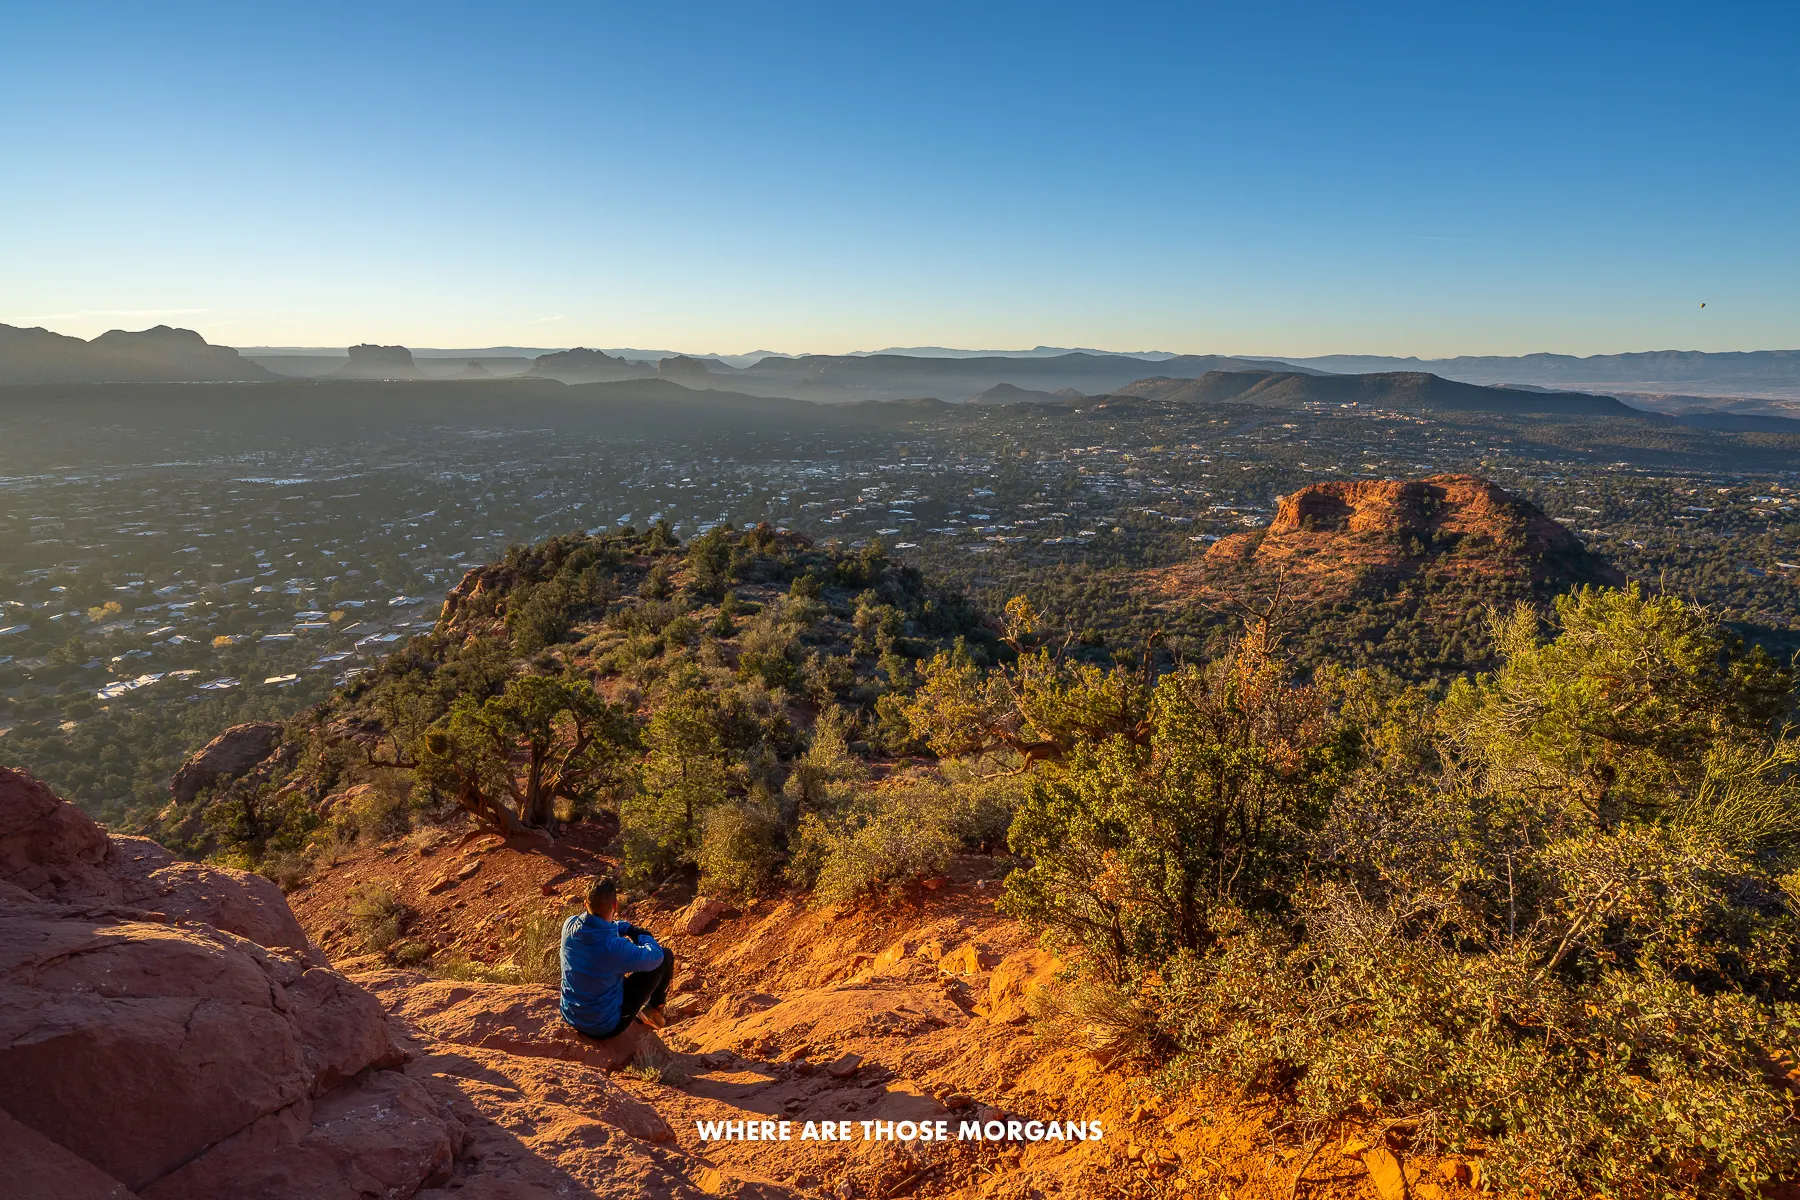
Chimney Rock & Little Sugarloaf (5:00 AM – 7:00 AM)
We hiked Chimney Rock and Little Sugarloaf Trail on our 8th and final morning before leaving. It was cold and we were exhausted, so we very nearly skipped it – but we’re so glad we didn’t. This 2.1-mile round trip hike with 650 feet elevation gain turned out to be our favorite hidden gem sunrise hike in Sedona.
 Mark enjoying the sunrise views from Chimney Rock summit
We hoofed it up to Chimney Rock because it was the higher summit and made it just in time to watch a magical sunrise erupt over Sedona. Then we walked down to the lower, but flatter and more open Little Sugarloaf summit and realized it probably would have been even better. This trail was so close to town and we didn’t see a single other hiker at either summit, so it would be one of our must-do’s next time.
 Mark enjoying views from the summit of Little Sugarloaf right after sunrise
The climb up to Chimney Rock was pretty sketchy with no real trail to follow, but Little Sugarloaf was much easier with a clear path. If you’re shorter on time or don’t fancy a light scramble, stick to Little Sugarloaf – the views were more expansive too (here are our favorite sunrise and sunset photo spots in Sedona to learn more).
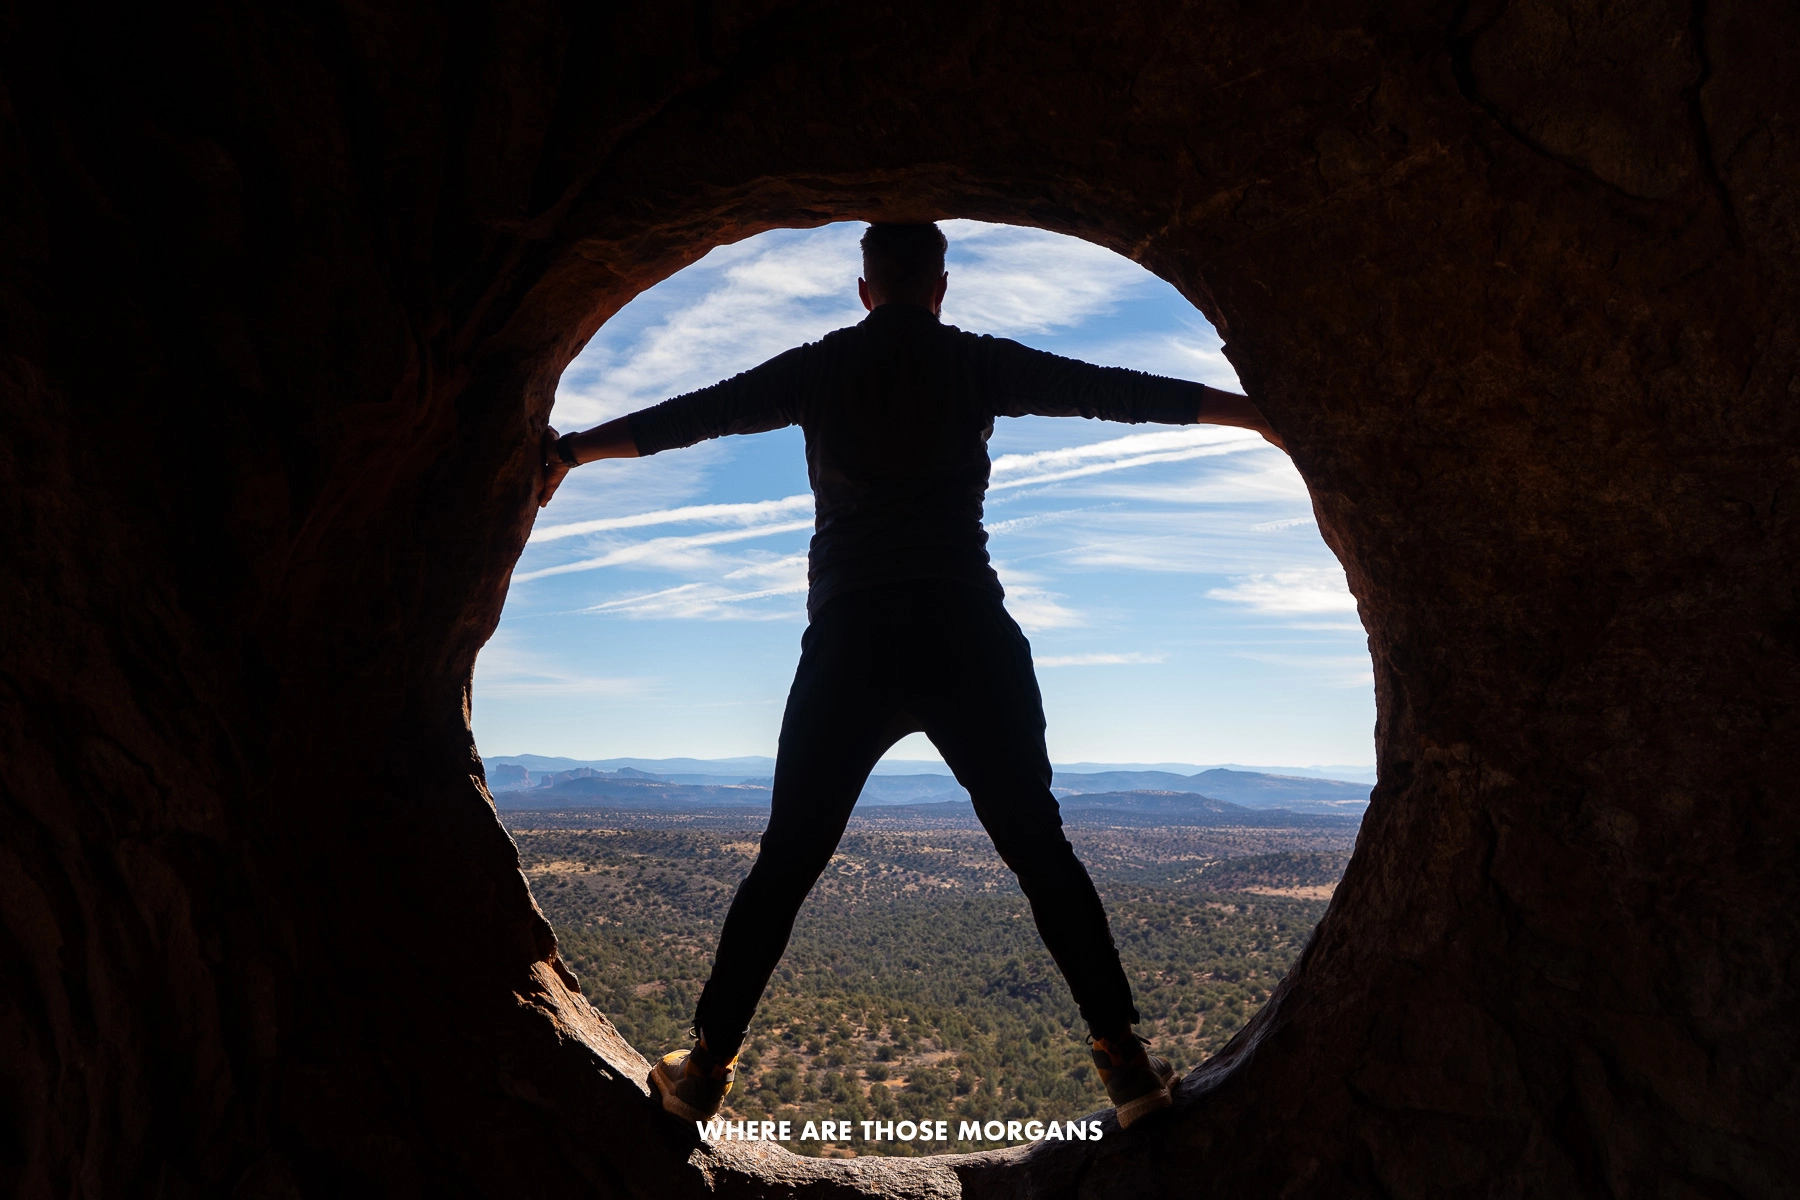
Keyhole Cave (7:30 AM – 10:00 AM)
Next, we’d drive 1.2 miles from Thunder Mountain Trailhead to Teacup Trailhead, park up and take Teacup Trail until it splits. Instead of following the path in either direction, we’d continue walking straight ahead into the rough vegetation aiming for red rock cliffs in distance which contain the massive Keyhole Cave.
Let us warn you now, there is no trail – it’s totally unmaintained and wild. The vegetation is rough and there’s plenty of ways to get injured, so only take this one on if you’re a strong hiker and you have solid navigation skills. Also just as important, you must respect the land here.
 Mark looking down at the entrance climb into the massive Keyhole Cave
Instead of following the slower twisting dry creek bed, we took a more direct route towards the cliffs. We had to track back a few times but it didn’t take too long to reach the cave. The climb into the cave was tough, but luckily another hiker had left a rope we could use for support. And once inside? The cave blew us away, it was well worth the adventure!
Amitabha Stupa & Peace Park (10:30 AM – 11:30 AM)
Back in the car, we’d drive a few minutes west to visit Amitabha Stupa and Peace Park for some gentle reflection and relaxation.
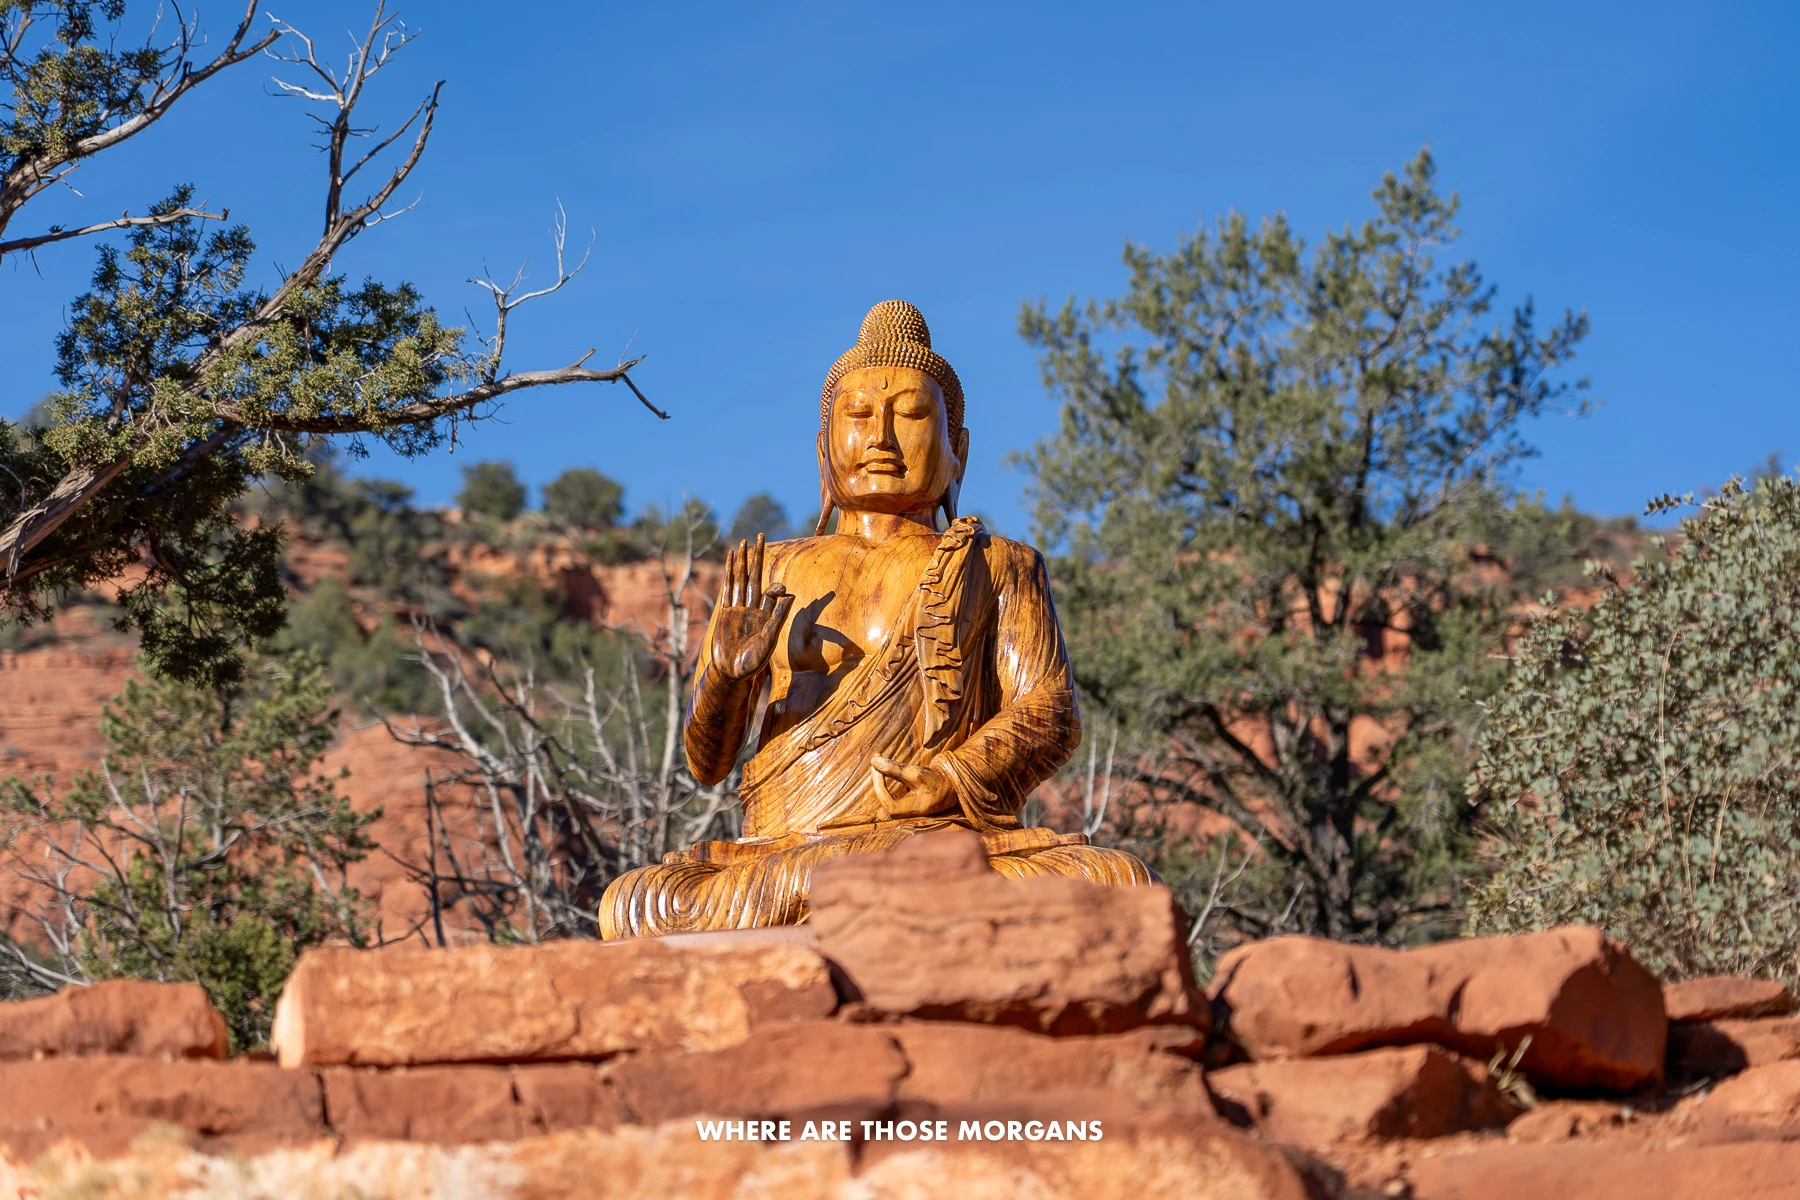 Mark took this photo of Buddha inside the peace park
It’s free to enter and doesn’t take long – we just walked around the Stupa, the statue of Buddha and the medicine wheel – but it’s well worth a quick side trip, even if you’re not religious.
Day 3 Afternoon
Lunch In Uptown (12:00 PM – 1:00 PM)
There’s a better selection of quality eateries with high ratings in Uptown Sedona, and our itinerary brings us back to Uptown for dinner a few more times so pick around 4 or 5 options and stagger them between lunches and dinners.
 This was Mark’s pulled pork burger and sweet potato fries at Outlaw Grille
The very first place we ate after arriving into Sedona was Outlaw Grille, a super low-key hamburger joint with tiny tables in a Western themed back room. It was fantastic and we’d definitely go again next time, so it fits here perfectly.
Sedona Heritage Museum (1:30 PM – 2:30 PM)
After our foodie pit-stop, we’d drive up to the northern reaches of Uptown to visit the Sedona Heritage Museum. It costs $10 for adults (free under 13’s) and it’s open 11:00 AM – 3:00 PM daily.
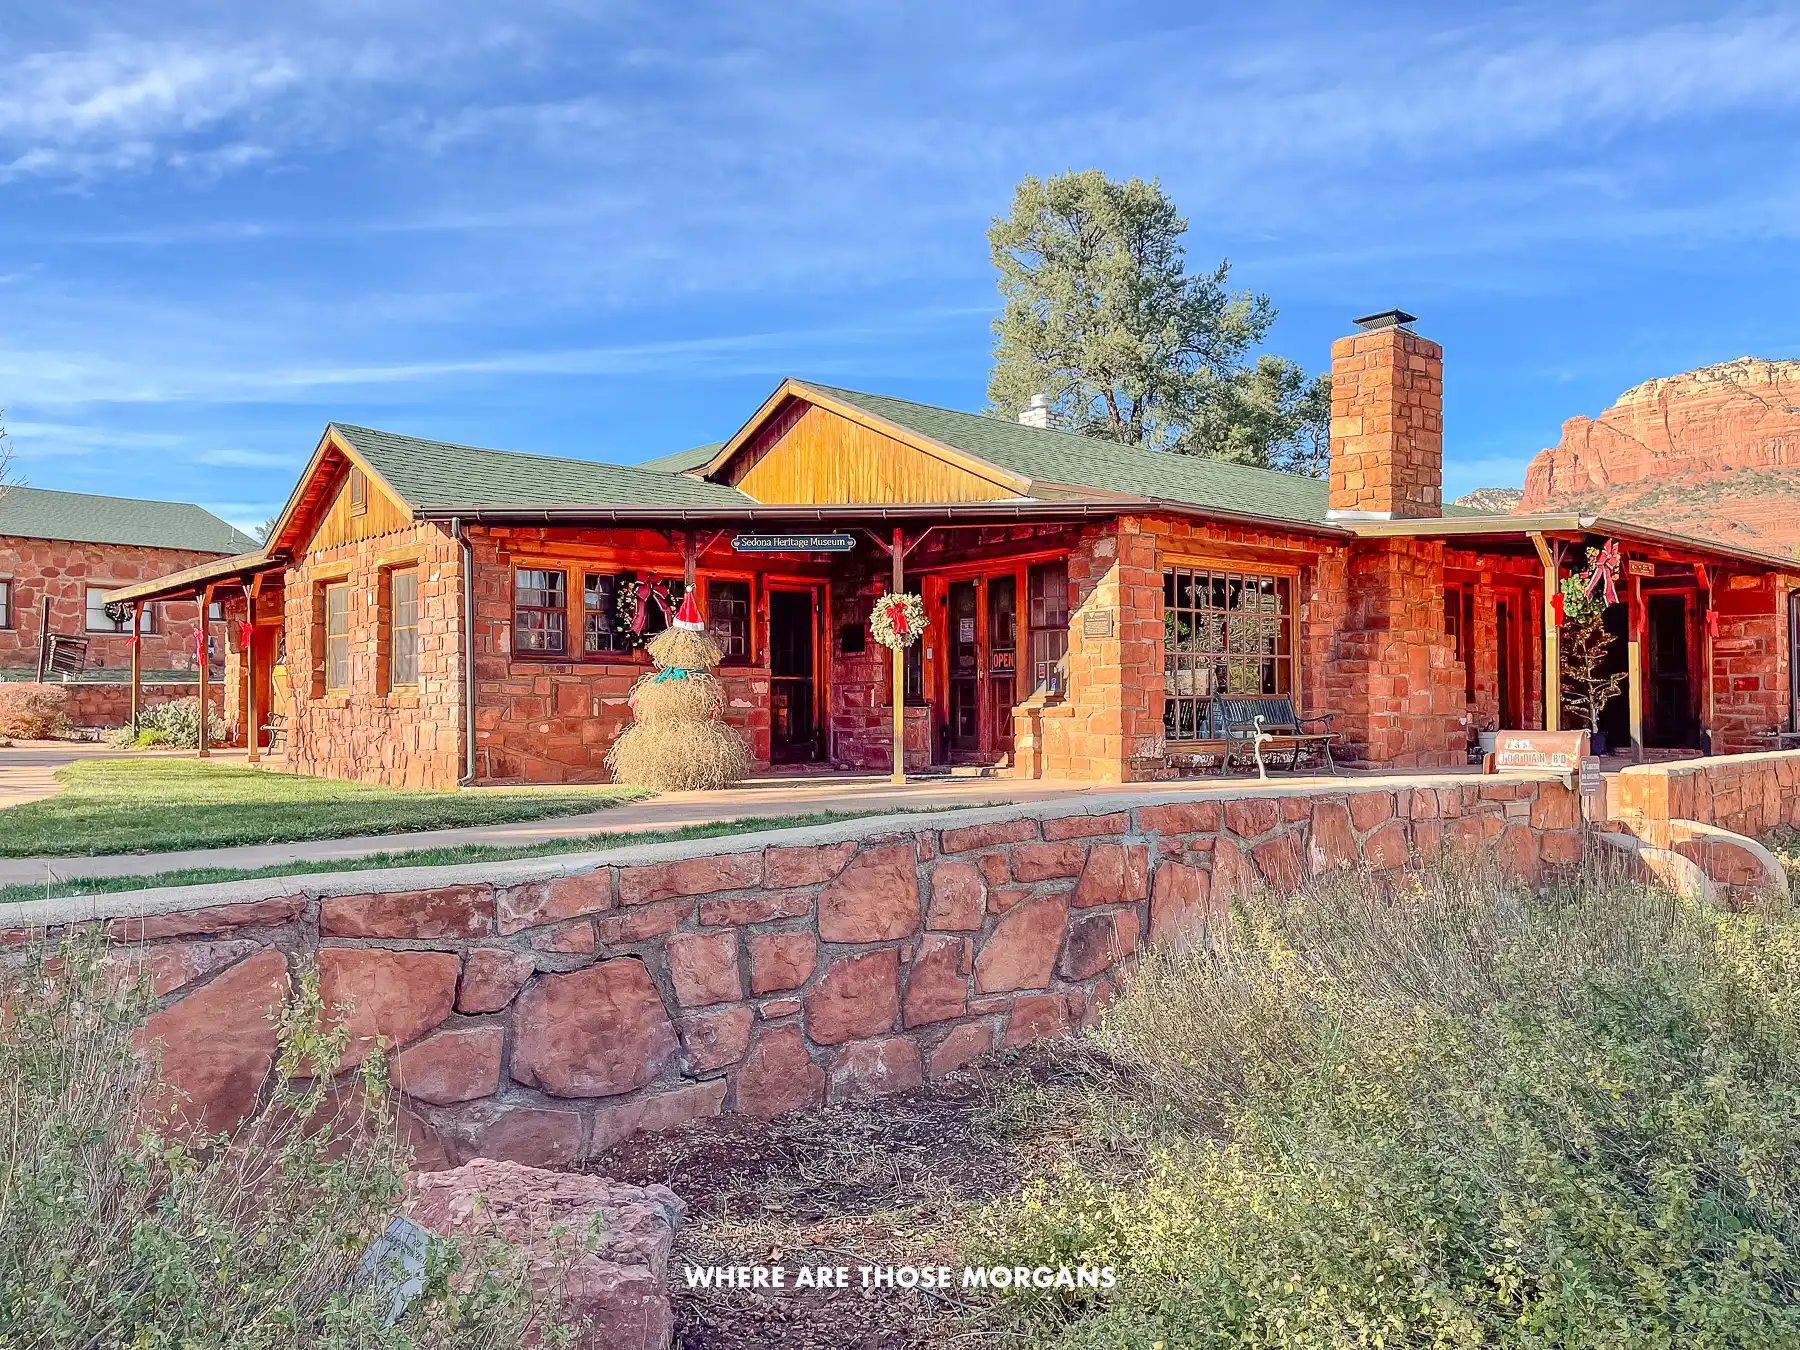 We took this photo during our visit to Sedona Heritage Museum
Inside we learned about Sedona’s unique history, from cowboys and settlers to being a movie location and changing exhibits. It was a nice, easy and calm break from all the outdoor adventures.
Slide Rock State Park (3:00 PM – 5:00 PM)
After being indoors we’d be keen to get back outside in the nice weather, ready to cool off in the waters of Oak Creek at Slide Rock State Park. It costs $30 May – September or $20 October – April, price is per vehicle with 1-4 adults included.
It was far too cold when we visited Sedona in December – but if our next trip was in spring, summer or fall, you’d definitely find us sliding down the 80-foot long slippery slope along red rocks into Oak Creek. It has a 7% decline from top to bottom and is just a few feet wide, creating a natural slide. Sounds fun, right?
Winery 1912 (5:30 PM – 6:30 PM)
Once we’d had enough sliding, swimming and cooling off, we’d get changed and head back into Uptown for another wine tasting at Winery 1912. It’s not on the Verde Valley Wine Trail, but it’s conveniently located for this itinerary.
 It was dark by the time we left Winery 1912 in this plaza
We almost went all in on the cheeses and hummus plates, but we held back because we wanted to try more places for dinner in Uptown. Next time, we’d allow ourselves to indulge on the small bites at 1912.
Dinner In Uptown (7:00 PM)
We tend to use reviews as a guide when picking places to eat, and on the south side of Uptown we saw a place called The Hudson with thousands of positive reviews.
So we gave it a try and it turned out to be excellent. Kristen got a massive burger and Mark got a chicken pot pie, both were great. The food was a bit pricey, but it’s the same at most quality sit-down restaurants in Uptown Sedona.
How to slow it down: The obvious way to slow this day down is to skip Keyhole Cave. Honestly, it’s more for thrill-seekers and it does eat up a good 2.5-3 hours. Or if you really want to hike Keyhole Cave, cut the Sedona Heritage Museum instead to save time.
Need help planning your trip to Sedona?
Our Sedona travel guidebook gives you hidden gem hiking trails, secret caves, vortex sites, ancient ruins, wineries, jeep trails, photo spots, where to eat and stay, 1-5 day itinerary ideas and much more. Plus, you’ll get an exclusive map to use in Sedona!
View Guidebook 
Day 4 Morning
Tuzigoot National Monument (9:00 AM – 10:00 AM)
After three days of sunrise hikes we’d welcome a sleep in on day 4. We’d grab a decent breakfast and drive over to Tuzigoot National Monument to arrive right as it opens at 9:00 AM, before walking around the 100-room hilltop pueblo built by the Sinagua people over 1,000 years ago.
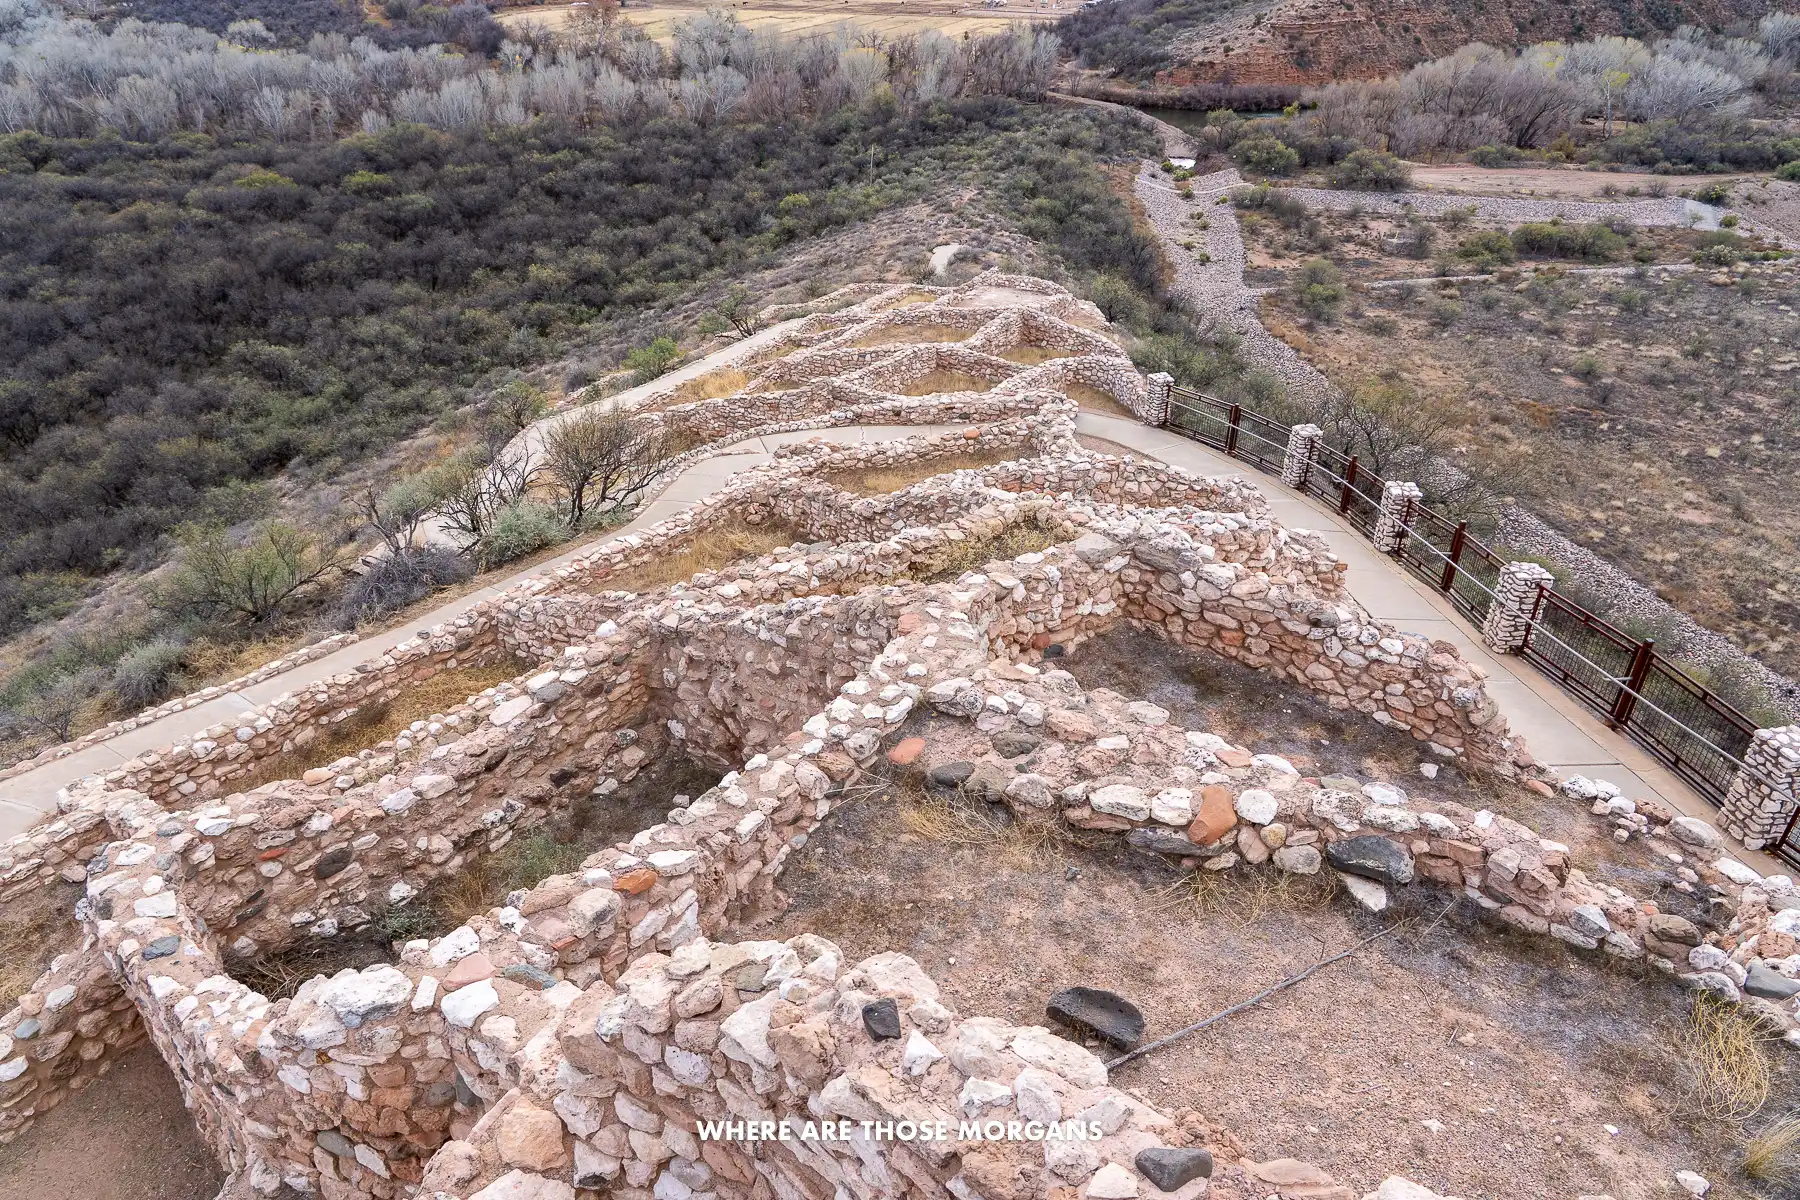 These were the remains of an ancient pueblo at Tuzigoot
It costs $10 adult (under 16’s free), but we’d use the entrance ticket we already picked up at Montezuma Castle. We didn’t actually pay the $10 for our tickets to both places because we used our America the Beautiful Annual Pass. Tuzigoot is a small site and it only took us 45 minutes to get around the whole site, but it was well worth seeing.
Jerome (10:15 AM – 12:15 PM)
Next, we’d drive a little further west to the tiny old mining town of Jerome. We’d consider booking onto the 11:00 AM Jerome ghost tours time slot, which takes one hour and looks like fun – but it would eat into the middle portion of time allotted for Jerome.
Alternatively, we’d consider grabbing brunch at The Clinkscale or an early burger at Haunted Hamburger, both look excellent. Afterwards, we’d stop in for a quick a wine tasting flight at Caduceus Cellars before heading over to Clarkdale for the train ride.
Day 4 Afternoon
Verde Canyon Railroad (1:00 PM – 5:00 PM)
The big event today is riding the Verde Canyon Railroad through wild and stunning Arizona countryside. The 40-mile round trip train ride from Clarkdale to Perkinsville lasts 4 hours, and it really gets you out there into rugged and remote red rocks as it follows the Verde River.
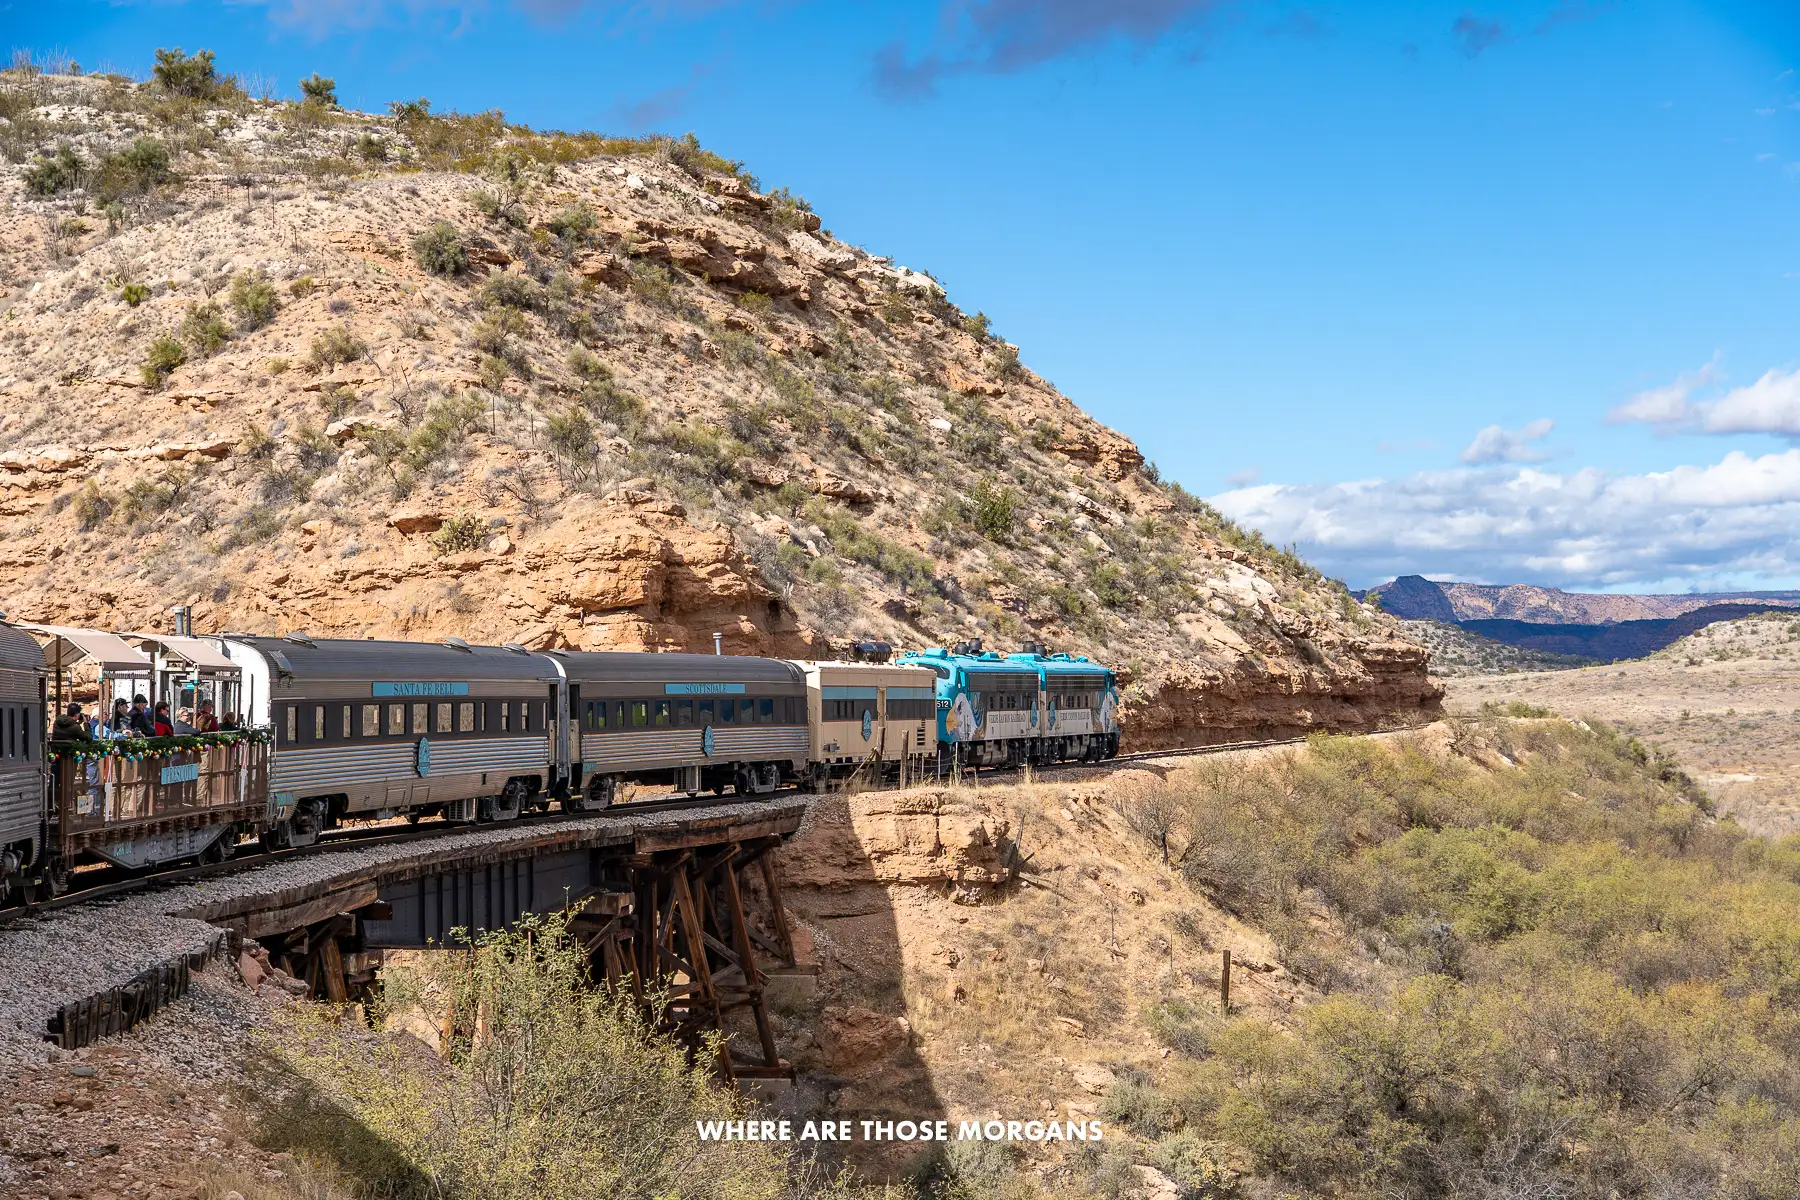 This was our train ride on the Verde Canyon Railroad
We paid $195 for our tickets at the time (they’re $135 each now) – that included narration, guides who told interesting stories and showed us geological formations, complimentary charcuterie trays which were great, and welcome champagne. It was a chilled, easy-going and picturesque way to spend an afternoon. And while we wouldn’t do it again, we would recommend it for a first time visit to the area.
Wineries & Dinner In Cottonwood (5:30 PM)
After the train ride we’d be more than ready for dinner, and just 5 miles drive on the way back to Sedona is the small town of Cottonwood. We’d sample another wine flight at Arizona Stronghold, before heading for dinner on the north side of town at either Pizzeria Bocce (which looks fantastic) or Nic’s Italian steak and crab house.
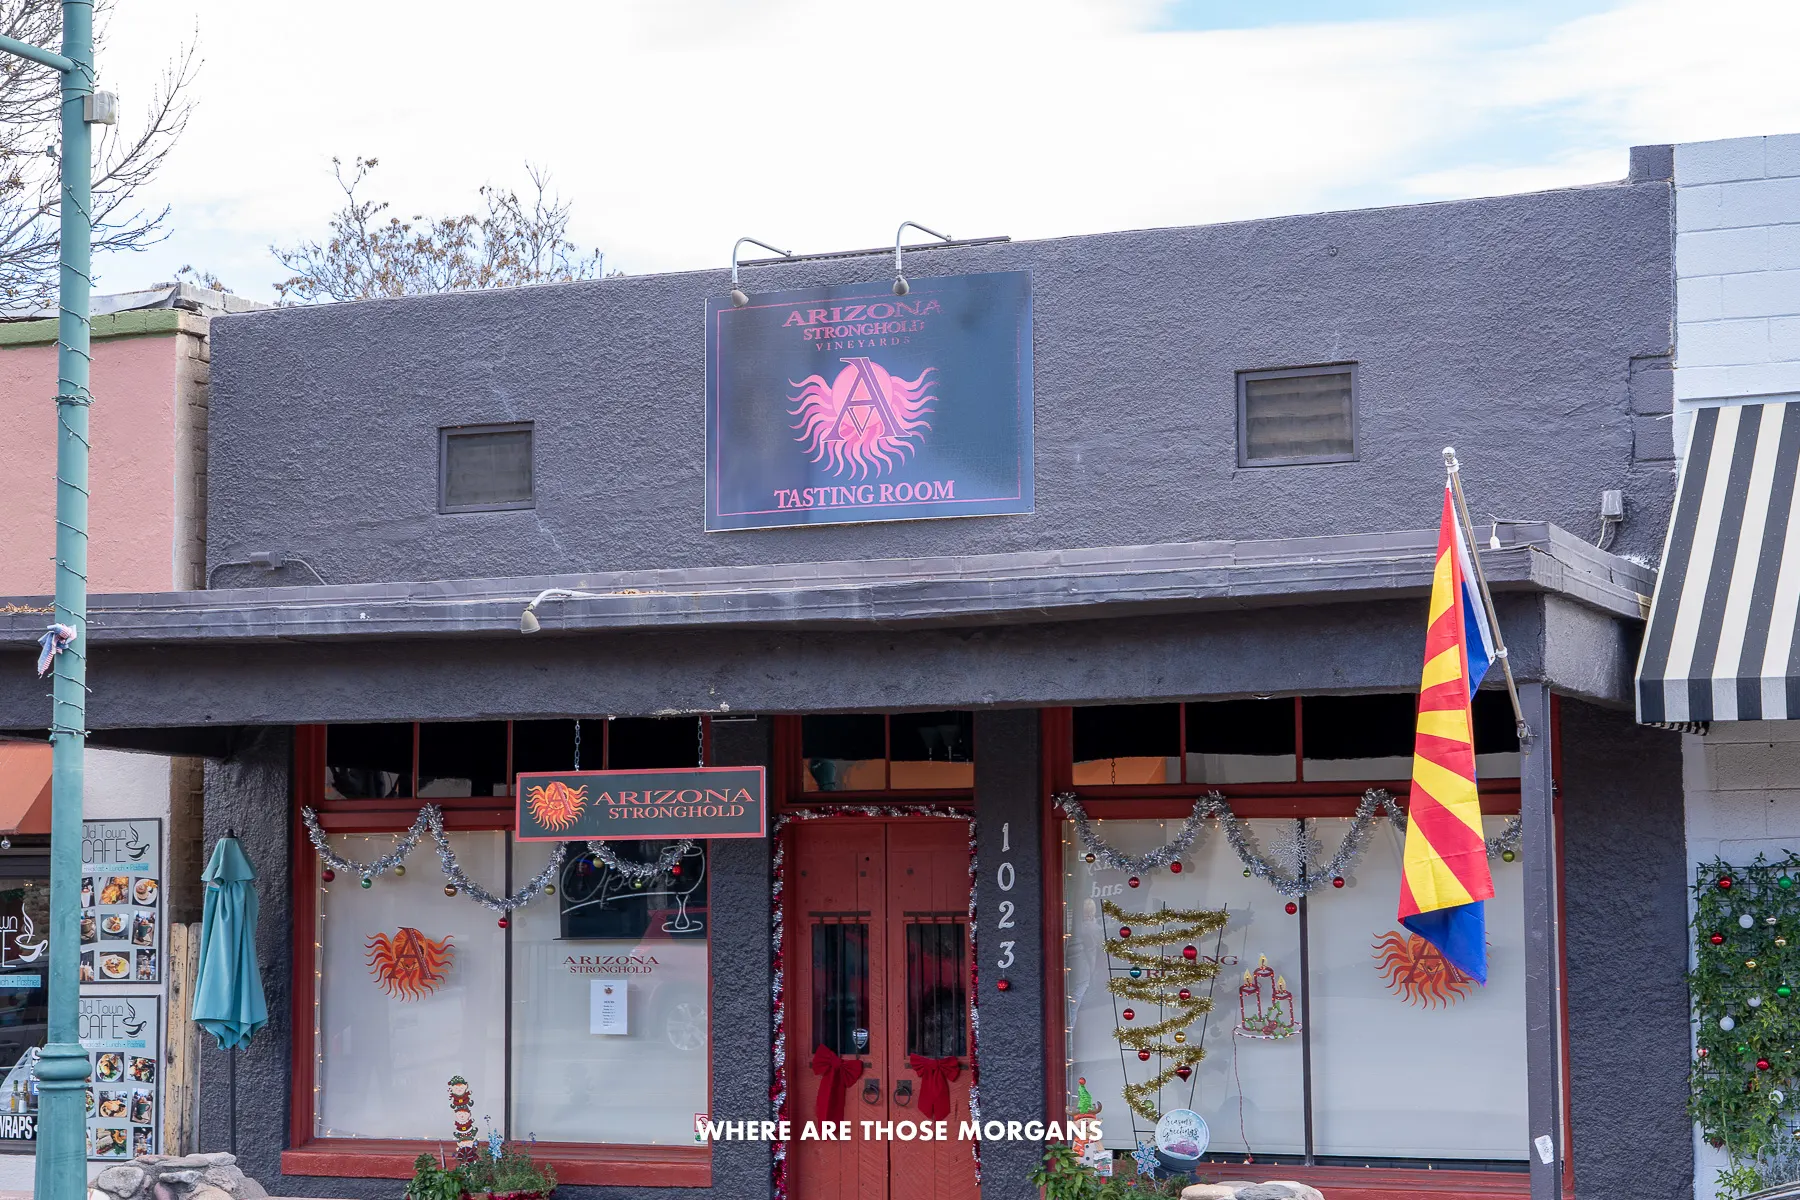 We made a quick pit stop for a few sips of wine at Arizona Stronghold in Cottonwood
How to slow it down: Cutting Tuzigoot or not visiting Jerome are the only ways to slow this day down. The Verde Canyon Railroad only runs from 1:00 PM – 5:00 PM each day so there’s no flexibility.
Day 5 Morning
Rent A Jeep (8:30 AM – 9:30 AM)
We hired a jeep for 3 days during our trip to Sedona in December 2021. It cost us something outrageous like $750 – which we know sounds like an obscene amount of money – but honestly it more than paid for itself in terms of experiences. Just to be clear – we are not affiliated in any way with jeep companies in Sedona, so it’s of no benefit to us to recommend them. We just know how awesome it was.
We’d 100% rent a jeep next time, but with one major difference – we would only hire for 2 days (instead of 3). After driving every jeep trail in Sedona, and maximizing the usefulness of having a 4WD high clearance vehicle to access certain trailheads and secluded photo spots, we’ve figured out how to make it all work in 48 hours.
 “Amy” was the jeep we rented from Barlow for 3 days
We hired from Barlow Jeeps and we would again next time, so we’d turn up at 8:30 AM to walk through the leasing agreement, get set up with the jeep and talk through route options with the staff. We’d pack a lunch, snacks, water and anything else into the provided cooler, hop in the beast and hit the road.
Palatki Heritage Site (10:00 AM – 11:00 AM)
The first stop we’d make in the jeep is Palatki Heritage Site right as it opens for the day at 10:00 AM. This is one of the parking areas around Sedona that requires either a Red Rock Pass ($5 for 1 day or $15 for 7 days) or an Interagency Pass ($80 for one year, this is what we used in Sedona).
We’d already have our pre-booked compulsory 60-minute guided tour entry tickets (free but $1 booking fee). Guided tours run every 30 minutes Thursday – Tuesday, but Wednesdays only have 10:00 AM and 11:00 AM time slots available. You won’t be able to visit the site without a time slot, so make sure you book in advance.
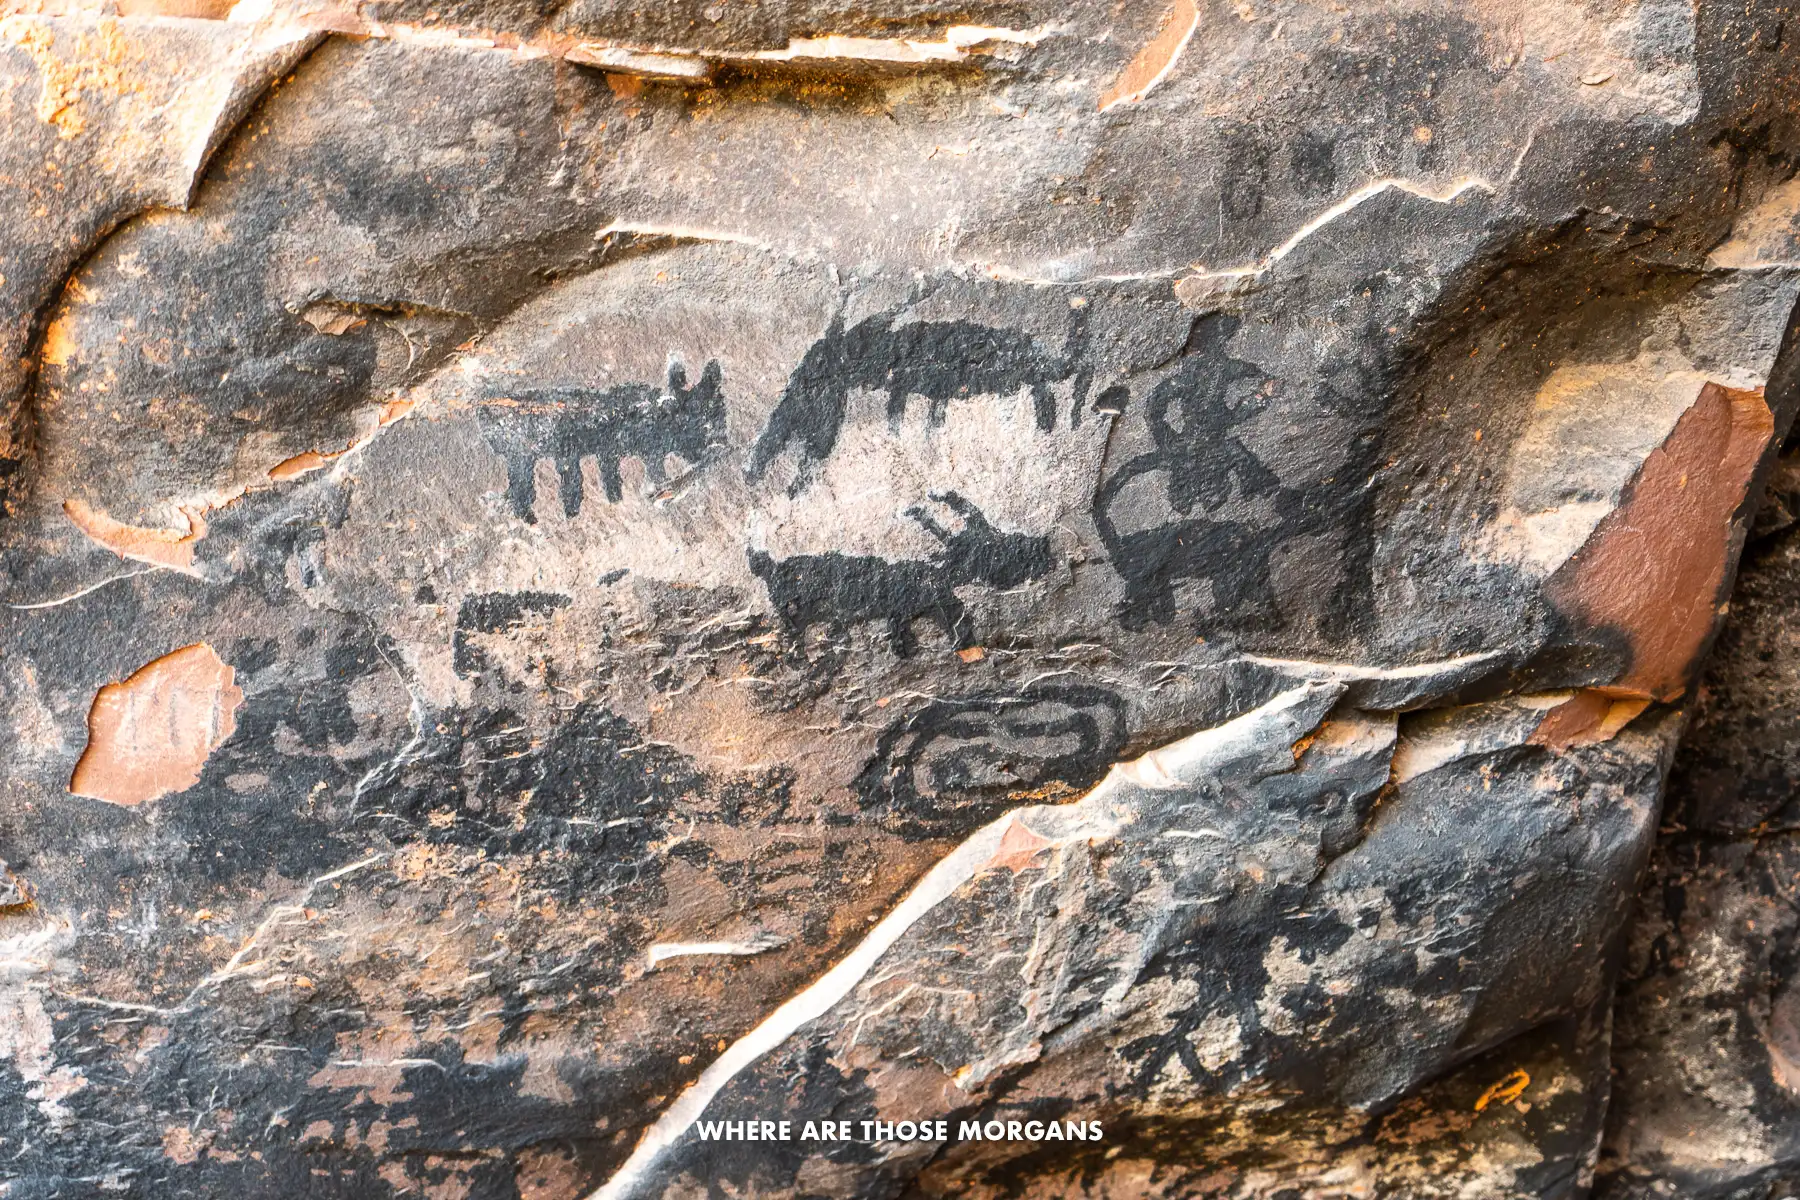 These were some of the most prominent petroglyphs we saw at Palatki
We found the guided tour to be interesting and engaging, and the guide was great. We toured a grotto and dwelling – both were covered in rock art left by the Sinagua people between 1150-1350 AD. It’s off-the-beaten path for Sedona’s usually jam-packed attractions, so don’t miss it.
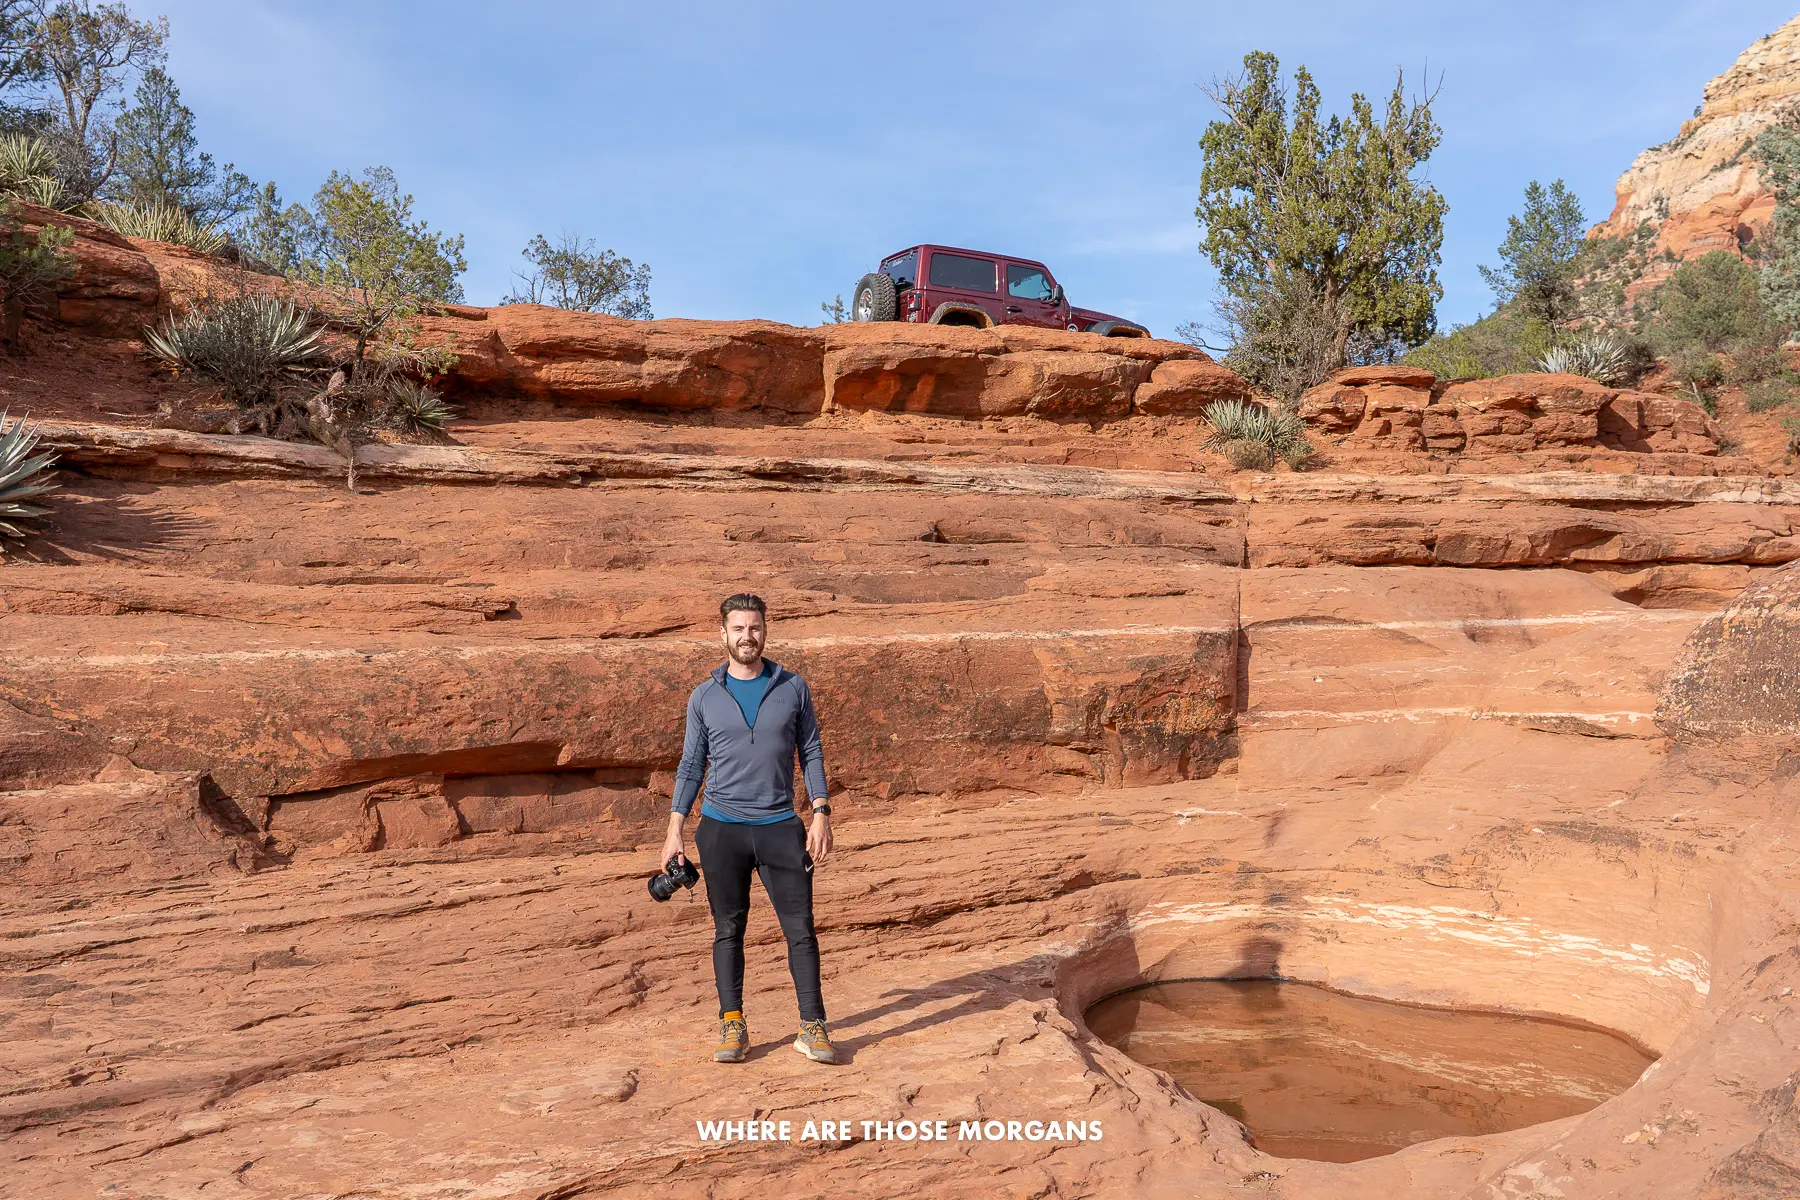
Diamondback Gulch (11:30 AM – 1:00 PM)
Less than 10 minutes drive to the south (where Boynton Pass Road meets FR 152A) we’d get stuck into our first of Sedona’s exciting jeep trails – Diamondback Gulch. As a side note – before or during this trail we’d be tucking into our packed lunch!
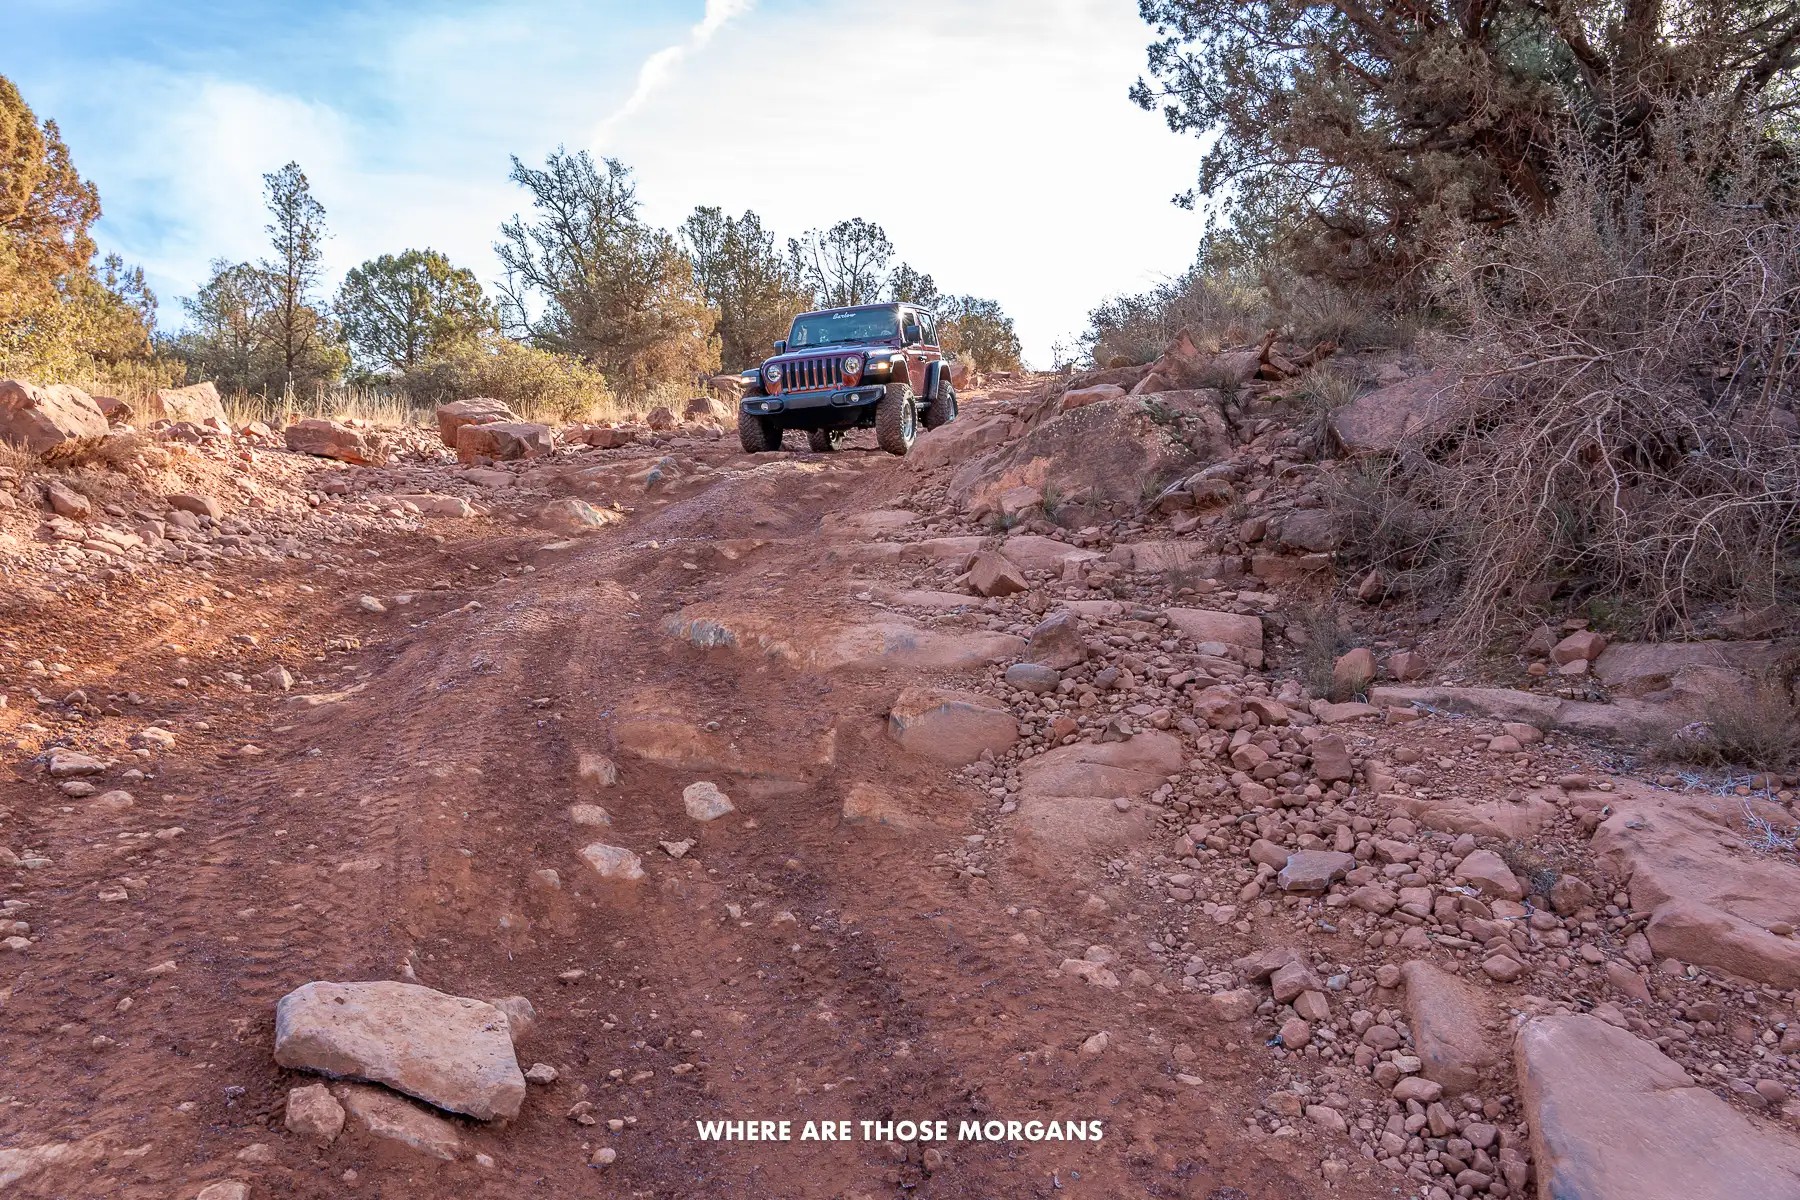 Mark driving our jeep down the steep V-shaped Diamondback Gulch
Mark loved this 6.7-mile route because it had a perfect blend of flat dirt for picking up a bit of speed and steep rocks to really test the jeep, especially the 400-foot deep V-shaped ravine half way around. It sounds scary (and it looks even worse in person), but we honestly had so much fun driving it.
Day 5 Afternoon
Honanki Heritage Site (1:30 PM – 2:00 PM)
After driving Diamondback Gulch in a clockwise direction, we’d turn right on Forest 525 and follow it all the way up to Honanki Heritage Site. Similarly to Palatki, this site features lots more ancient rock art from the same time period by the same people. The difference is that the 200 rooms at Honanki were built directly against the canyon walls and shielded by trees.
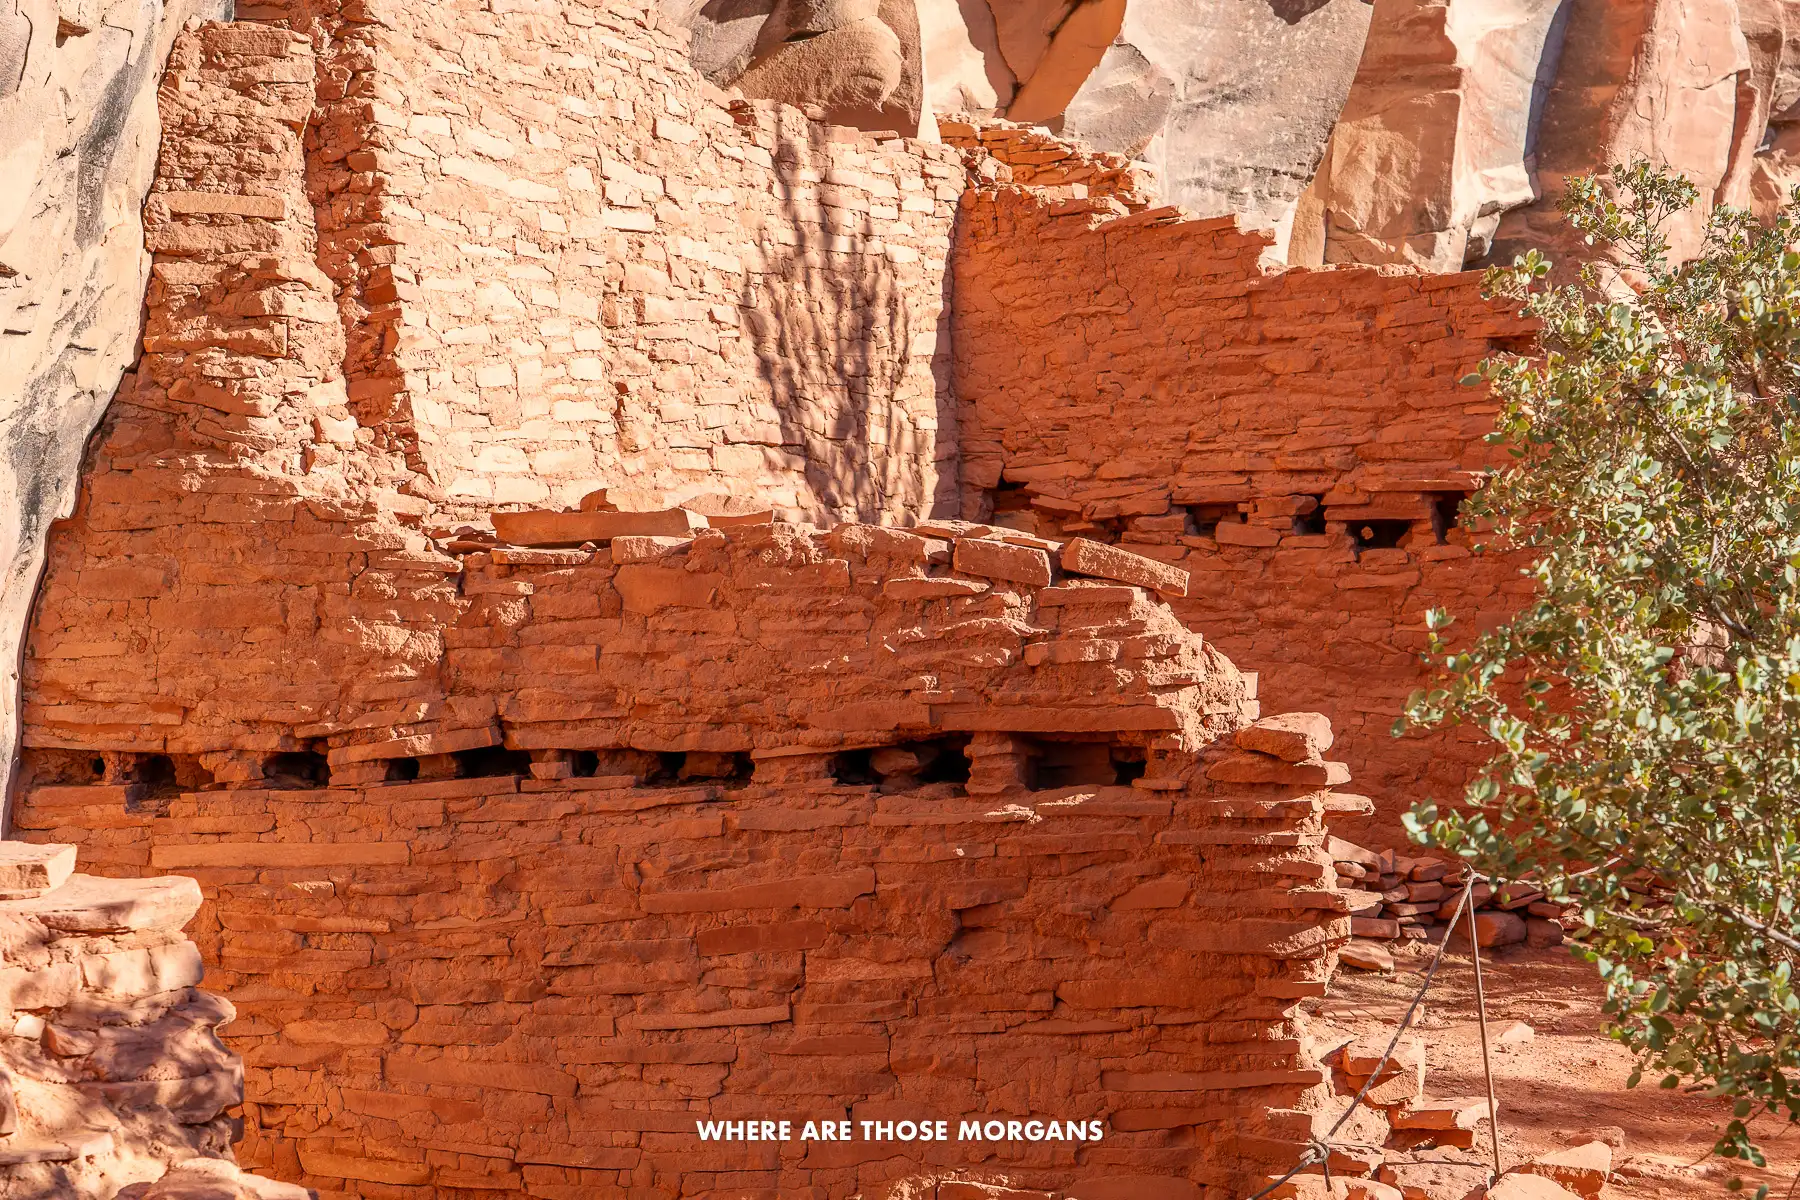 These were some of the most in-tact remains at Honanki
This site doesn’t require advanced reservations or guided tours and it’s free to enter, but it does have the same Red Rock Pass or Interagency Pass requirement for parking. It’s open 7 days a week from 9:30 AM – 3:00 PM. Importantly, Palatki is doable with a 2WD vehicle, but Honanki can only be reached by high clearance 4WD vehicles like the jeep.
Outlaw Trail (2:00 PM – 3:30 PM)
On the opposite side of the forest road to Honanki, we’d get straight onto the next jeep trail called Outlaw. This 6.4-mile route was one of Kristen’s favorites because it passed through wide open countryside with washes and stunning views. It was moderately difficult throughout without ever being too technical.
 Mark driving a rocky portion of Outlaw Trail
The only thing we didn’t like on Outlaw was sharing the trail with tons of ATV’s who would blast by and kick stones back at the jeep. With it being a rental we were concerned about getting a windshield crack and having to pay, so we moved aside every time an ATV hammered past us.
Robbers Roost (4:00 PM – 5:30 PM)
After finishing Outlaw we’d drive down Forest 525 and get on Forest 525 C all the way up to a right fork leading to Robbers Roost Trail and the awesome Hideout Cave. There are cut throughs from three-quarters of the way around Outlaw to Forest 525 C which would save time but we didn’t take them so we don’t know if the shortcuts would work.
The 4WD section of road leading to the hiking trail is short and easy to drive, plus it cuts the Robbers Roost hike to Hideout Cave in half vs having a 2WD vehicle and parking on Forest 525 C.
 Mark enjoying views from the window of Hideout Cave
We’d park at the trailhead, walk down and back up a small ravine, skirt around the back side of a red rock cliff, and shimmy into Hideout Cave (also called Shaman’s Cave) which has one large oval window and one small round window. The cave views were outstanding, and we were completely alone in this remote, seriously off-the-beaten-path part of Sedona.
Pyramid & Scorpion Loop (6:00 PM – 7:30 PM)
Back in the jeep we’d quickly get down Forest 525 C and Forest 525, turn left on 89A and take the second right onto the east side of Red Rock Loop Road (importantly skipping the first right which would be the west side of Red Rock Loop Road).
If we were doing well for time and daylight hours, we’d drive down to Pyramid Mountain Trailhead and hike the relaxing Pyramid Scorpion Loop Trail for sunset. This 2.1-mile trail with 400 feet elevation gain was one of our favorite hidden gem hikes in Sedona, we didn’t see a single other hiker (but we did see a few mountain bikers so be aware) and the views over Cathedral Rock were magnificent at dusk.
 Mark hiking Pyramid Trail with awesome Cathedral Rock views
If we weren’t doing well for time and darkness was fast approaching, we’d skip the hike and instead drive to Lover’s Knoll to watch the sunset. This was another hidden gem spot, but it required no hiking and also had spectacular views over Cathedral Rock. Plus, we think some of the popular vortex tours use this spot as a lesser-known site vs the more famous vortex sites.
Dinner In West Sedona (8:00 PM)
Just like Uptown, West Sedona has lots of excellent foodie options for dinner. If we’re being honest, we preferred the less stuffy and more low-key eateries in West Sedona because we had such a full itinerary and didn’t want to bother too much with presenting ourselves well at night!
We’d choose between Rascal (modern diner), Tres Amigos for laid back Mexican or The Angel Kitchen for Japanese food (we loved the ramen here).
How to slow it down: More interested in heritage sites? Drop Diamondback Gulch, Outlaw Trail or Robbers Roost. More interested in jeep trails? Drop Palatki or Honanki. These are easy ways to slow things down on day 5.
Day 6 Morning
Devils Bridge (5:00 AM – 7:00 AM)
One of the best things about hiring a jeep during our trip was being able to drive it down Dry Creek Road to Devils Bridge Trailhead proper – cutting out 1.2 miles each way of hiking on the jeep road from Dry Creek Trailhead to Devils Bridge Trailhead. We’d seen this hike plastered all over social media so we were happy to have this head start and get up there before sunrise to beat the crowds.
We bypassed other early morning hikers walking on the jeep road in the dark with headlamps on, parked, then hiked the 1.8-mile round trip trail with 400 feet elevation gain to reach the summit and bridge. Note that it will be a 4-mile round trip hike with 450 feet elevation gain if you park at Dry Creek Trailhead or Mescal Trailhead without a jeep.
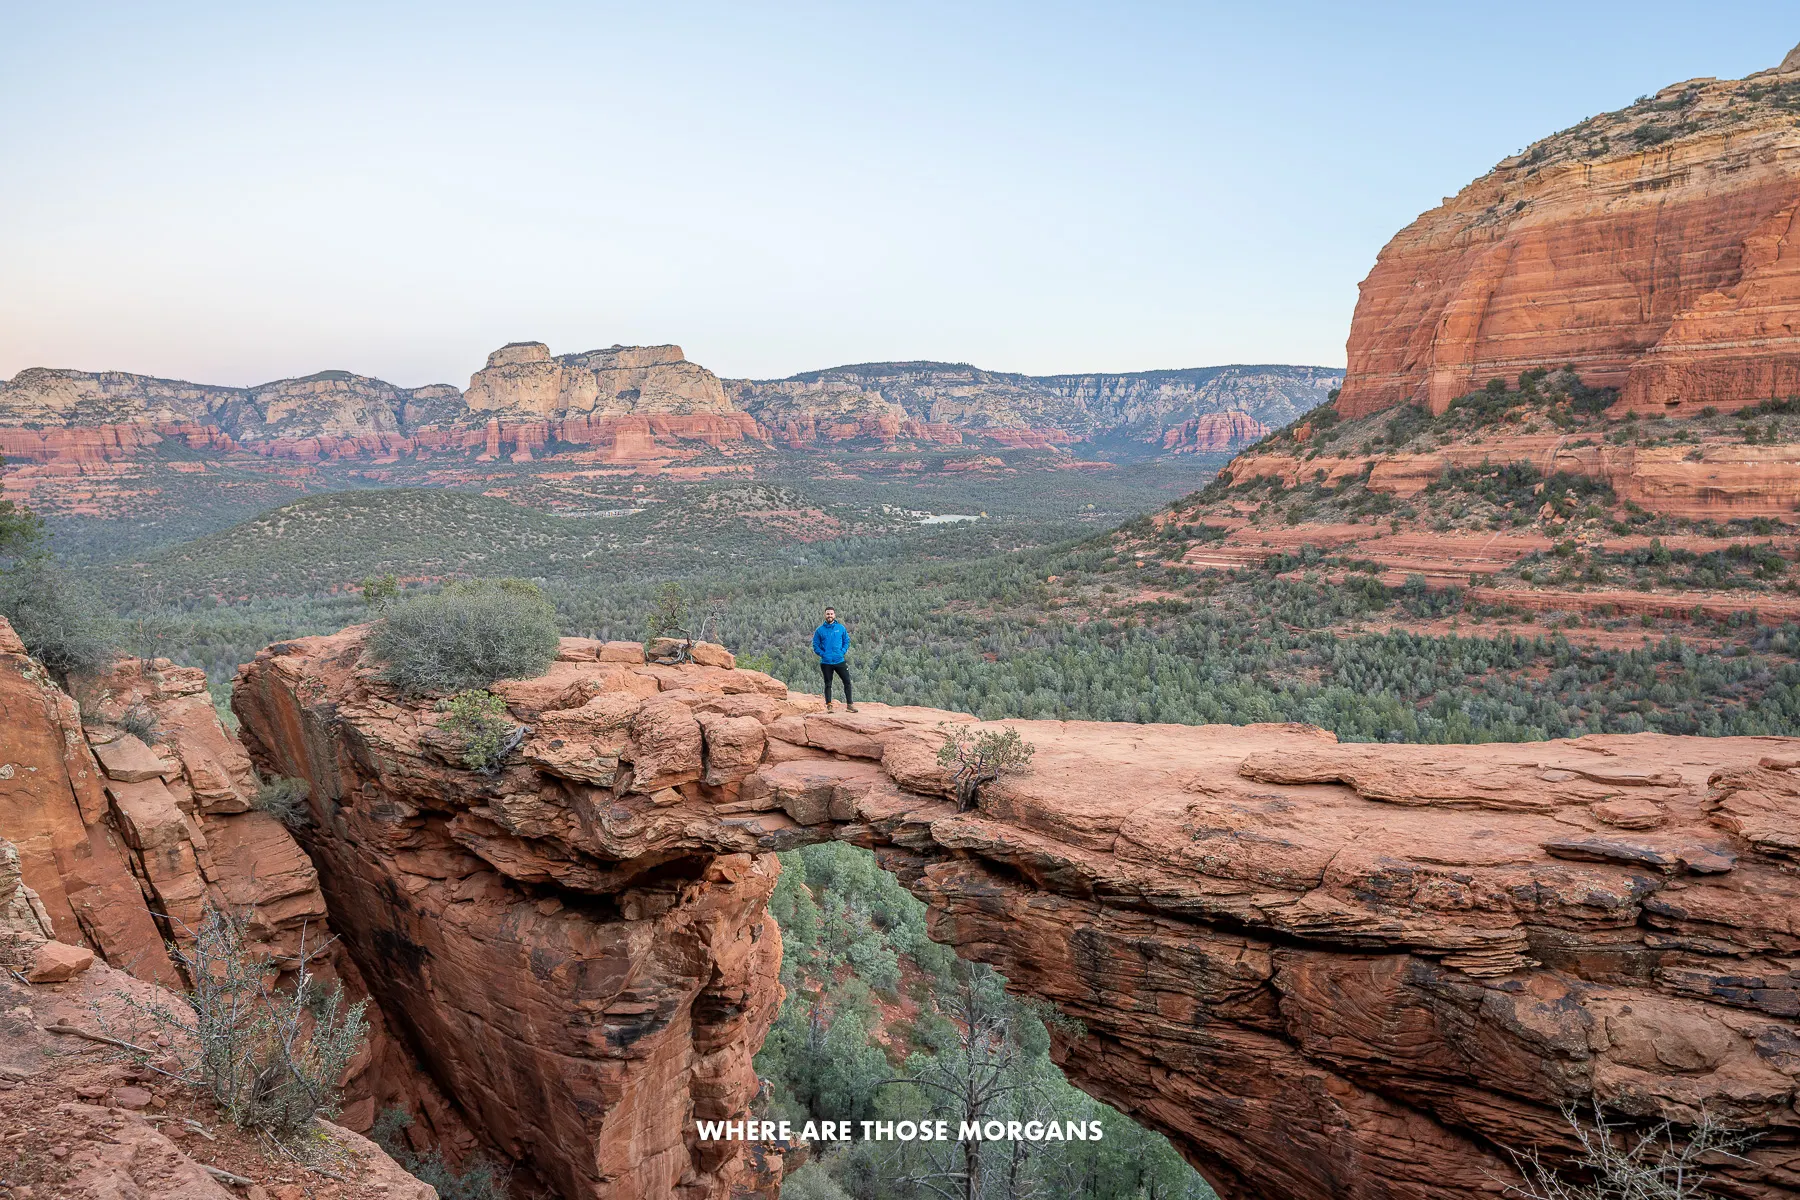 Mark on the famous Devils Bridge formation at sunrise
It was a short, fairly easy hike with just one steeper section up uneven rocks to reach the Instagram-famous formation. Honestly? We expected more from Devils Bridge Trail. Don’t get us wrong, the photo spot was cool. But for all the hype and stories of insane queues, we found it a touch underwhelming. We’d still do it next time (and again for sunrise when the light is best) but we’d manage our expectations.
Dry Creek Basin Trail (7:00 AM – 8:00 AM)
Back in the jeep after sunrise we’d navigate S-bends through creeks, significant rocky sections and shallow water on Dry Creek Basin heading north until reaching Van Deren Cabin.
 Mark driving across Dry Creek Basin to Van Deren Cabin
Then we’d avoid making the same mistake from our December 2021 trip – we did things in a less efficient order than what we’re showing you in this itinerary and we needed to hustle to get to Soldier Pass, so we turned around at the cabin instead of continuing along Dry Creek Basin to Vultee Arch.
Vultee Arch (8:00 AM – 10:00 AM)
We didn’t hike to Vultee Arch because we ran out of time. But after condensing and cutting things from our 8-day trip, we can fit it into this more efficient 7-day itinerary. So we would hike it after Devils Bridge and driving Dry Creek Basin to the trailhead, which is super remote in Red Rock Secret Mountain Wilderness.
It’s a 3.4-mile round trip hike with 530 feet elevation gain that leads to a gigantic arch. People walk across the top of the narrow arch formation which is similar in some ways to Devils Bridge with long drops to either side, but you must take care if you venture out. Note this hike can also be accessed without a jeep at Sterling Pass Trailhead on 89A.
Lunch In West Sedona (11:00 AM – 12:00 PM)
With one lunch remaining in West Sedona, we’d save it for the fantastic Senor Bob’s burgers and dogs.
 We went all in with our hot dogs at Senor Bobs!
We crushed two lunches here during our trip because it was cheap, quick and delicious. Mark loved the burgers and Kristen ate too many hot dogs!
Day 6 Afternoon
Soldier Pass (12:30 PM – 2:00 PM)
After a quick lunch we’d drive less than 10 minutes to Soldier Pass Trailhead to take advantage of having the jeep for a second time at another of Sedona’s most popular hikes. The trailhead parking lot has 14 spaces, which is a joke compared to how many people hike it at once. Jim Thompson is the backup parking lot with a connecting path, or the Sedona Shuttle from Posse Grounds is another alternative (Thursday – Sunday only).
 Mark next to one of the Seven Sacred Pools with our jeep parked behind
But with the jeep? We bypassed all the cars waiting with stressed out hikers, drove straight through the tiny trailhead parking lot, opened a gate at the back (using a code we got after paying $6 for this must-have permit to access the road), and drove down a technical but fun 4WD road.
 Kristen walking through Soldier Pass Cave
From the trailhead, the 4.2-mile Soldier Pass Trail hike with 750 feet elevation gain goes past Devil’s Kitchen sinkhole and Seven Sacred Pools, before forking right to a climb which leads to Soldier Pass Cave. But we drove to the sinkhole and pools, then parked at the end of the 4WD road at Soldier Wash, connected with the main trail and hiked up to the cave which was awesome, so don’t miss it.
Broken Arrow (2:30 PM – 4:00 PM)
Following the cave, we’d hike back to the jeep (without completing the Brins Mesa Loop), exit through the tiny parking lot and drive 13 minutes south on AZ-179 to reach the beginning of our favorite off-roading route in Sedona, the ultra-technical Broken Arrow Trail.
![]() Mark driving our jeep down “the steps” on Broken Arrow Trail
Mark driving our jeep down “the steps” on Broken Arrow Trail
It’s a 4-mile round trip all-out-action trail with obstacles named “the traffic circle”, “the slide”, and “the steps” – and trust us they’re even more fun than they sound. After enjoying staggering (and unexpected) views from Submarine Rock and Chicken Point Overlook, we ended up driving the main loop part of the trail with the obstacles three times because it was such a unique route.
Schnebly Hill (4:30 PM – 7:00 PM)
If we were doing well for time and sunset was still a good few hours away, we’d drive 8 minutes north and get onto Schnebly Hill Road. Now, we have to admit this 11.4-mile round trip drive with 1,800 feet elevation gain was long, bouncy and very slow going. We both had headaches by the time we got back down. But the sunset views from Merry Go Round and the summit vista were insane.
 This was our dusk view over Sedona from the top of Schnebly Hill Road
The end of this drive on the east side of Sedona was the highest point we made it to in the area, and we also had enough time to quickly hike a portion of Munds Wagon Trail at the Cow Pies, which had unusual swirling formations. We passed by tons of pink jeep tours on the way back down Schnebly Hill as it was getting dark, so they must have been up for sunset too.
Dinner In Uptown (7:30 PM)
When mapping out this optimized 7-day Sedona itinerary we of course found new places that didn’t exist during our trip in December 2021. One such place is a restaurant called Broome & Orchard. It has fantastic reviews and the food looks excellent (though it is a bit pricier). This is where we’d go for dinner on day 6.
How to slow it down: Skipping the Vultee Arch hike or the long drive up Schnebly Hill Road are the two ways we’d consider slowing this day down.
Day 7 Morning
Mystic Vista (5:30 AM – 6:30 AM)
On our last day we’d finish with another agonizingly early alarm clock, before jumping back in the jeep and driving to Forest 9587A (very close to Fay Canyon Trailhead) for a hidden gem sunrise finale. It’s just a 1 mile round trip drive down the road to reach a small hill at the end, which we’d climb to reveal a sublime sunrise viewpoint.
 We loved this secret sunrise spot at Mystic Vista
We saw hot air balloons taking to the air from our elevated vantage point as we soaked up the morning’s first rays of sun and enjoyed hot coffees. It’s important to know this road passes through a residential area so keep the jeep slow and noise to a minimum.
Breakfast In West Sedona (7:00 AM – 8:00 AM)
One of our favorite things about staying in West Sedona was being a short drive from so many great restaurants, and although we didn’t eat many sit-down breakfasts, we still managed it on our last day (after our sunrise hike).
For this itinerary it works perfectly on the last morning to try a breakfast restaurant like Sedona Bistro & Crepes, Cafe Jose or the place we ate pancakes and waffles called Coffee Pot Restaurant.
Return The Jeep (8:30 AM – 9:00 AM)
After breakfast we’d swing by a gas station to fill the jeep up before dropping it back at Barlow. The hire would be 48 hours, so getting it 2 days earlier in the morning would give us the same return time on our last day. We’d go through checks with the staff so they could see we’d been sensible and be on our way.
Chapel Of The Holy Cross (9:30 AM – 10:30 AM)
Back in our car, we’d drive across town and down to one of the most popular sights in Sedona – Chapel of the Holy Cross. It’s such an iconic landmark with unique architecture, so don’t skip it from your itinerary.
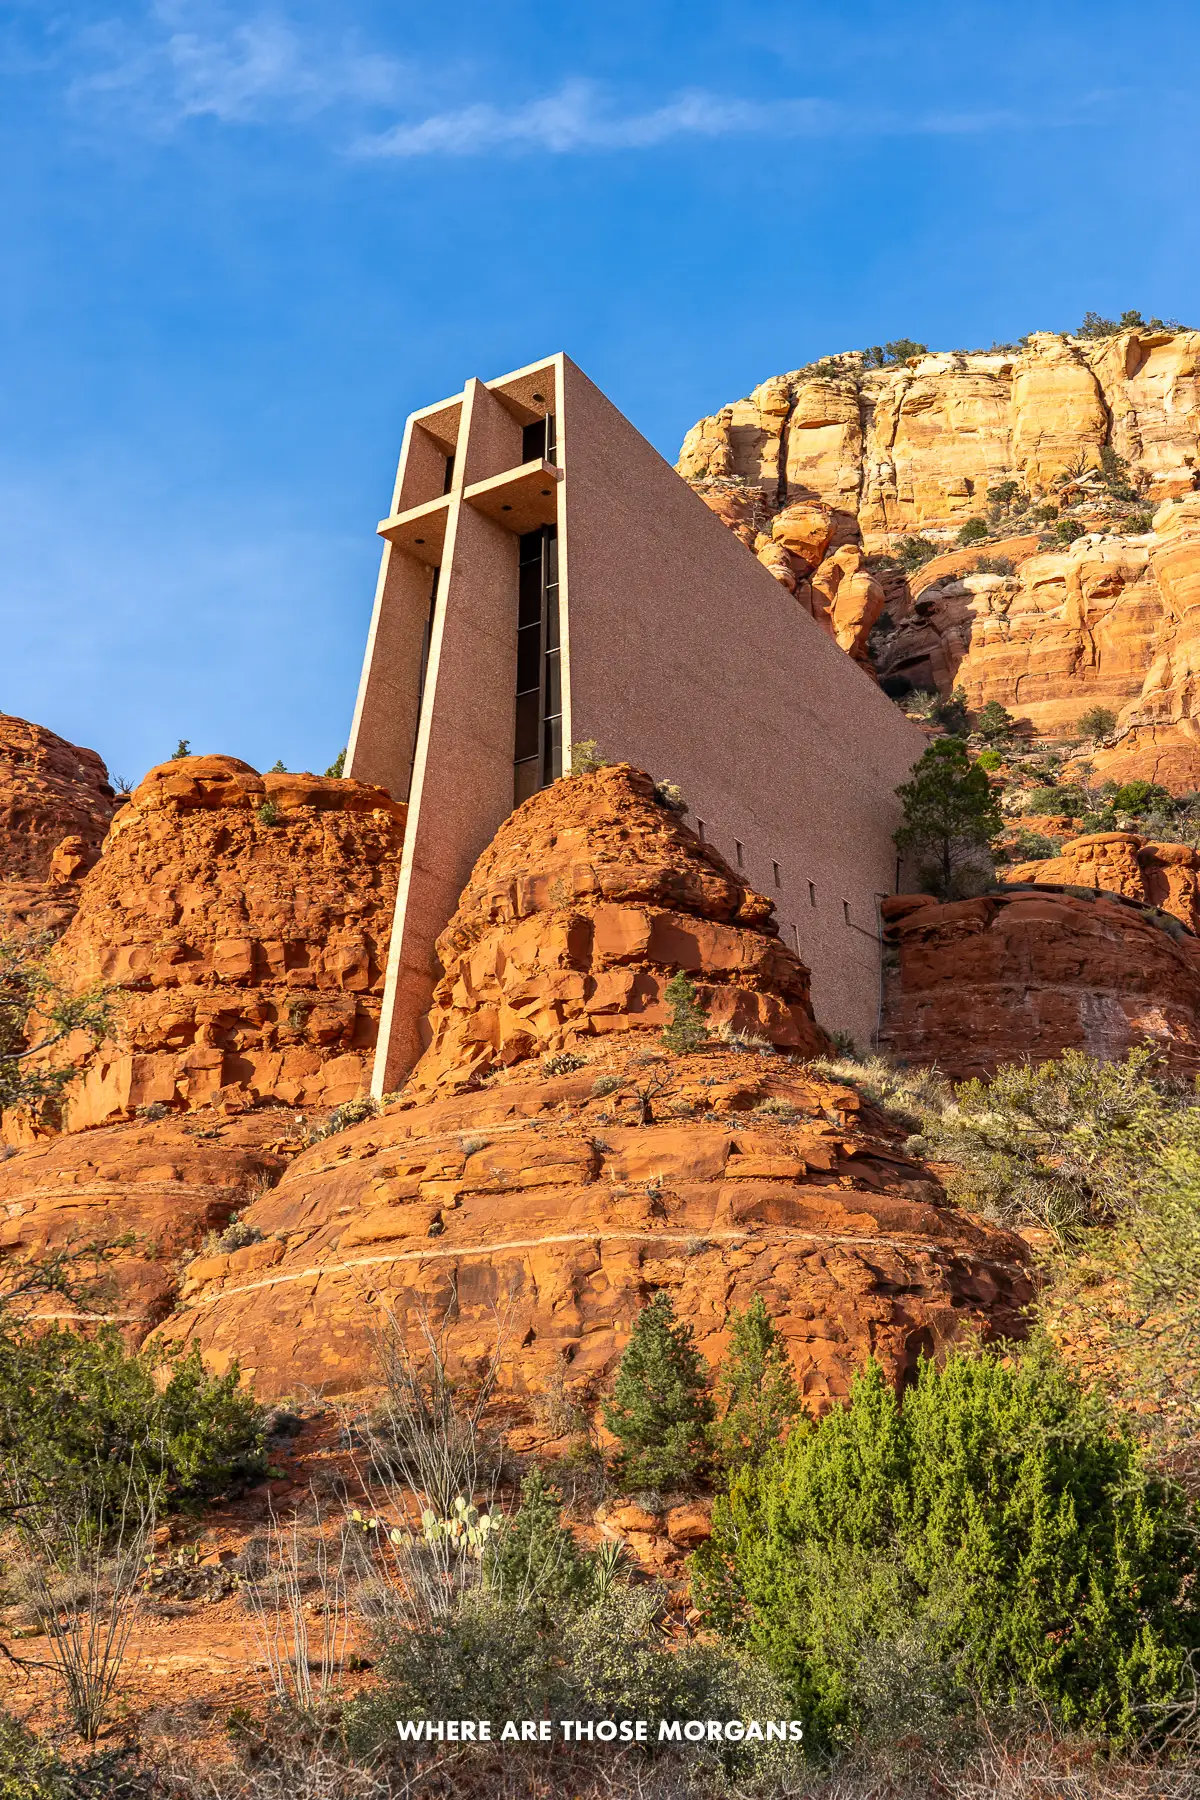 We loved this photo spot looking up at the unique Chapel of the Holy Cross
We parked at the bottom, walked up, took a look around inside, and soaked up the awesome views over Bell Rock and Cathedral Rock. But honestly, the photos looking up at the cross-shaped building from below are what we remember most.
Shopping & Lunch At Tlaquepaque Village (11:00 AM – 1:00 PM)
Next we’d park at Tlaquepaque Arts and Shopping Village and take a slow, leisurely stroll around the independent stores. We absolutely loved the stucco walls and cobbled walkways, which led us to unique shops containing ceramics, glass, jewelry, crafts, paintings and so much more. During our trip in December, Tlaquepaque illuminated with Christmas decorations and trees at night which was amazing.
 Mark and Kristen with a Christmas Tree in Tlaquepaque Village in December
There’s also tons of places to eat within both sides of the complex, though many are overpriced or don’t have the best ratings. After having pancakes and waffles for breakfast earlier, we decided to dip back into the breakfast menu at Pump House Station which ran until 1:00 PM by ordering eggs benedict and an urban burrito.
Day 7 Afternoon
West Fork Trail (2:00 PM – 5:00 PM)
The perfect way to walk off lunch on our last day would be to drive 21 minutes north on 89A to West Fork Oak Creek Trailhead, park in the paid lot (it cost us $10) and hike the local’s favorite 7.5-mile round trip West Fork Trail which has 500 feet elevation gain.
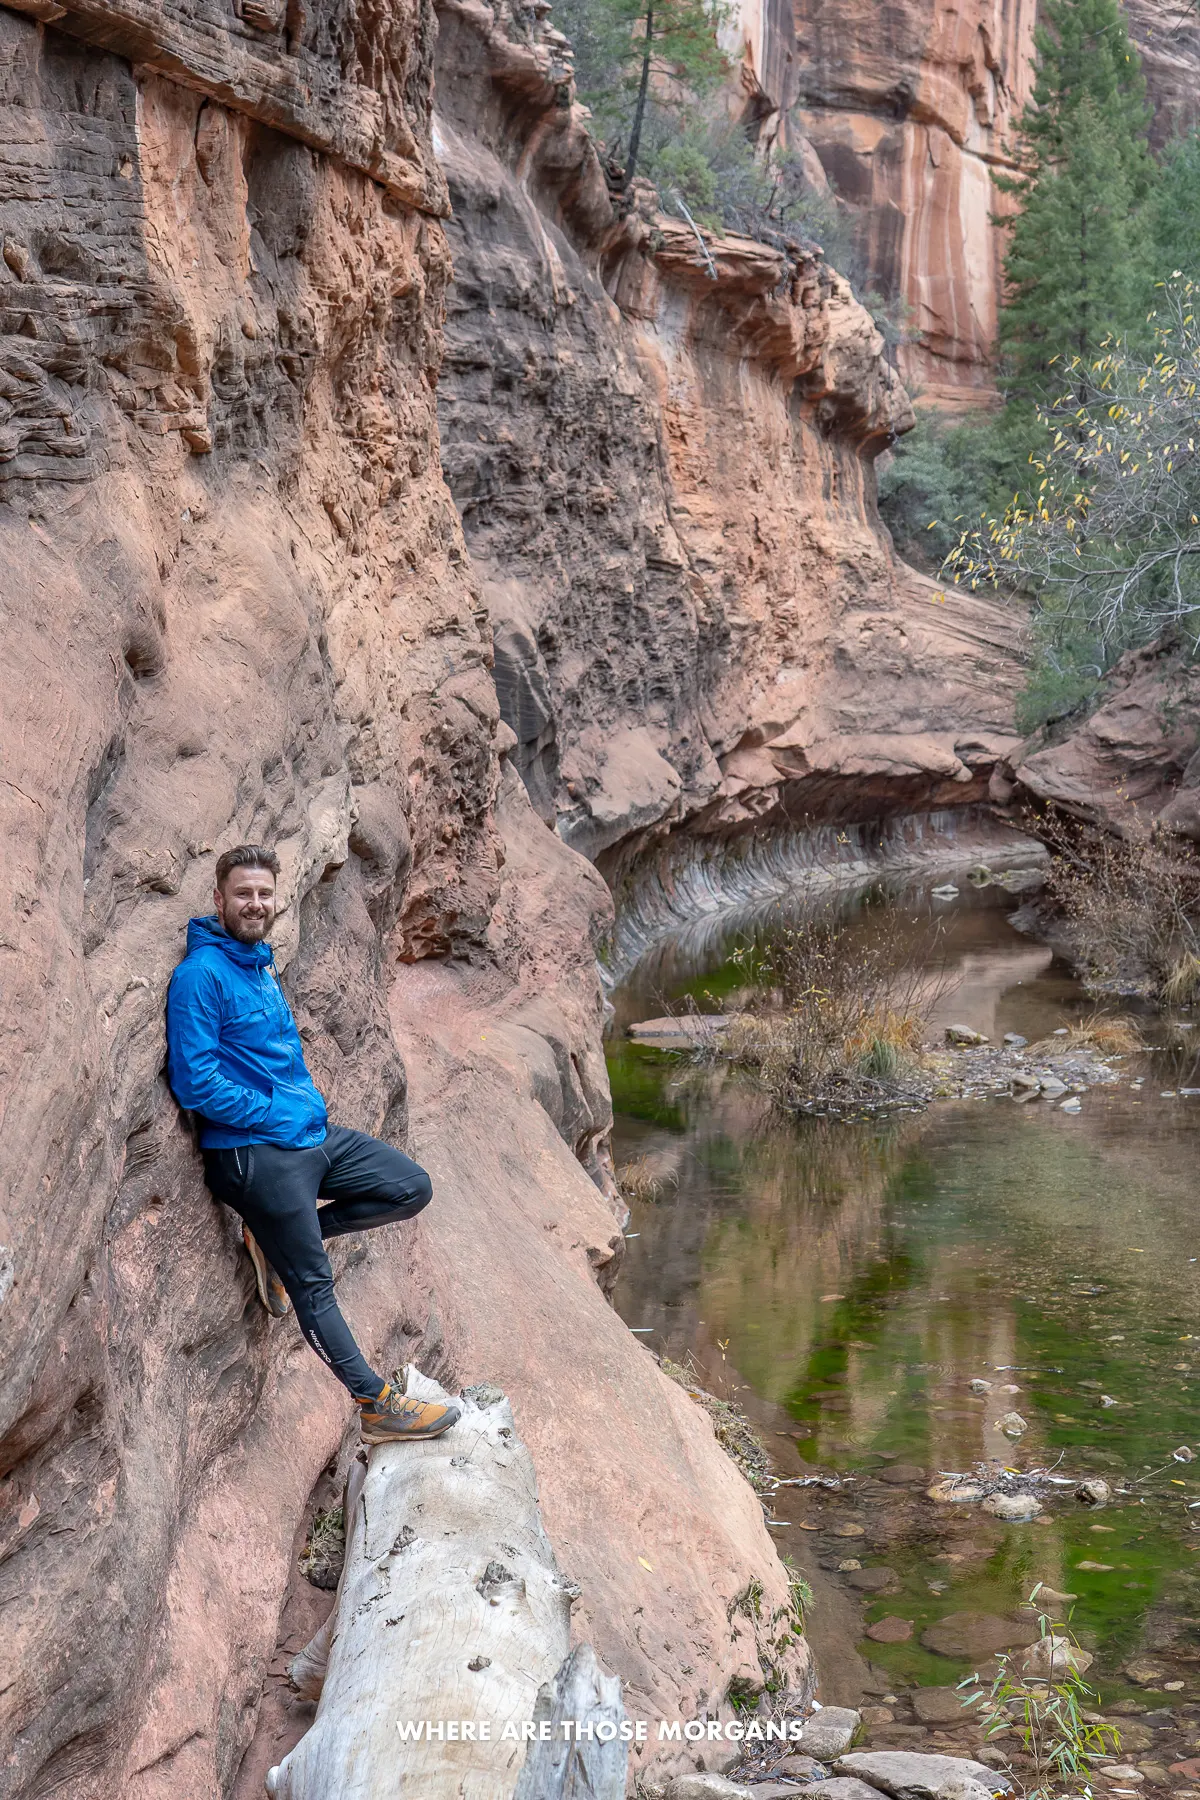 Mark at the end of the West Fork Trail with the subway tunnel river
We hated paying separately for this one parking area (after using our Interagency Pass at every other hike in town), but the hike was quiet, flat, easy and ultimately led to a cool subway-tunnel shaped formation filled with water. It was December so the water was cold, but if we visited in a warmer month next time, we’d definitely wade through the subway tunnel and continue on the unmarked trail.
Dinner In Uptown (6:00 PM)
After the hike, we’d head out for a final dinner in Sedona at The Vault or Creekside – or if we were going out in a blaze of glory we’d splurge at Rene in Tlaquepaque Village. And that would be it, 7 days in Sedona filled with adventure.
How to slow it down: There’s no need to slow this day down, it’s by far the most relaxing and action-free day on the itinerary.
Sedona Itinerary Map
Map key:
- Red – Day 1
- Blue – Day 2
- Green – Day 3
- Orange – Day 4
- Purple – Day 5
- Yellow – Day 6
- Black – Day 7
How to use this map: Click the map above to activate, then tap any icon to see more information. See a list of all attractions by clicking the arrow icon in the top left, or see a full version of the map by clicking the “view larger map” icon in the top right. When you’re in Sedona you can open the map, tap the next place you want to visit and get directions. Stops for each day on the map are listed in order, so you can easily follow the route.
How to save this map: Click the small star next to the map title – this will add the map to your Google account. Open your Google Maps app, tap “saved”, then tap “maps” and open this map.
 Kristen walking on Thunder Mountain Trail after our sunrise hike up Little Sugarloaf
Planning For A Week In Sedona
From our week in Sedona, we learned about budgeting, where to stay and key tips you need to know before your trip. These are the things we would have loved to know before we visited:
7-Day Budget Breakdown
Sedona was not a cheap trip for us, and remember we visited in the supposed off season in December. Hotels were expensive because we were booking last minute – luckily we found a budget-friendly place to stay for 7 nights that cost us $790, but it wasn’t amazing. Sit-down meals at most restaurants in town were commonly in the $30 range rather than the $10-20 range. And of course we rented a jeep for $750.
Learn from the mistakes we made and you’ll have a much cheaper trip. Book your hotel as far in advance as possible to have more options and get better prices. You can get great hotel deals in winter and summer when it’s quieter, but restaurant prices will be the same. And by following our itinerary you’ll cut the price of a jeep by 33% to $500 which is a huge saving.
Here’s how much a couple might spend by following our itinerary:
- Hotel: $1,400 ($200/night)
- Eating out: $700 ($50/day per person)
- Wine tasting: $150
- Jeep: $500
- Gas: $50
- Verde Canyon Railroad: $270
- Red Rock 7-Day Pass: $15
- National Monuments: $10
- West Fork Trail: $10
- Total: $3,105
And this is without taking flights to and from Phoenix or renting a car at Phoenix Sky Harbor Airport into account. Add around $250 extra for a 7 day car rental.
You could stay at a cheaper hotel, book an apartment with a kitchen instead of a hotel to cut down on eating out costs, and skip the expensive Verde Canyon Railroad to save money.
Where To Stay
We stayed in West Sedona and loved the location for easy access to most of the popular hikes on the northwest side of town. It was close to tons of low-key eateries, but we had to drive to them. Uptown is the prime-time location because it has restaurants and shopping within walking distance, and a more central location to all of Sedona’s hikes and attractions.
Hotels are slightly more affordable in West Sedona vs Uptown, but for even cheaper options you can consider Oak Creek Canyon, Village of Oak Creek or even a little further out in wine-country around Cottonwood.
For our next trip, we’d stay in either West Sedona or Uptown because being close to hikes is most important to us. Read our complete guide on where to stay in Sedona to learn more about each area and see the top rated hotels, but here are the top rated hotels we’d consider booking:
 We loved watching hot air balloons take off at sunrise
What You Need To Know
Getting around: Whether it’s a rental or your own, you need a car to get to hikes and attractions in Sedona. The roads are in great shape, but trailhead parking is notoriously challenging – use the Sedona Shuttle as an alternative. Hiring a jeep (or having your own) is the only way to reach certain off-the-beaten path attractions and all off-road trails.
Physical demands: This one-week itinerary is filled with hikes, which means constant physical activity over a prolonged period. Training before arriving will help, but make sure to cut a hike or two each day if you don’t feel comfortable with the high intensity. Remember sun protection and water every day.
Packing: Over the course of a week you could encounter sun, rain, wind, cold or warm weather so it’s crucial to pack effectively. We had icy cold dawns and dusks but comfortable sunny daytime temperatures in December. Moisture wicking shirts, lots of mid-layers and warm outer layers were key for us. If you visit in spring or summer you won’t need the heavy layers, but you’ll still need tons of hiking gear to last 7 days.
Permits and rules: No hike in Sedona requires a permit like Angels Landing or Half Dome, but almost every single trailhead parking lot requires either a Red Rock Pass or Interagency Pass. West Fork has it’s own private parking fee. It’s imperative to practice leave-no-trace when hiking in Sedona. Pack out whatever you pack in.
Dining and groceries: Want a great way to speed up this 7 day itinerary and save money at the same time? Go to Safeway and stock up on lunch foods, pack a lunch every day and eat on the go. You’ll save a small fortune and tons of time sitting around waiting for meals. We did a massive Safeway shop the day we arrived into town for our 8 day trip in 2021.
Cell service: Most of the major trails had decent cell service coverage during our trip, but there were definitely a few times on more remote hikes or deeper canyons when it dropped out. Consider installing a hiking app like AllTrails or our personal favorite GaiaGPS so you can download offline maps and track your position without service (here’s our guide on the must-have hiking apps to learn more).
Best Time For A Week-Long Visit
We visited Sedona for a little over a week in December. The mornings and evenings were freezing cold which made our sunrise and sunset hikes and photoshoots pretty brutal, but in return we had an easier go of trailhead parking and emptier trails vs visiting during peak season months in spring and fall.
If you have a healthy budget and you don’t mind crowds, we’d suggest visiting in April, May, September or October to benefit from comfortable conditions for hiking, sightseeing and photography. The mornings and evenings will be far more comfortable.
The one season of the year we personally would avoid is summer. Temperatures can be dangerously hot, and monsoon-type rains and thunderstorms are more common. That said, hotels are cheaper and trails are less crowded because of those very reasons, so there’s a trade-off.
We would definitely avoid holidays year-round, and we’d plan our week long trip to only include one weekend (like Wednesday to Wednesday), rather than weekend to weekend (like Saturday to Saturday). Crowds and hotel prices inflate Fridays through Sundays.

Next Steps
We hope our one week itinerary helps you figure out how to spend your days in Sedona.
Don’t forget you can book a travel planning video call with us if you’d like our expert help organizing your trip to Sedona. We can answer any questions you have or walk through a personalized itinerary to make the most of your time.
Still researching for your trip?
Finally, if you’ll be visiting more places on the same trip, we recommend reading our Arizona travel guide for more helpful tips and advice.
Happy Travels,
Mark and Kristen
Was this post helpful? Pin it for your visit!


All Rights Reserved © Where Are Those Morgans, LLC. Republishing this article and/or any of its contents (text, photography, maps, graphics, etc.) in whole or in part is strictly prohibited.
Mark and Kristen spent 6 years traveling the world, visiting over 40 countries across 4 continents and more than 30 US states. They created Where Are Those Morgans in 2018 to help others plan the best possible vacations by writing authentic travel and hiking guides based on their real experiences.
Since the arrival of baby Maya in late 2024, Mark and Kristen’s extensive travels have slowed down but they still take plenty of trips. Where Are Those Morgans now helps millions of travelers each year to visit new places and hike new trails through information-packed blog posts and expert travel guidebooks. Read more about Mark and Kristen.
Please visit:
Our Sponsor